Meditix
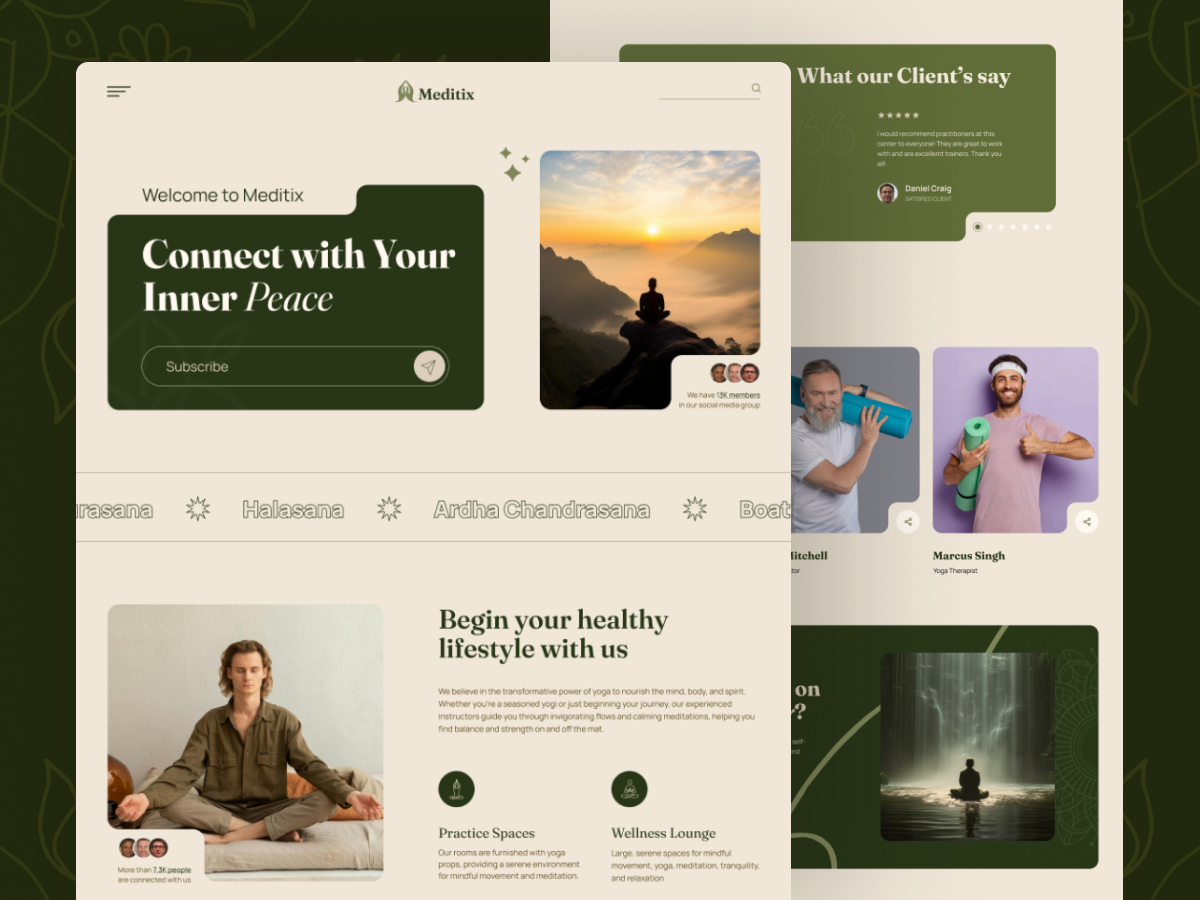
Introducing our cutting-edge Health Joomla Template, meticulously crafted for the wellness industry, specifically tailored to Yoga Studios and Instructors. Designed to optimize user experience and foster engagement, our template seamlessly blends modern aesthetics with intuitive functionality. Elevate your online presence and reach health-conscious individuals with ease, thanks to our SEO-optimized design that ensures maximum visibility and impact.
Download packages
Login to your account on ThemeXpert.com. Go to the Downloads > Joomla Templates > Meditix from Dashboard.
The Meditix template download section includes the following files:
- Meditix Quickstart Package
- Meditix Template
- Quix Presets
The Quix panel includes the following files:
- Quix 4 (J3, J4 & J5)
- Quix Installer (Recommended)
Quickstart (Demo) Installation
To set up the quickstart, you need to follow the same steps as installing Joomla 5. You can't add the quickstart to an existing Joomla 5 site through the extension manager because it comes with all the core files of Joomla 5. So, just install the quickstart package as you would install Joomla 5. Follow the guide of quickstart installation.
Manual Installation
Install the Jurix template and Quix page builder (pro) on your existing Joomla website.
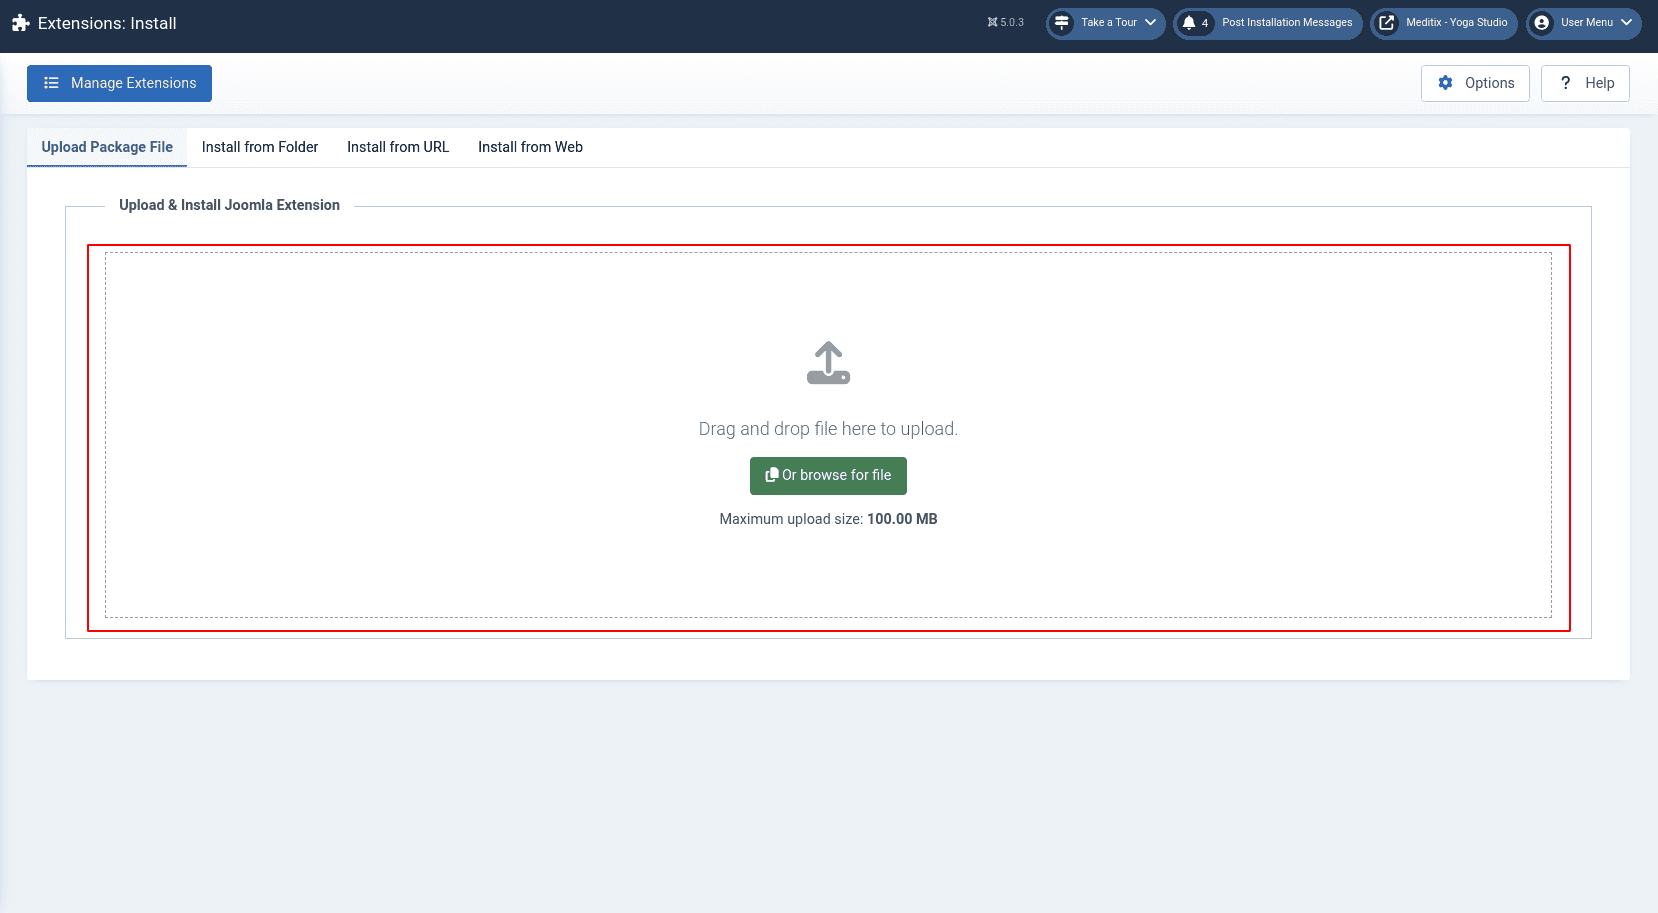
Go to Extensions > Upload Package Files from the Install section in the site administrator panel System Dashboard. Drag and Drop or Browse the following files:
- Meditix Template
- Quix Pro
Meditix Template Installation
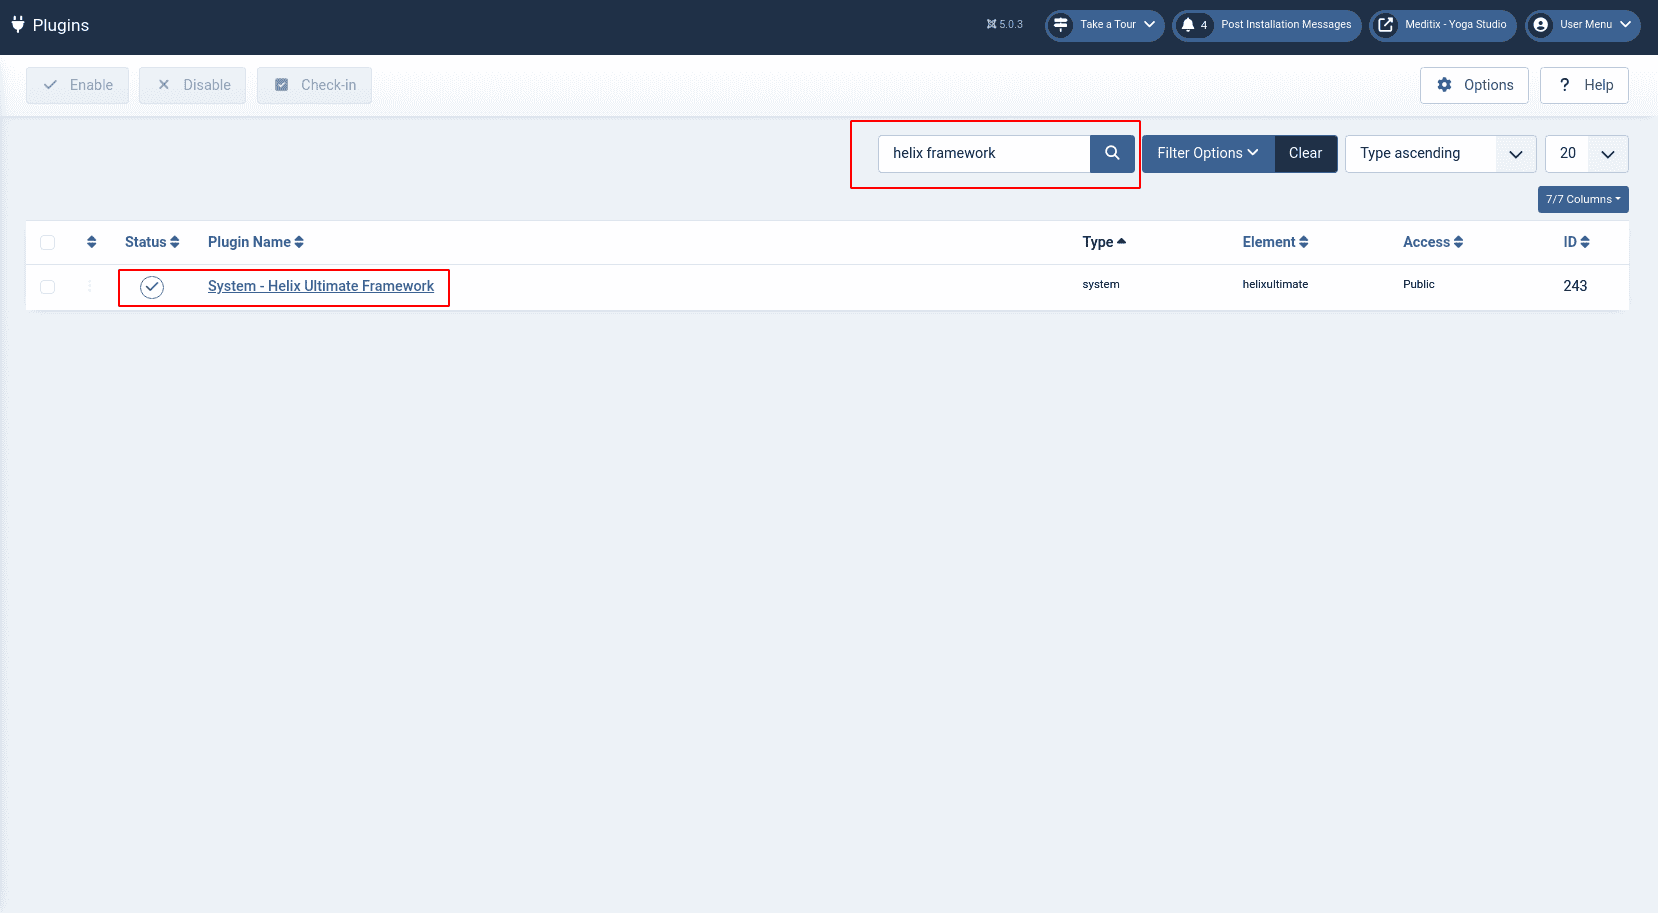
The Meditix template utilizes the Helix Ultimate framework, eliminating the need for a separate installation of the framework. When installing the template, the framework is automatically included within the Meditix Template .zip file, simplifying the process.
After completing the installation of the template, navigate to the Plugin Manager located in the Manage section of the System Dashboard. In the search field, enter "Helix Ultimate" and either press Enter on your keyboard or click on the Search icon. This action will display the System-Helix Ultimate Framework plugin. Select the checkbox next to it, and then proceed to click the Enable button to activate the plugin.
Quix Pro Installation
There are two versions of the Quix files available for installation. The first one, Quix 4, comprises the complete package of the Quix page builder. It's named pkg_quix_pro.zip and is sized at 11 MB. However, Joomla imposes a file upload limit of 2MB for installations, which can pose challenges for users who lack technical expertise to increase this limit via the server or cPanel.
To address this limitation, we recommend users to opt for installing the Quix installer file instead. The Quix installer's filename is com_iquix-1.7.0.zip, and it's only 48KB in size. Installing the Quix page builder using the Quix installer involves just 5 simple steps.
Detailed instructions for the installation process can be found here. (https://www.themexpert.com/docs/quix-builder/basics/installation).
Import Quix Presets
After downloading the quix-presets.zip file, begin by extracting its contents. Next, navigate to the Joomla site administrator panel. On the left-hand side, locate and click on "Quix - Page Builder."
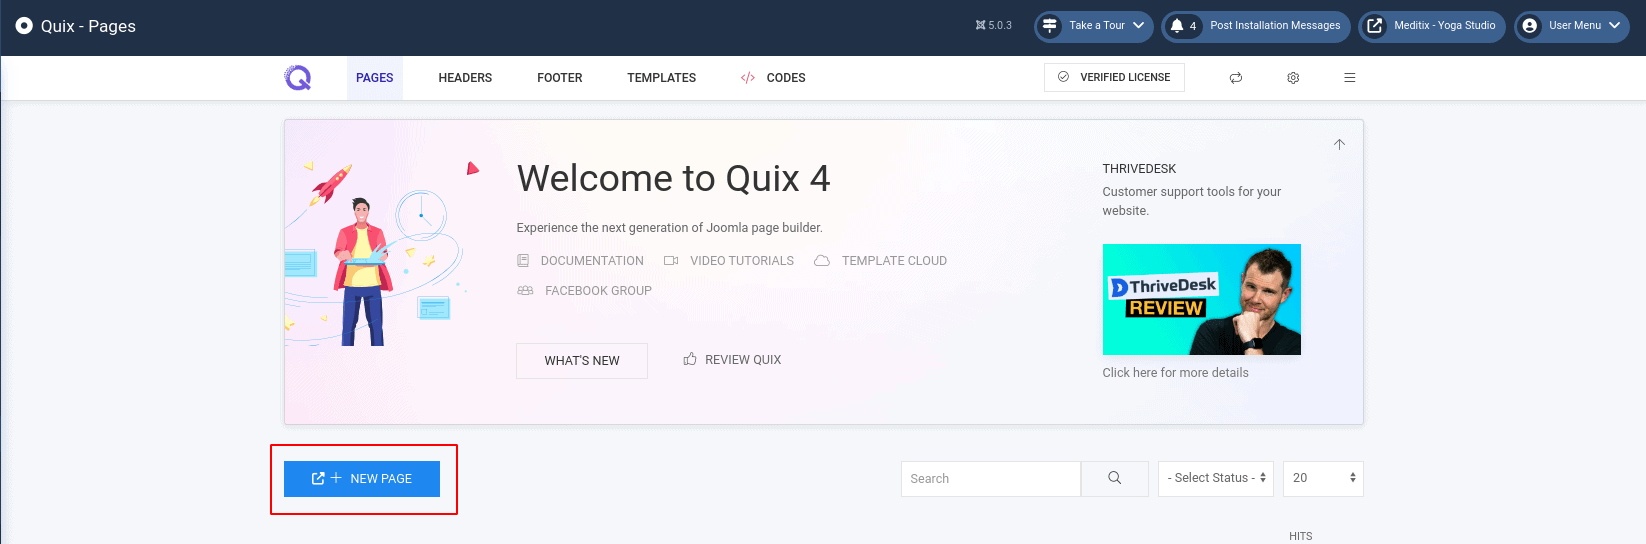
Upon clicking, the Quix Panel will appear. Proceed by clicking on the "New Page" button, then enter the desired page name into the field and click "OK." For example, let's name it "Home." Once the Home page is created, access the builder.
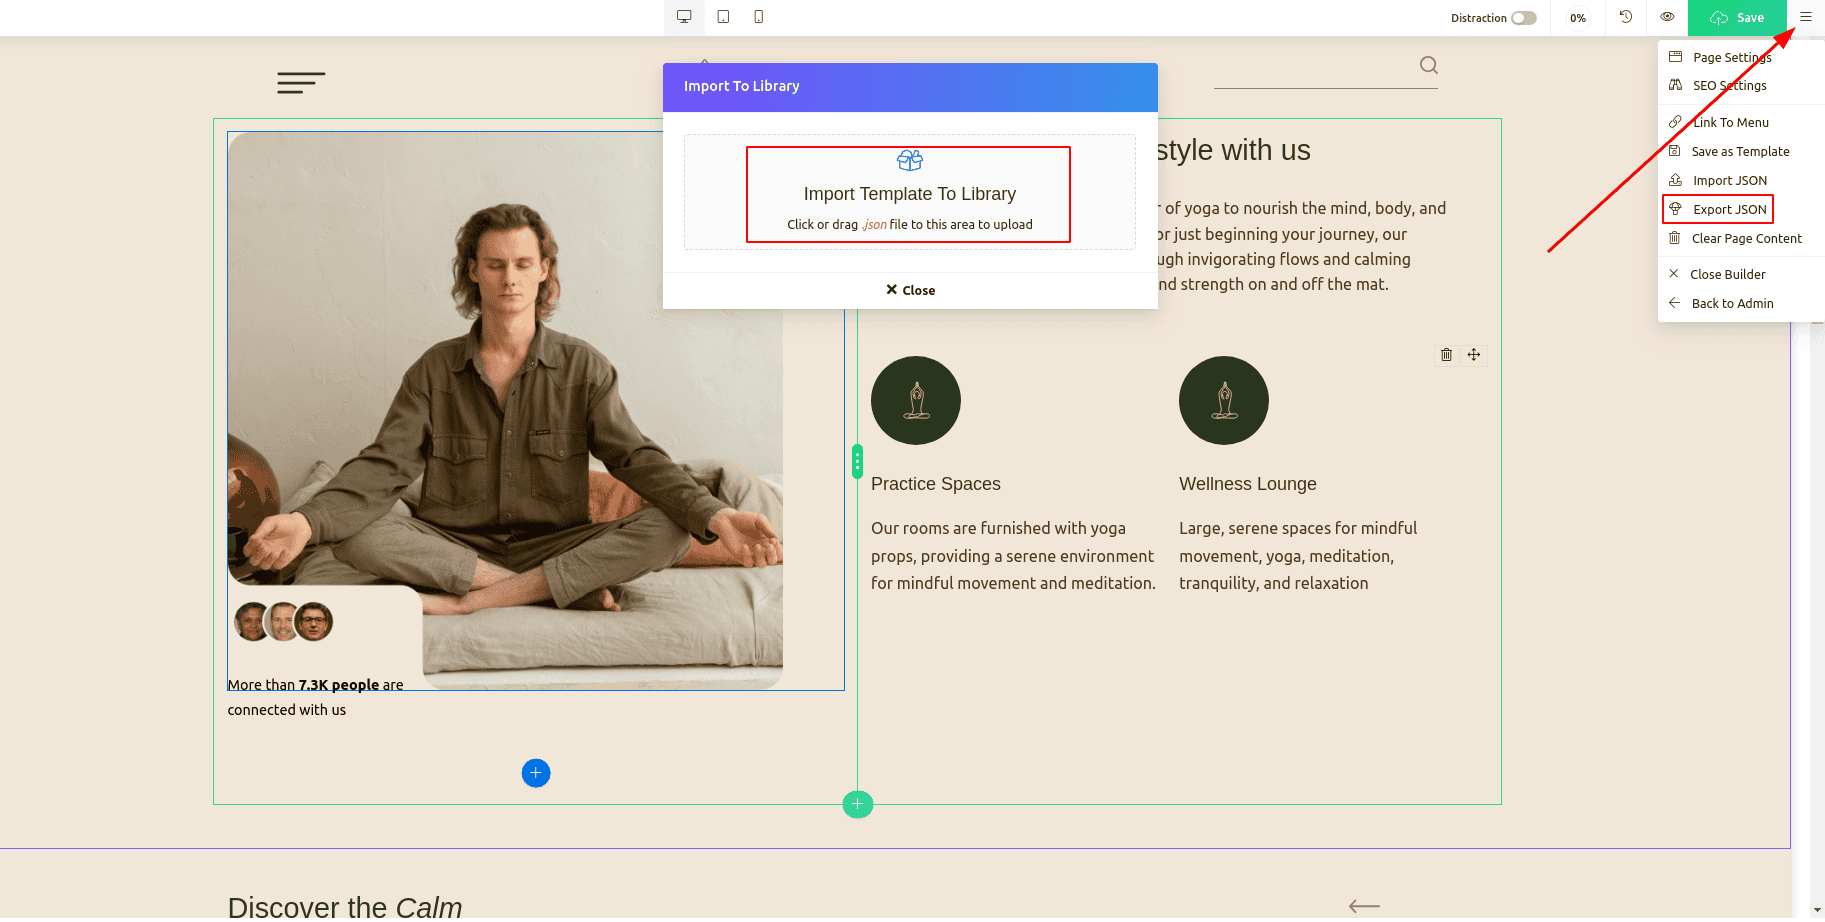
To import the Quix presets, follow these steps:
- Click on the "Bar" icon located on the right side of the top bar.
- Select "Import JSON" from the dropdown menu.
- The Import to Library panel will open.
The Meditix template Quix presets include: home.json, about.json, course.json, blog.json, contact.json, footer.json, and book now.json.
Drag and drop the JSON files into the Import field, or alternatively, click to upload them one by one.
Once all JSON files are imported, proceed to open the My Templates panel by clicking on the "Add template" button located below the builder.![]()
Home Page Setup
With the Home page already created, proceed to insert the Home presets by clicking the "Insert" button within the My Templates panel. Here is a demo of the home page.
These are the steps we took to create and insert the layout.
- Click on the New Page button, and write down the page name in the field and hit on the OK button.
- Click on the Add template button, open the Quix Library panel
- Click on the My Templates tab and click on the Insert button of the Home page.
By following the steps you have to create and insert other pages of Quix. The pages are:
Header Setup
Now, let's add the header. Our header will resemble the following design.

To access the templates panel, navigate to the Site Template Styles within the Templates section of the System Dashboard. Select the Tx Meditix template, then proceed by clicking on the Template Options button.
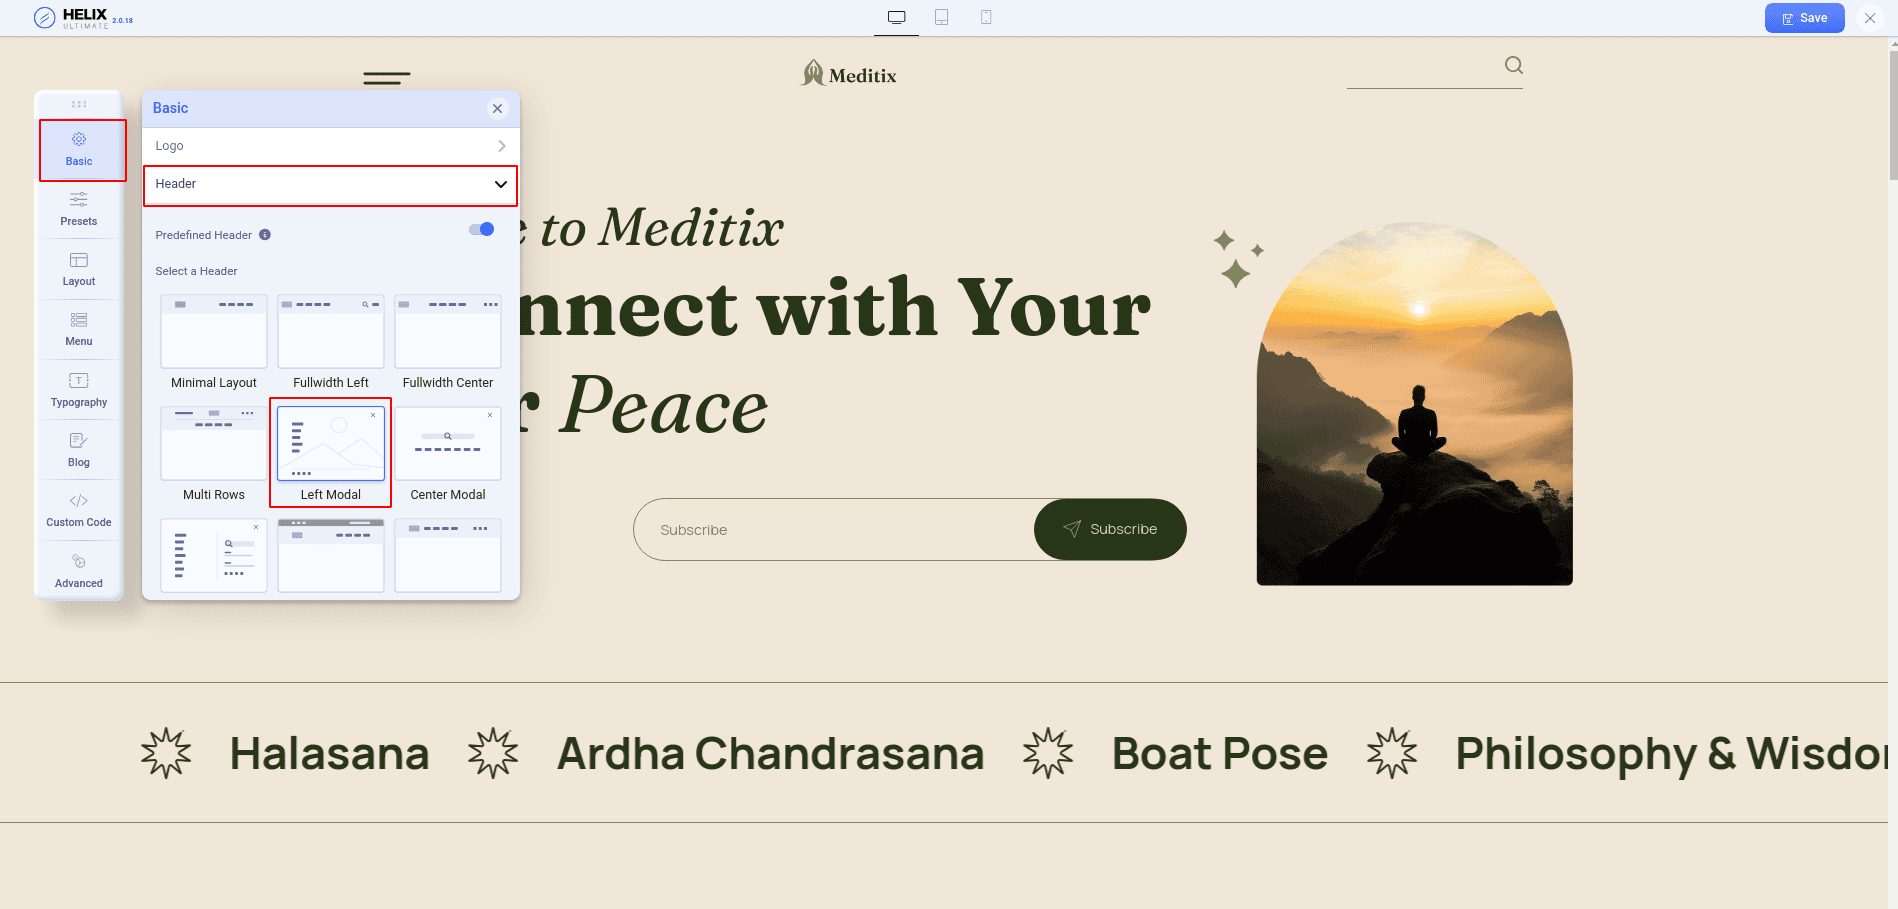
Add Logo and Favicon
Within the Logo panel under Basic settings, we will upload our site logo and favicon.
![]()
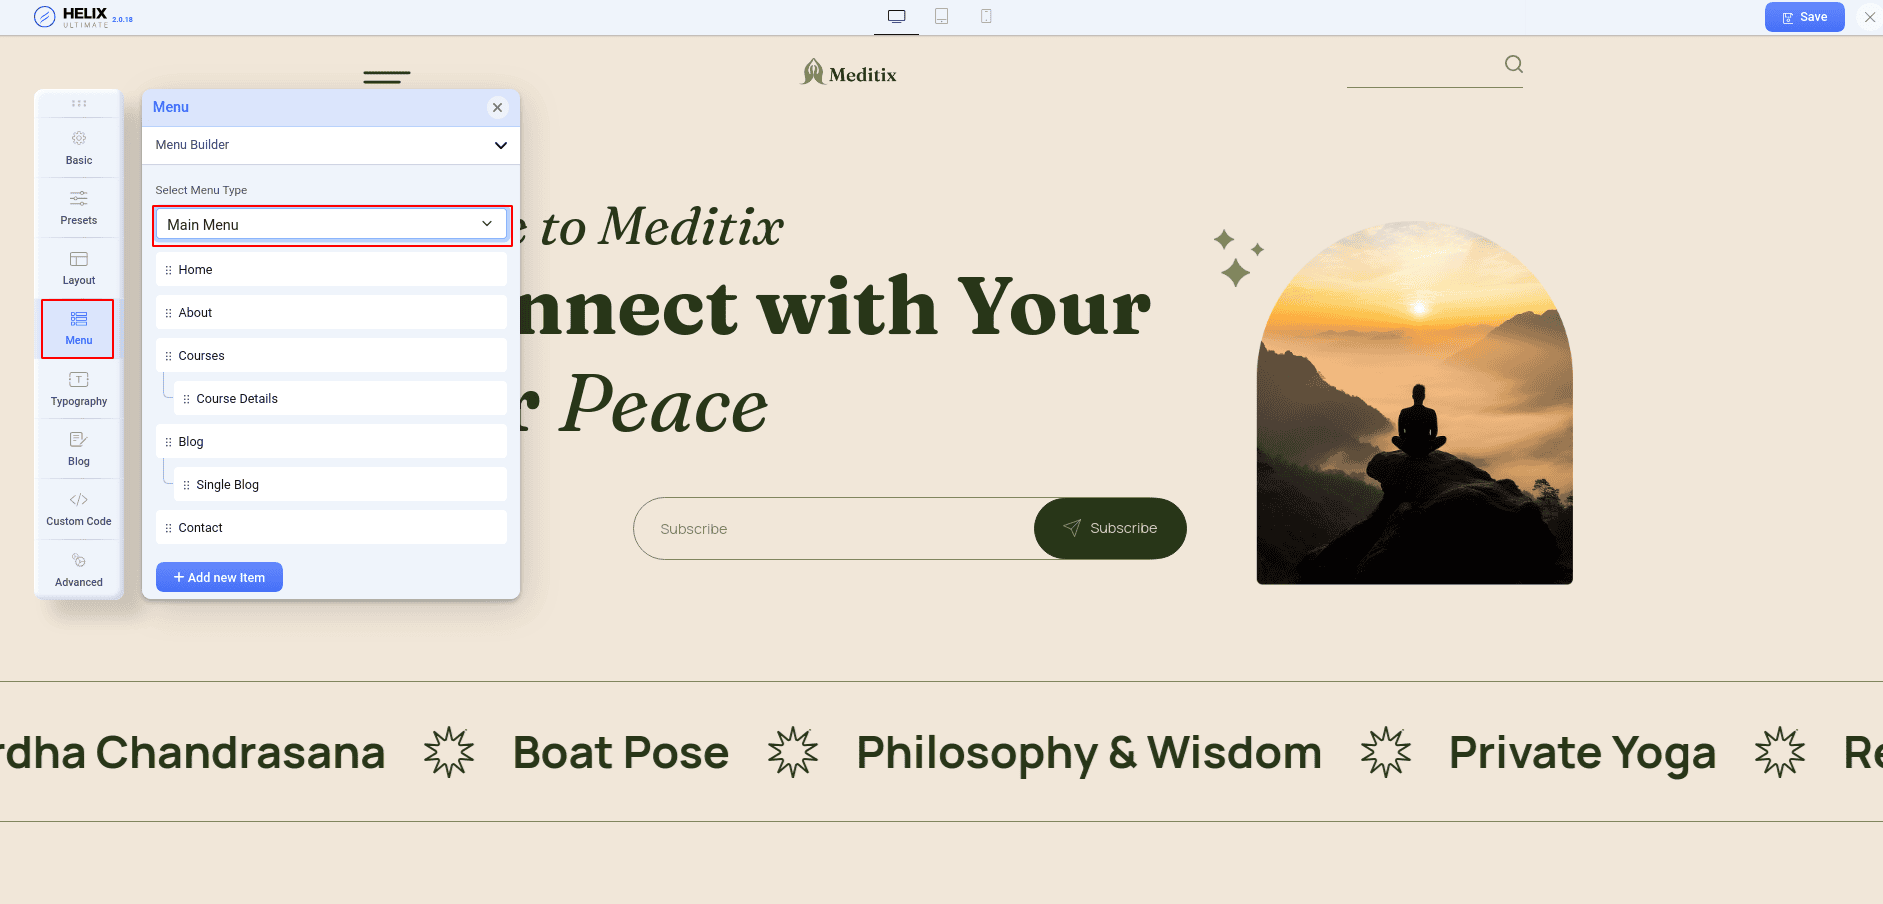
Add Main Menu
Establishing a menu is essential for your website's navigation. Let's configure the main menu now. Navigate to the Menu Builder panel and locate the Menu settings. Within the dropdown labeled "Select Menu Type," choose the menu you wish to display. Usually, this would be the main menu of your site.
Offcanvas Menu
Within the Off Canvas panel of the Menu settings, you'll discover options for managing the off-canvas menu. These configurations enable you to showcase the site menu on smaller devices like phones and tablets. There are three primary settings for the off-canvas menu.
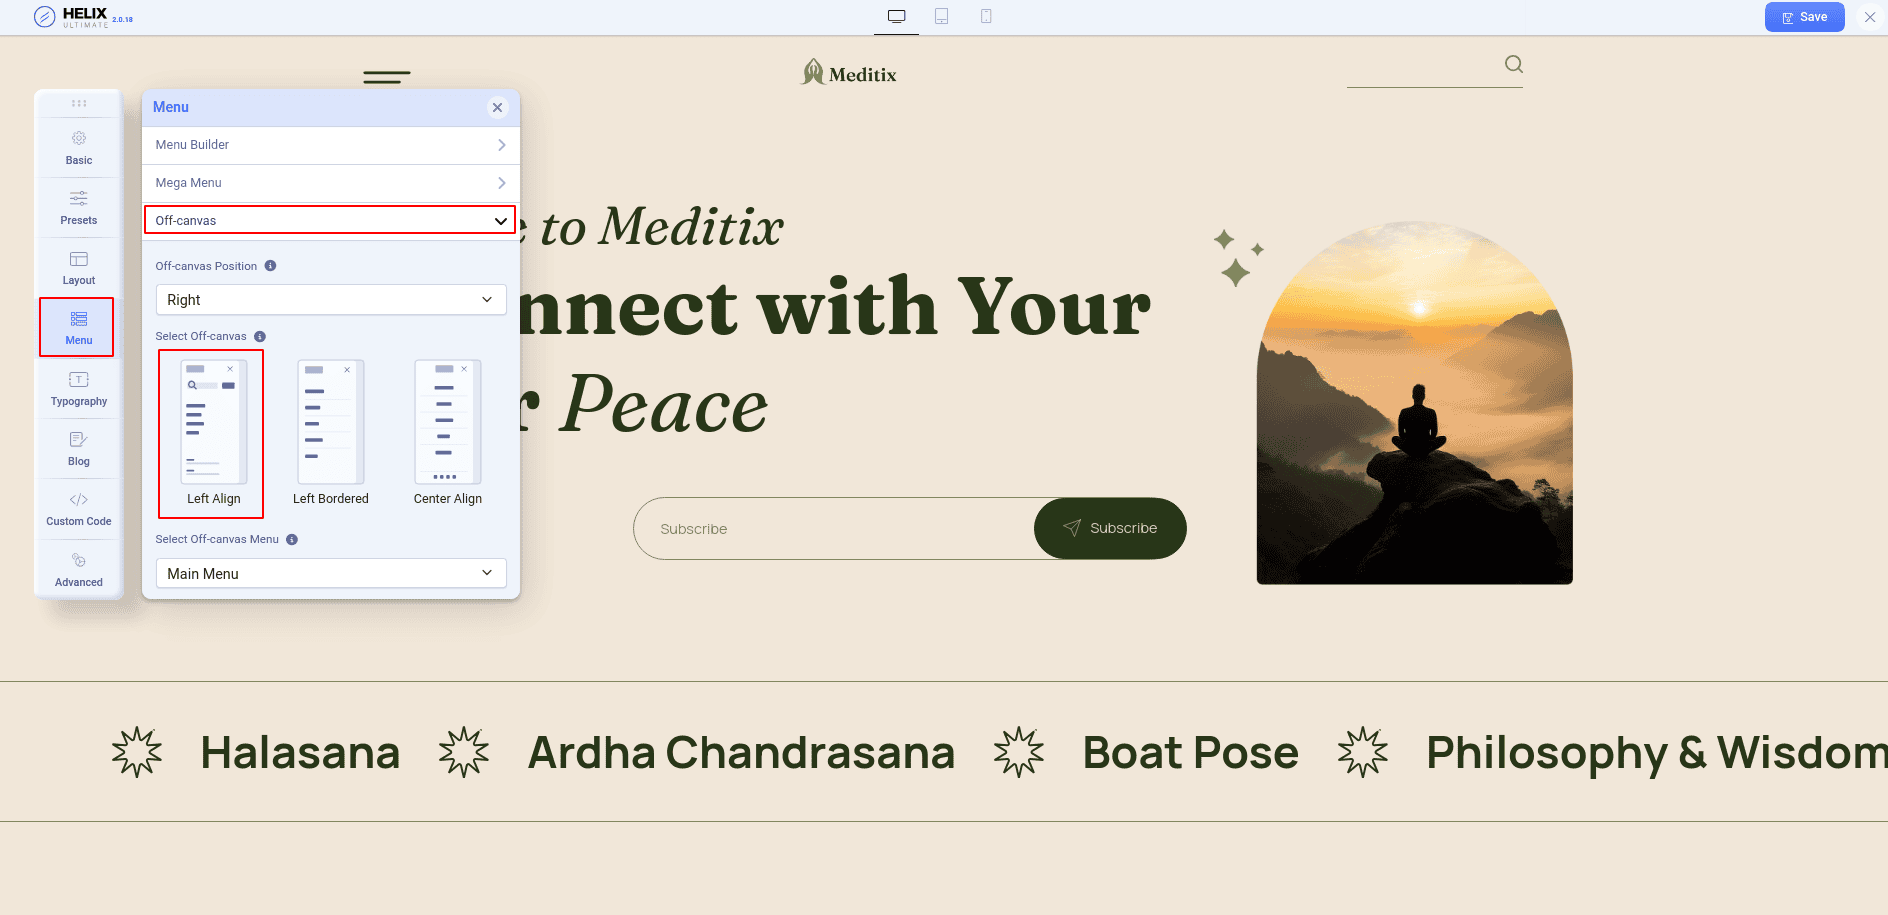
Off-canvas Position: You have two options to choose from: Left and Right. These options determine the placement of the mobile menu icon—either on the left or right side. In the screenshot below, the menu icon is positioned on the right side because we selected the Right option from the Off-canvas position settings.

Select Off-canvas: There are three styles of the off-canvas menu. The styles are: Left align, Left Bordered, Center Align. If you select Left align style, the mobile menu will get the style.

Select Off-canvas Menu: In the small device will show the menu which you selected from the Select Off-canvas Menu drop-down.
Extra asset: How to Change Navigation Menu on Selected Page
Footer Setup
We will setup the footer now. Our footer looks like this.

To craft a footer layout using the Quix page builder, adhere to the following steps:
- Access Quix by selecting "Quix Page Builder" from the left side of the site administrator panel.
- Within Quix, navigate to the "Footer" panel.
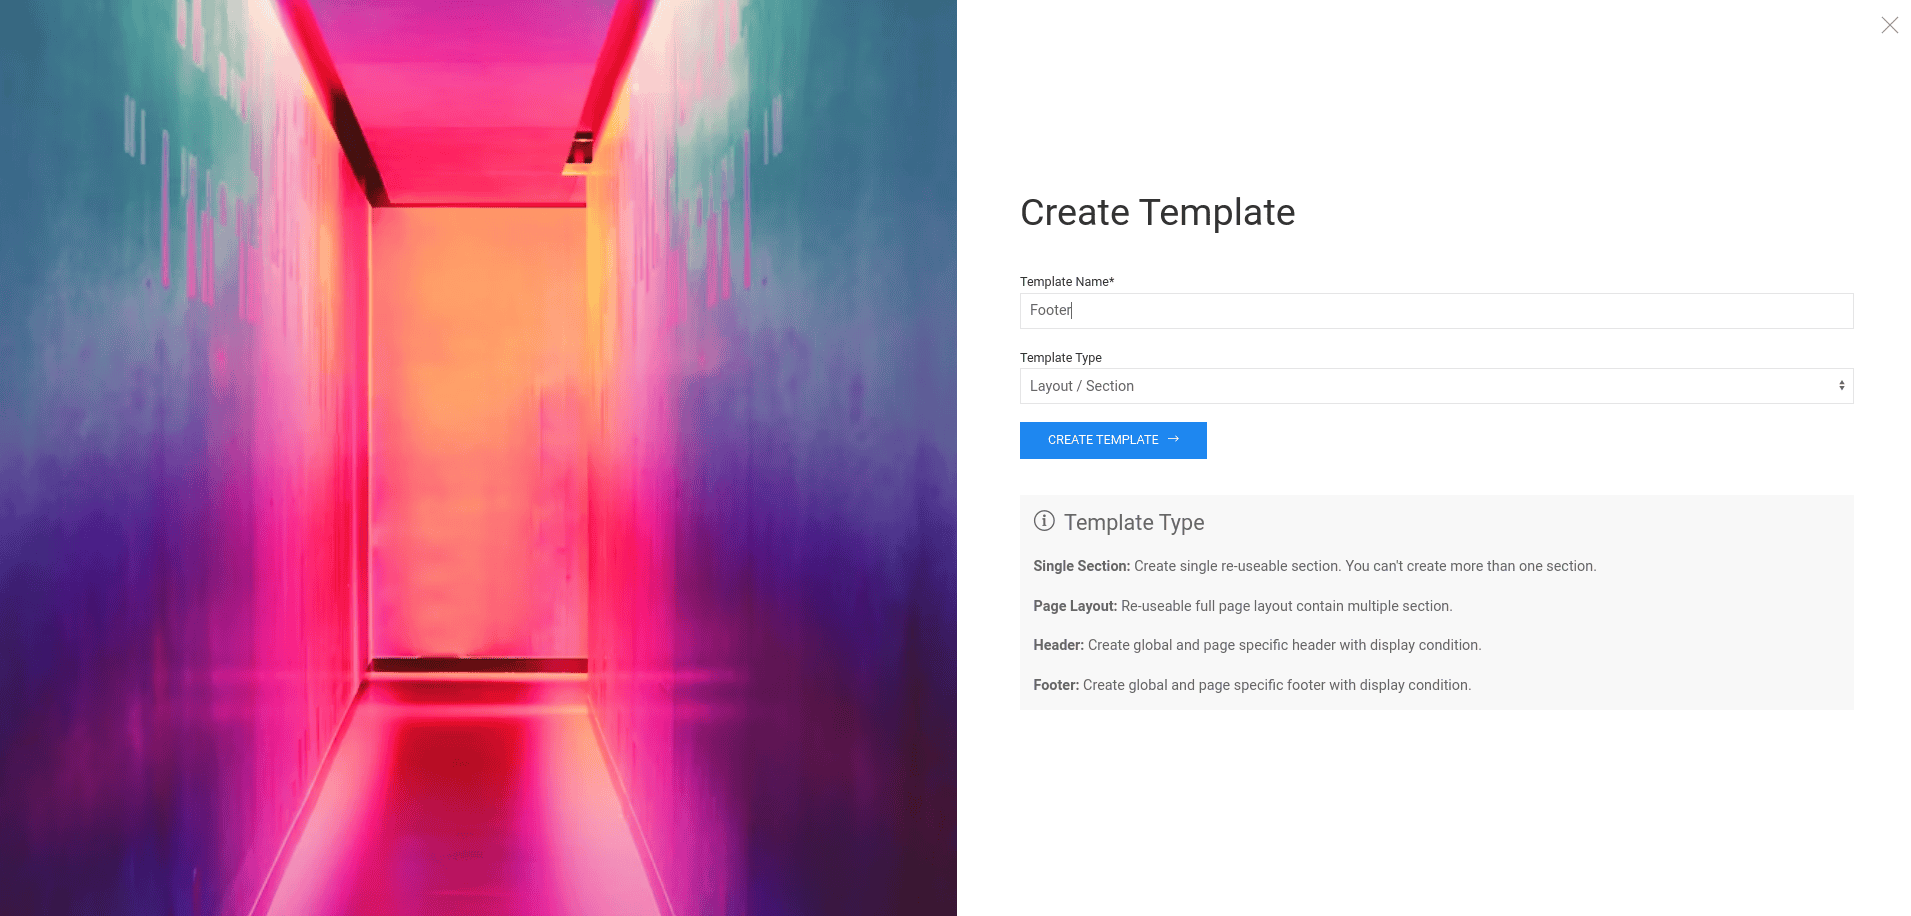
- Click on the "New Template" button.
- Input "Footer" in the Template Name field.
- From the Template Type dropdown menu, opt for "Footer".
- Ensure to save your settings by clicking on the appropriate options.
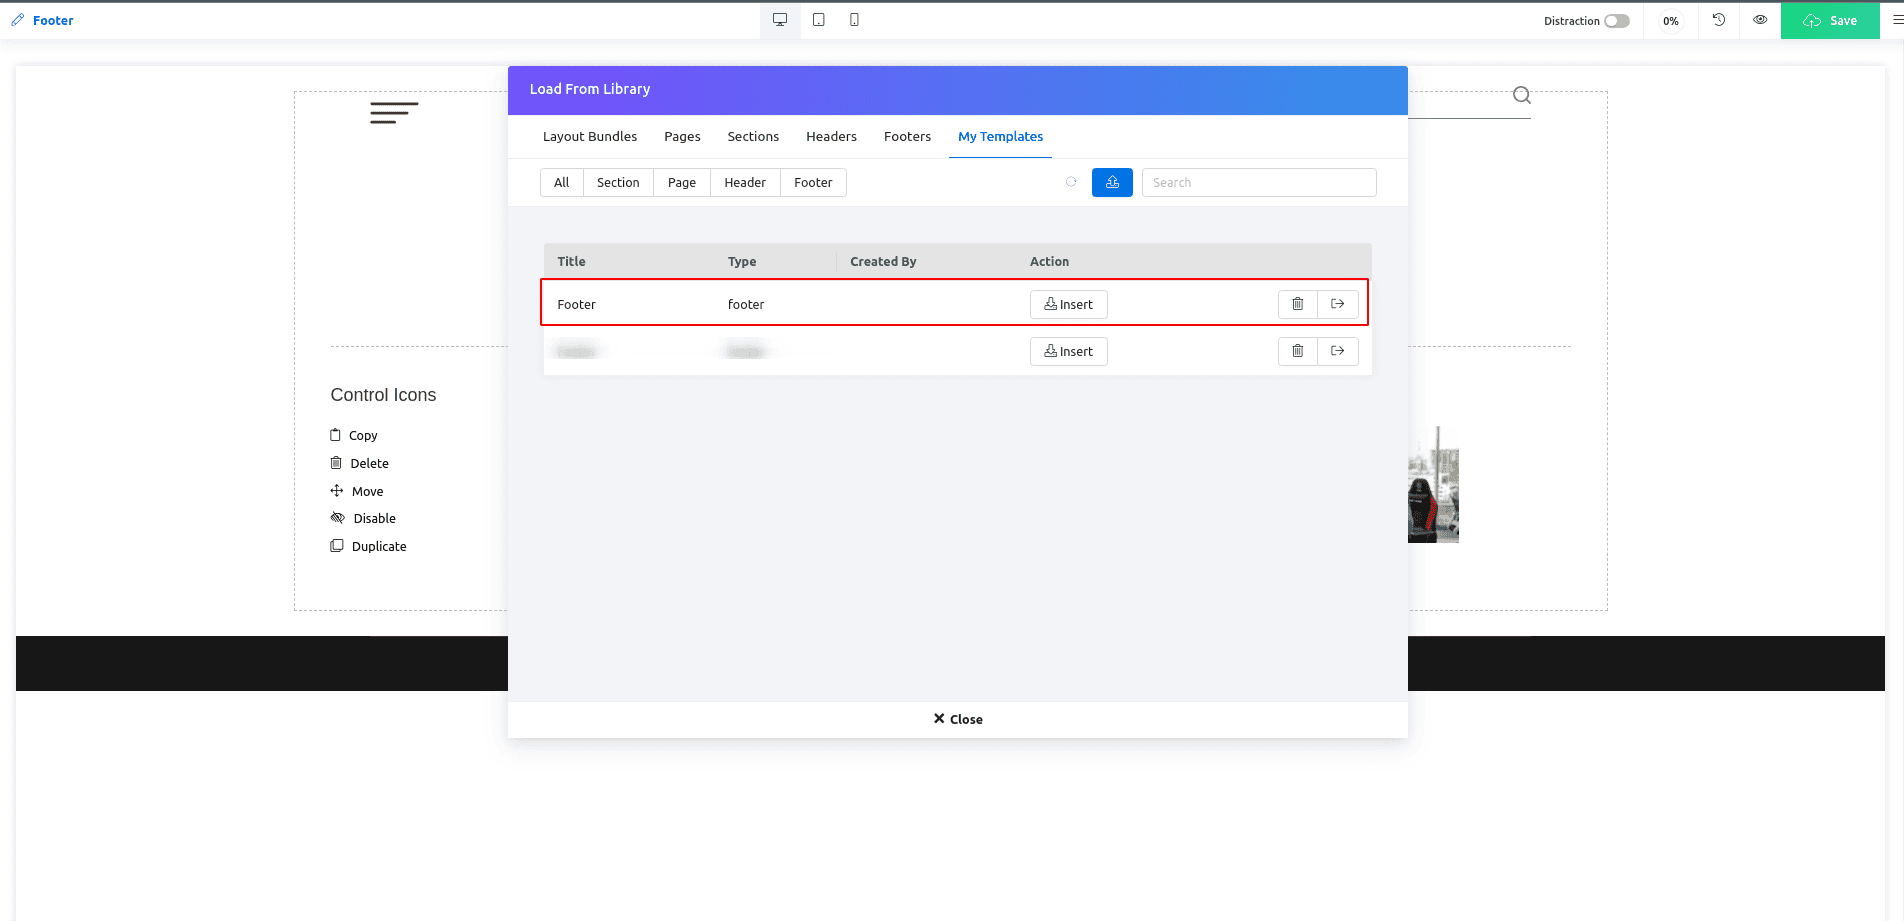
Once created the Footer, click on the Add Template button. Now insert the footer.
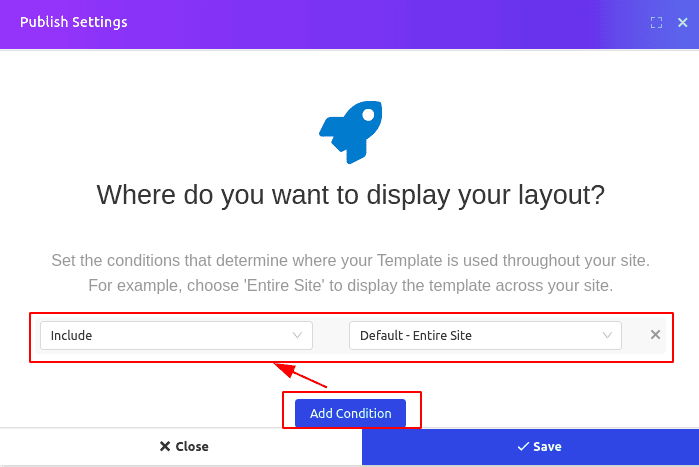
Once you've inserted the footer, click on the "Save" button. This action will prompt the Publish Settings to appear. Click on the "Add Condition" button, where you'll encounter two options: "Include" and "Default - Entire Site," with the latter being selected by default.
Selecting "Include" will position the footer in the specified footer area on your site. Alternatively, opting for "Default - Entire Site" will ensure the footer is displayed across all menu items you select.
Activate Quix License
To unlock the complete potential of Quix and utilize all its features, you must activate the license. Below is a step-by-step guide on how to activate the license: (https://www.themexpert.com/docs/quix-builder/how-to-activate-quix-4-license).
Upgrade Instruction
Take a full backup
It is advisable to create a comprehensive backup before initiating any upgrades. This precautionary measure minimizes the risk of data loss in case of any unforeseen issues. In the event of a problem, having backup files enables you to restore your data, ensuring everything remains secure and safeguarded.

Grow rapidly with our Joomla SEO service done by the veterans
With over 12 years of business and a vast array of Joomla templates and extensions, we know Joomla SEO better than anyone you could possiblly hire.
Improve my ranking