Jurix

Elevate your legal practice with our cutting-edge Joomla! template tailored for law firms and legal professionals. Designed with meticulous attention to detail, Jurix Pro seamlessly combines functionality, aesthetics, and user experience to enhance your online presence. With its SEO-friendly features and intuitive design, you can effortlessly showcase your expertise and services, captivating visitors from their very first click. Enjoy a clean and modern layout that puts your content front and center, maintaining a polished and professional appearance throughout your site.
Download packages
Login to your account on ThemeXpert.com. Go to the Downloads > Joomla Templates > Jurix from Dashboard.
The Jurix template download section includes the following files:
- Jurix Quickstart Package
- Jurix Template
- Quix Presets
The Quix panel includes the following files:
- Quix 4 (J3, J4 & J5)
- Quix Installer (Recommended)
Quickstart (Demo) Installation
To set up the quickstart, you need to follow the same steps as installing Joomla 5. You can't add the quickstart to an existing Joomla 5 site through the extension manager because it comes with all the core files of Joomla 5. So, just install the quickstart package as you would install Joomla 5. Follow the guide of quickstart installation.
Manual Installation
Install the Jurix template and Quix page builder (pro) on your existing Joomla website.
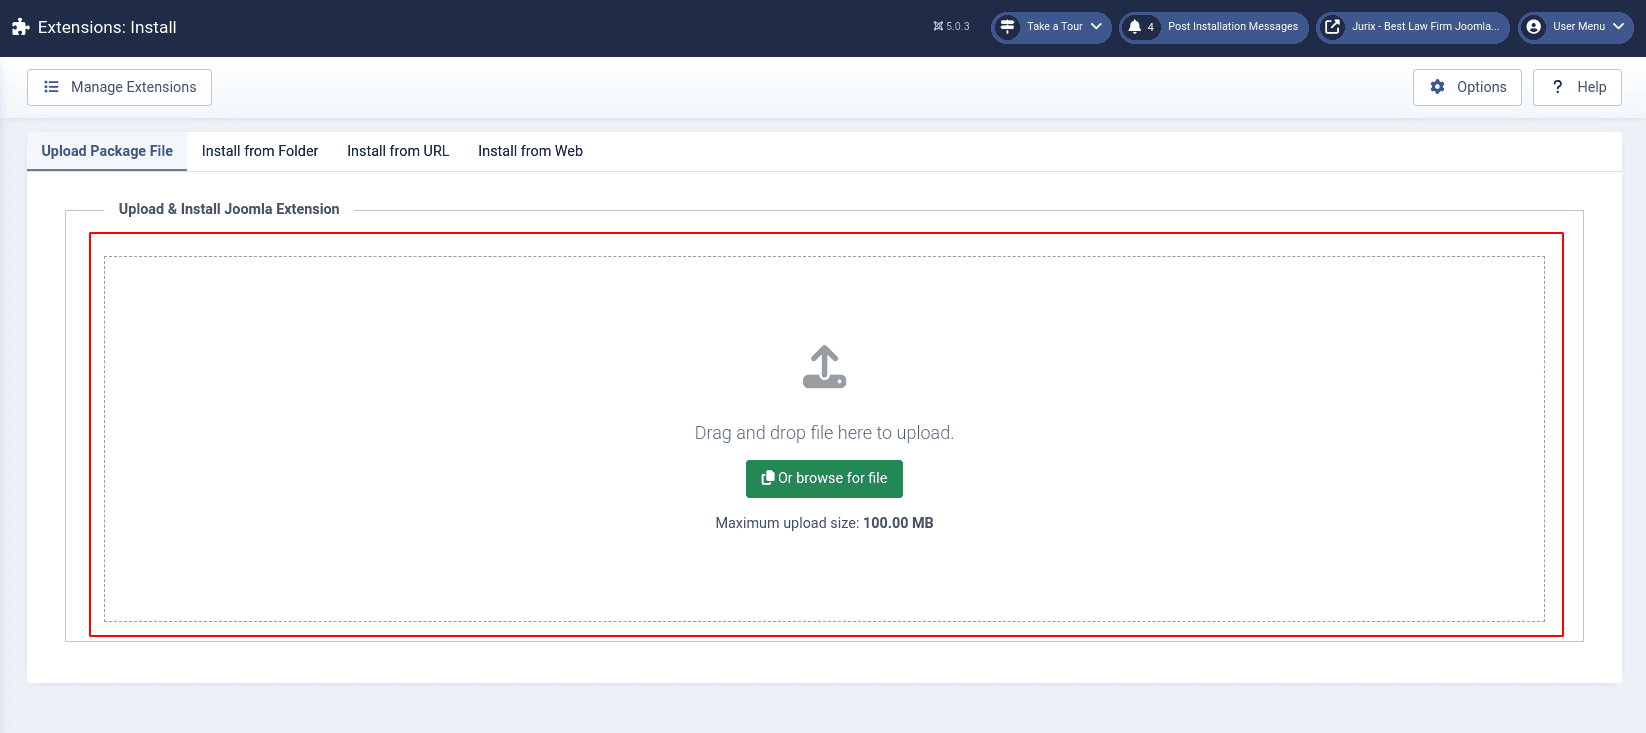
Go to Extensions > Upload Package Files from the Install section in the site administrator panel System Dashboard. Drag and Drop or Browse the following files:
- Jurix Template
- Quix Pro
Jurix Template Installation
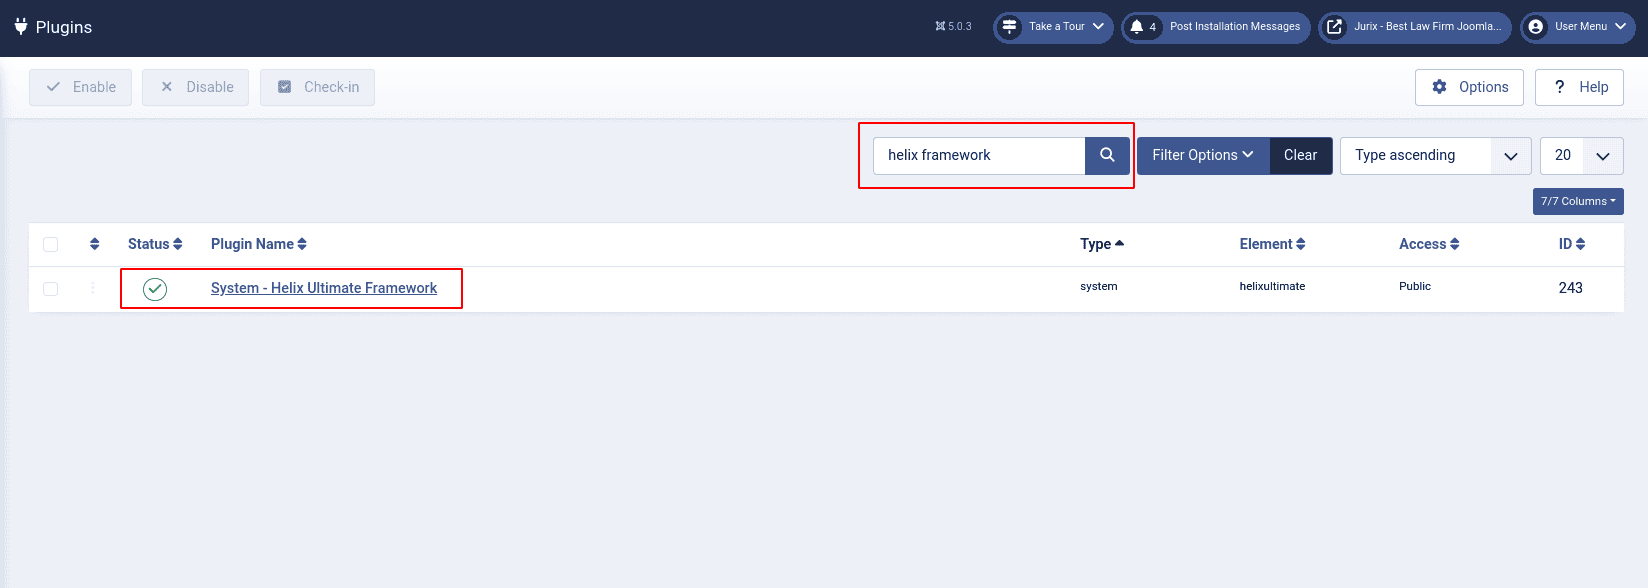
The Jurix template is made by the Helix Ultimate framework. There is no need to install the framework separately. The framework includes the Jurix Template .zip file. The framework will be installed with the template installation.
Once the template is installed, go to the Plugin Manager from the Manage section of the System Dashboard. Now write Helix Ultimate in the search field, and press on the Enter key from your keyboard or click on the Search icon. You will get the System-Helix Ultimate Framework plugin. Click on the check box, and now hit the Enable button to enable the plugin.
Quix Pro Installation
There are two Quix files available. The first one, Quix 4, is a complete package of the Quix page builder. Its file name is pkg_quix_pro.zip, and it's 11 MB in size. However, Joomla only allows file uploads of up to 2MB for installation. Increasing this limit from the server or cPanel can be challenging for users without technical expertise.
That's why we suggest our users to install the Quix installer file instead. The Quix installer's filename is com_iquix-1.7.0.zip, and it's only 48KB in size. Installing Quix page builder using the Quix installer is straightforward and requires just 5 simple steps.
You will get the detailed instructions here (https://www.themexpert.com/docs/quix-builder/basics/installation).
Import Quix Presets
You already downloaded the quix-presets.zip file, extract the file at first. Now go to the Joomla site administrator panel. On the left side, you will get the Quix - Page Builder.
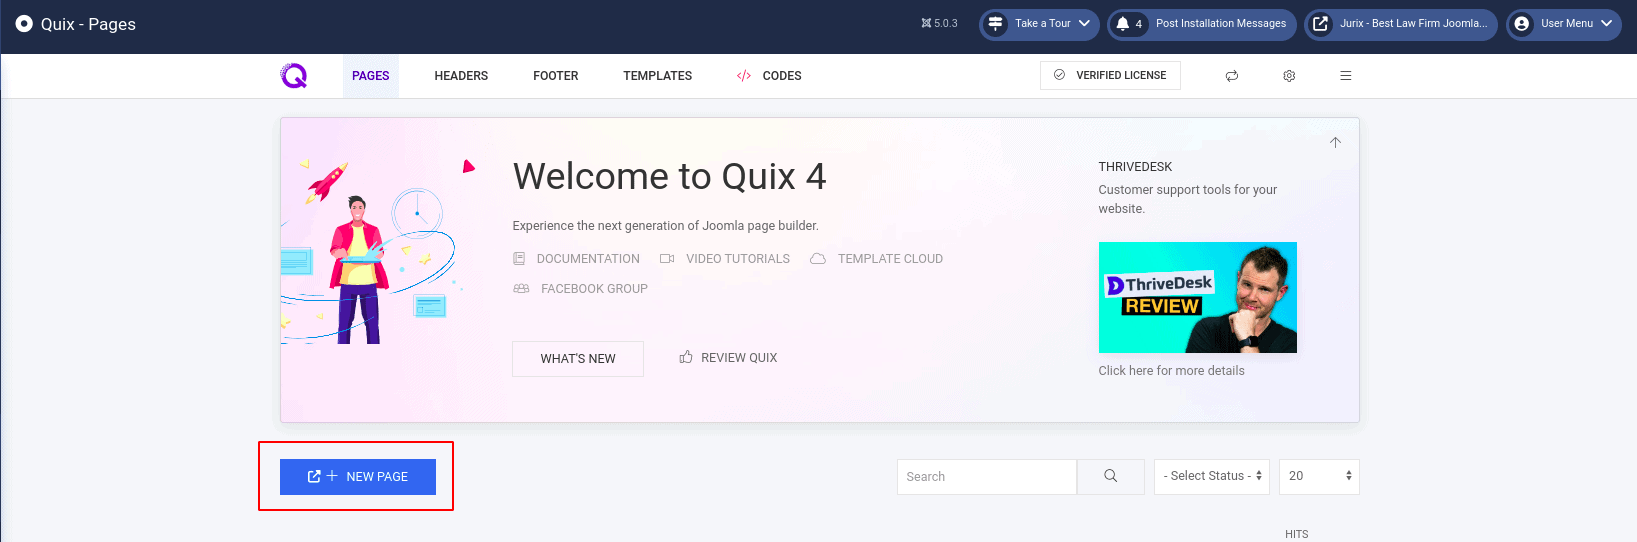
Click on the Quix - Page Builder, you will get the Quix Panel. Click on the New Page button, and write down the page name in the field and hit on the OK button. In the meantime, we will write Home in the field. Once the Home page is created, open the builder. Now we will import the Quix presets.
By following these steps, we will import Quix presets.
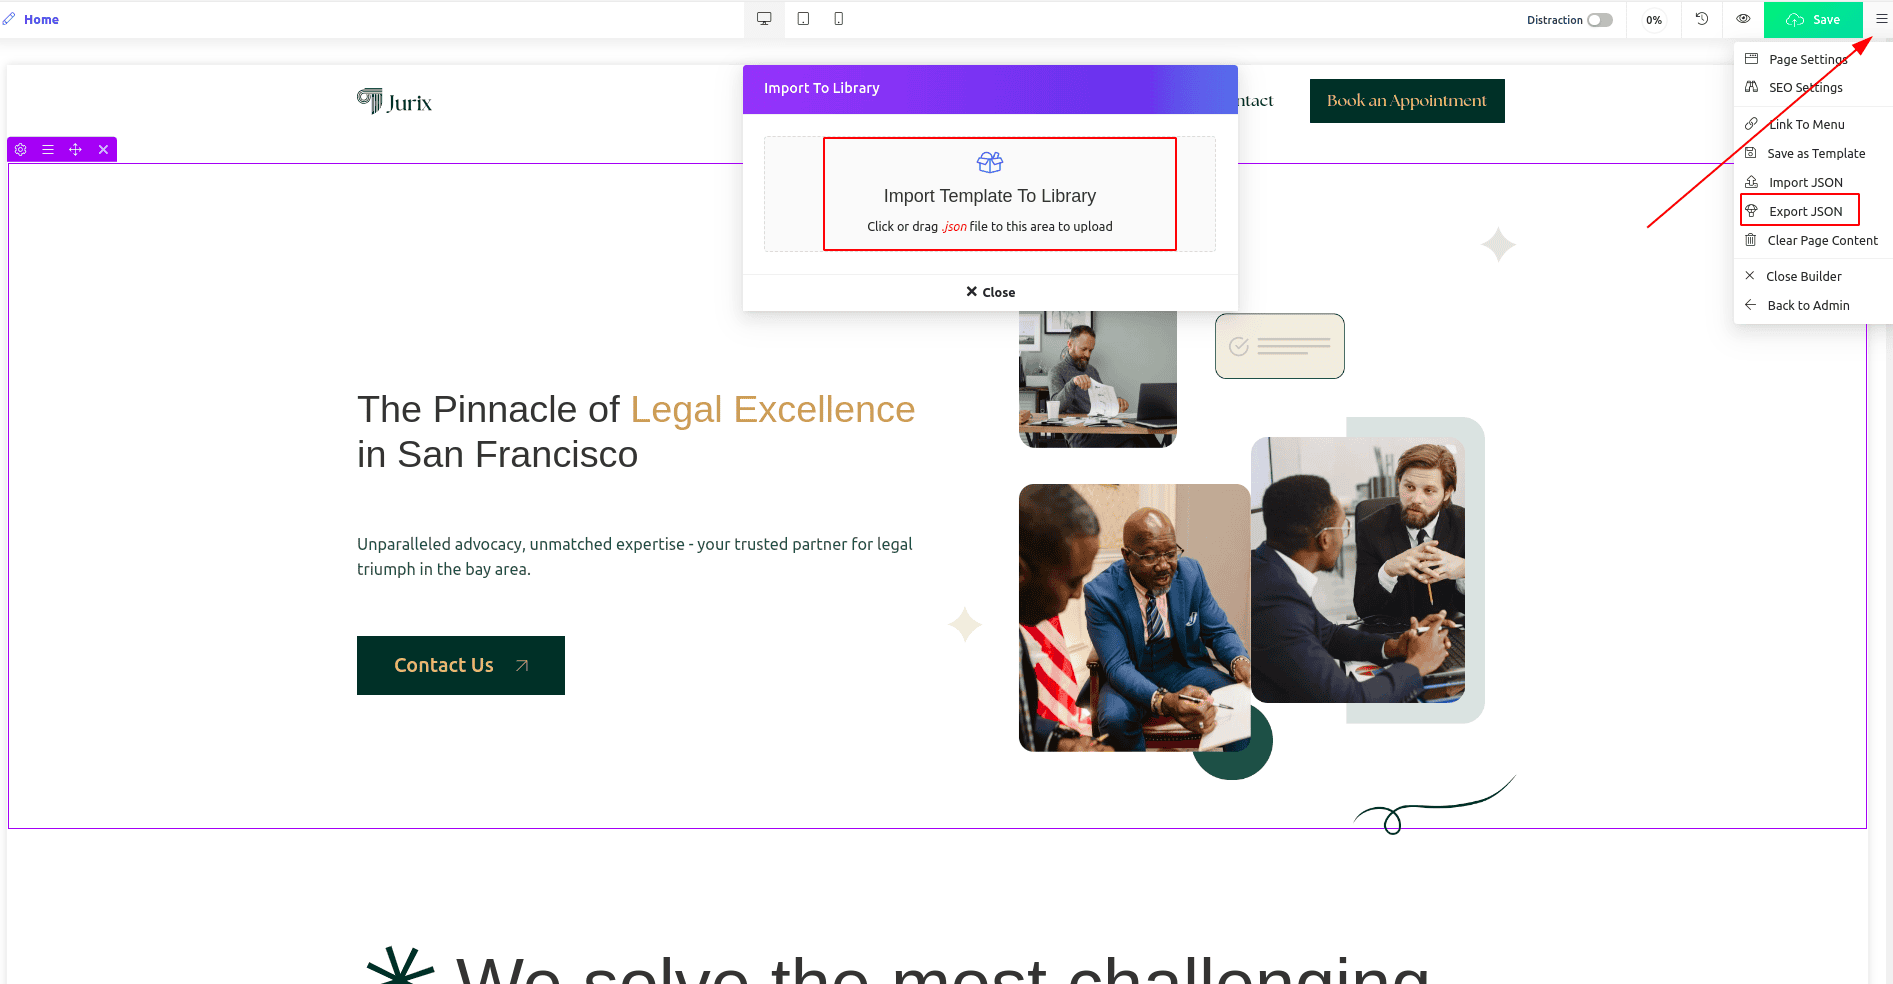
- Click on the Bar icon on the right side of the top bar.
- Click on the Import JSON
- Import to Library panel is open.
The Jurix template Quix presets are: home.json, about.json, practice-areas.json, our team.json contact.json, footer.json, and book now.json.
Drag n drop the json files in the Import field or click and upload one by one. Once all json files are imported.
Now open the My Templates panel by clicking on the Add template button that you will get below the builder.
![]()
Home Page Setup
We already created the Home page. Now we will insert the Home presets by clicking the Insert button from the My Templates panel. Here is the home page demo.
These steps we followed to create the home page of Quix and insert the layout.
- Click on the New Page button, and write down the page name in the field and hit on the OK button.
- Click on the Add template button, open the Quix Library panel
- Click on the My Templates tab and click on the Insert button of the Home page.
By following the steps you have to create and insert other pages of Quix. The pages are:
- About
- Services
- Blog
- Pages
-- Team
-- Service details
-- Single blog
-- Single team - Contact
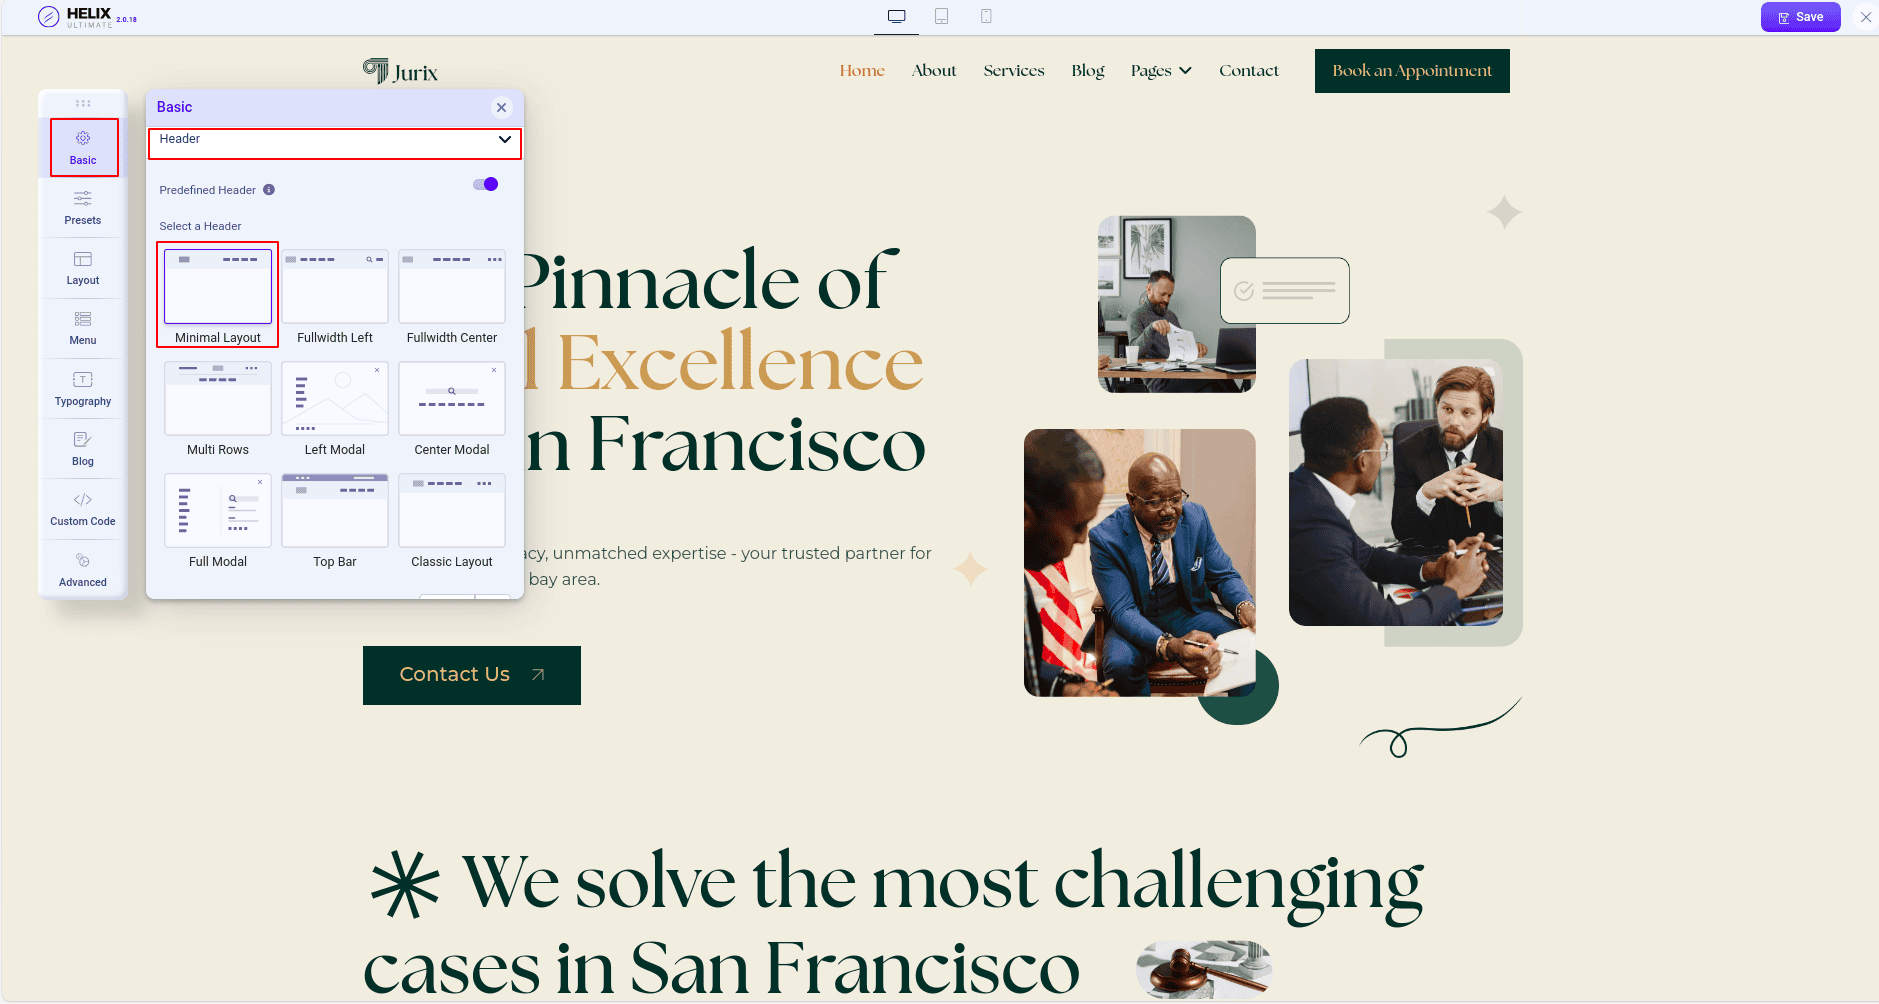
Header Setup
It’s time to add the header. Our header will be like this.

We are going to the templates panel by clicking on the Site Template Styles of the Templates section from the System Dashboard. Click on the Tx Jurix template, now click on the Template Options button.
Add Logo and Favicon
In the Basic settings Logo panel, we will add our site logo and favicon.
![]()
Add Main Menu
Adding a menu is crucial for your website. Let's set up the main menu now. In the Menu settings under the Menu Builder panel, you'll find a dropdown labeled "Select Menu Type". Here, choose the menu that you want to display. Typically, this would be the main menu of your site.

Offcanvas Menu
In the Menu settings Off Canvas panel, you'll find options for controlling the off-canvas menu. These settings allow you to display the site menu on smaller devices such as phones and tablets. There are three key settings for the off-canvas menu.
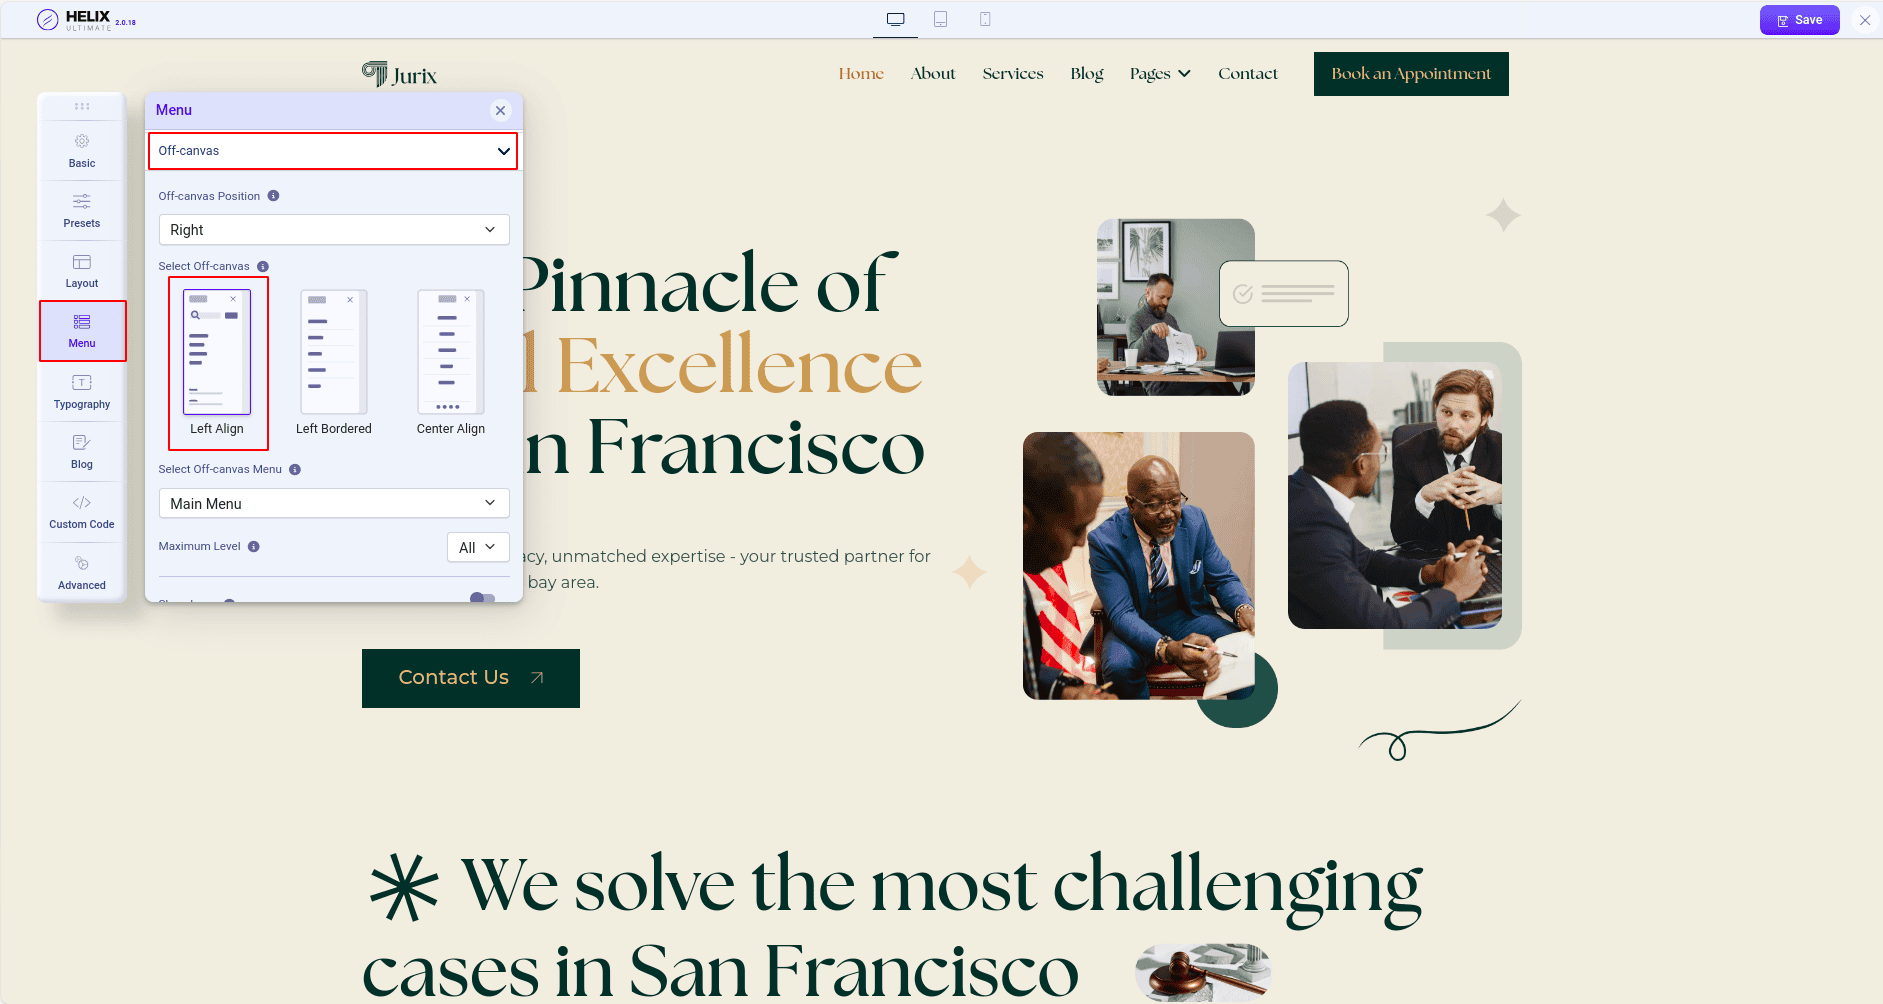
Off-canvas Position: There are two options, one is Left and Right. The options change the mobile menu icon left or right. The following screenshot, the menu icon has on the right site as we selected the Right from the Off-canvas position option.

Select Off-canvas: There are three styles of the off-canvas menu. The styles are: Left align, Left Bordered, Center Align. If you select Left align style, the mobile menu will get the style.
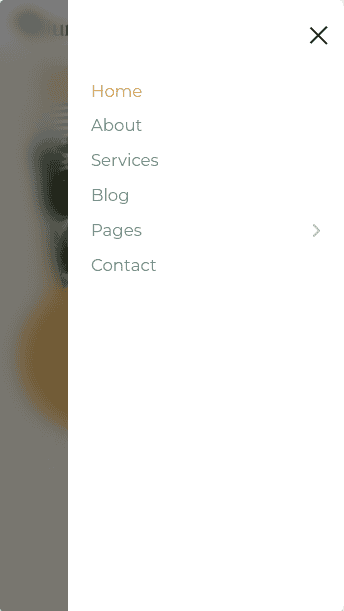
Select Off-canvas Menu: In the small device will show the menu which you selected from the Select Off-canvas Menu drop-down.
Extra asset: How to Change Navigation Menu on Selected Page
Book an Appointment Button
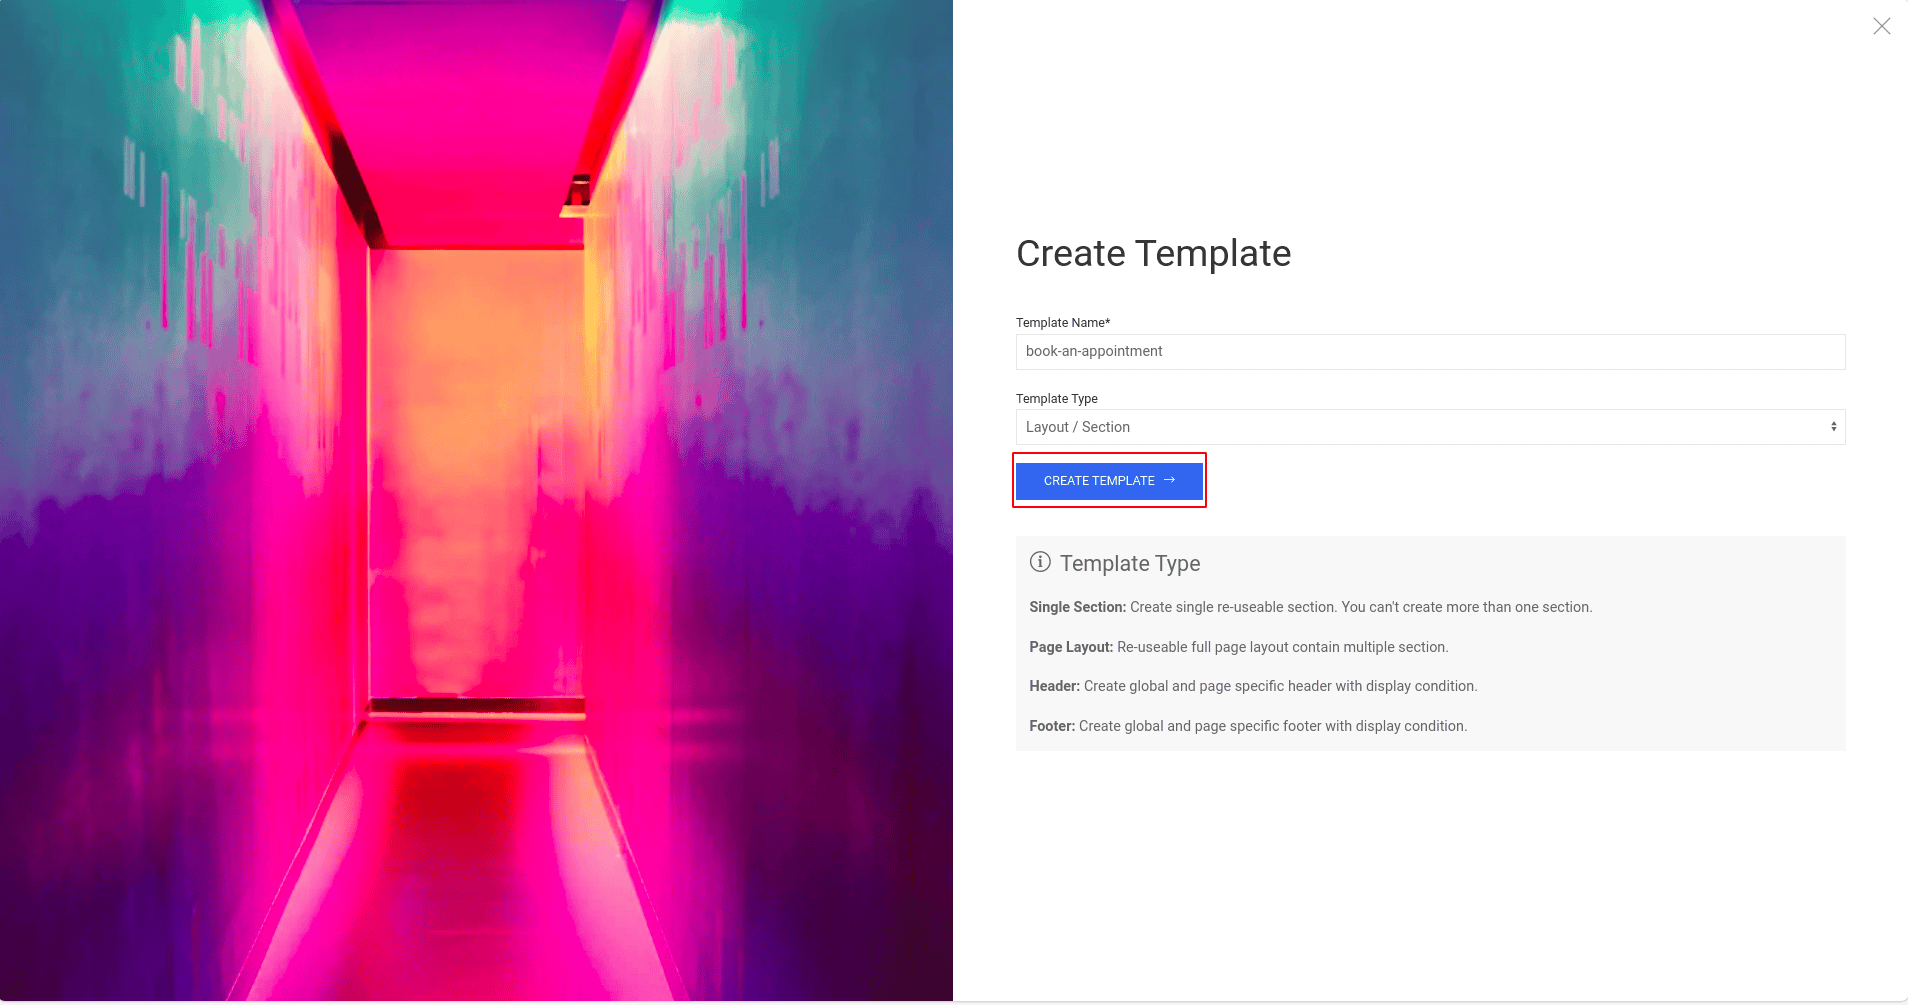
To set up the "Book an Appointment" feature, you'll need to create a layout using Quix. Here's how:
- Navigate to the Quix dashboard located on the left side of the site administrator panel.
- Click on "Templates" from the Quix menu bar.
- To create a new layout, click on the "New Template" button.
- In the layout name field, enter "Book an Appointment" and choose "Layout/Section" from the Layout Type drop-down menu.
- Click on the "Create Layout" button to proceed.
- You'll have the option to create header and footer layouts from here as well, but we'll discuss that later.
Once the Book an Appointment layout is created, click on the Add Template button. Now insert the Book an Appointment item by clicking on the Once the Book an Appointment layout is created, click on the Add Template button. Now insert the Book an Appointment item by clicking on the Insert button.

We will add the Book an Appointmentbutton in our header right side through the module position. We have a module position on our selected header. The module position name is Header Button. We will use the Quix module to achieve it.
Now click on the Site Module under Module section from the site System Dashboard. Click on the New button, select Module - Quix type. Write the module name Book an Appointment in the Title field.
Click on the Select button from the Select Template field and insert the Book an Appointment by clicking on the Insert button.
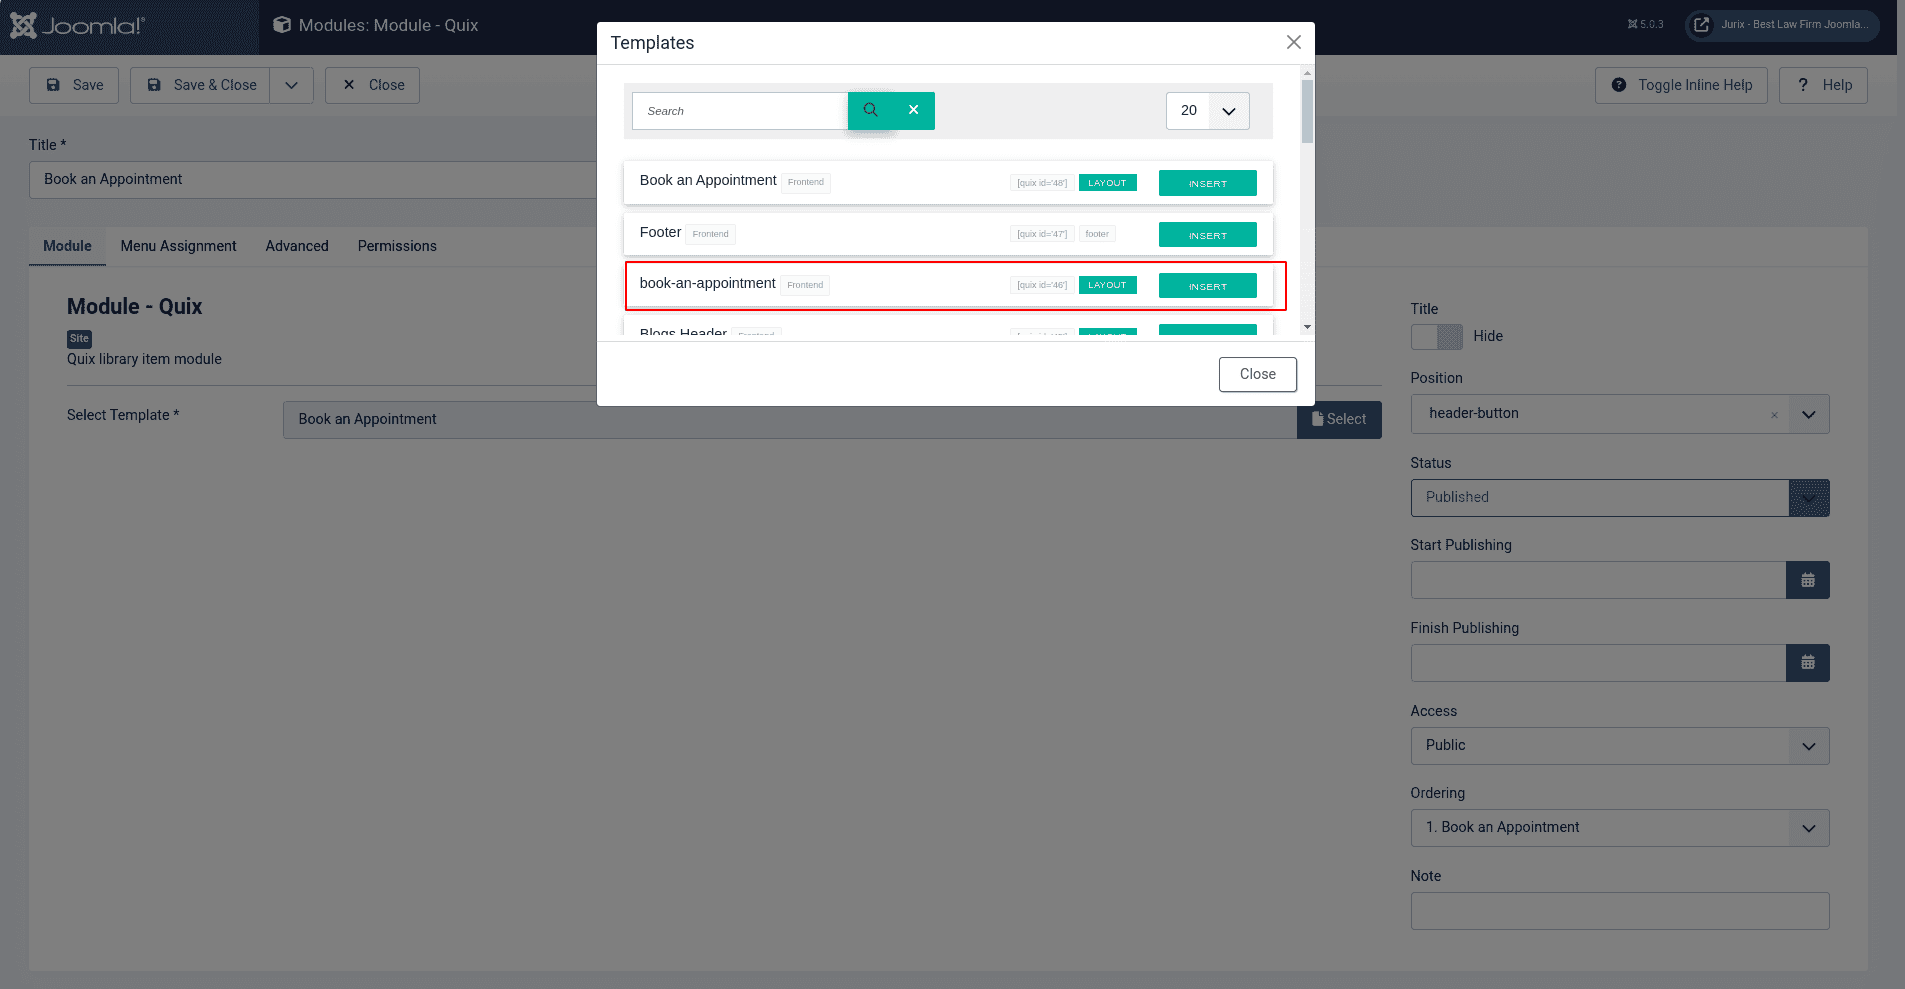
Now select the module position Header Button from the Position dropdown and select Published under Status drop-down. We will assign the module by selecting the On All Pages from Menu Assignment tab Module Assignment drop-down. Hit on the Save & Close button.
After completing the Publishing settings, click on the Save button again. You will see the footer when you reload the home page.
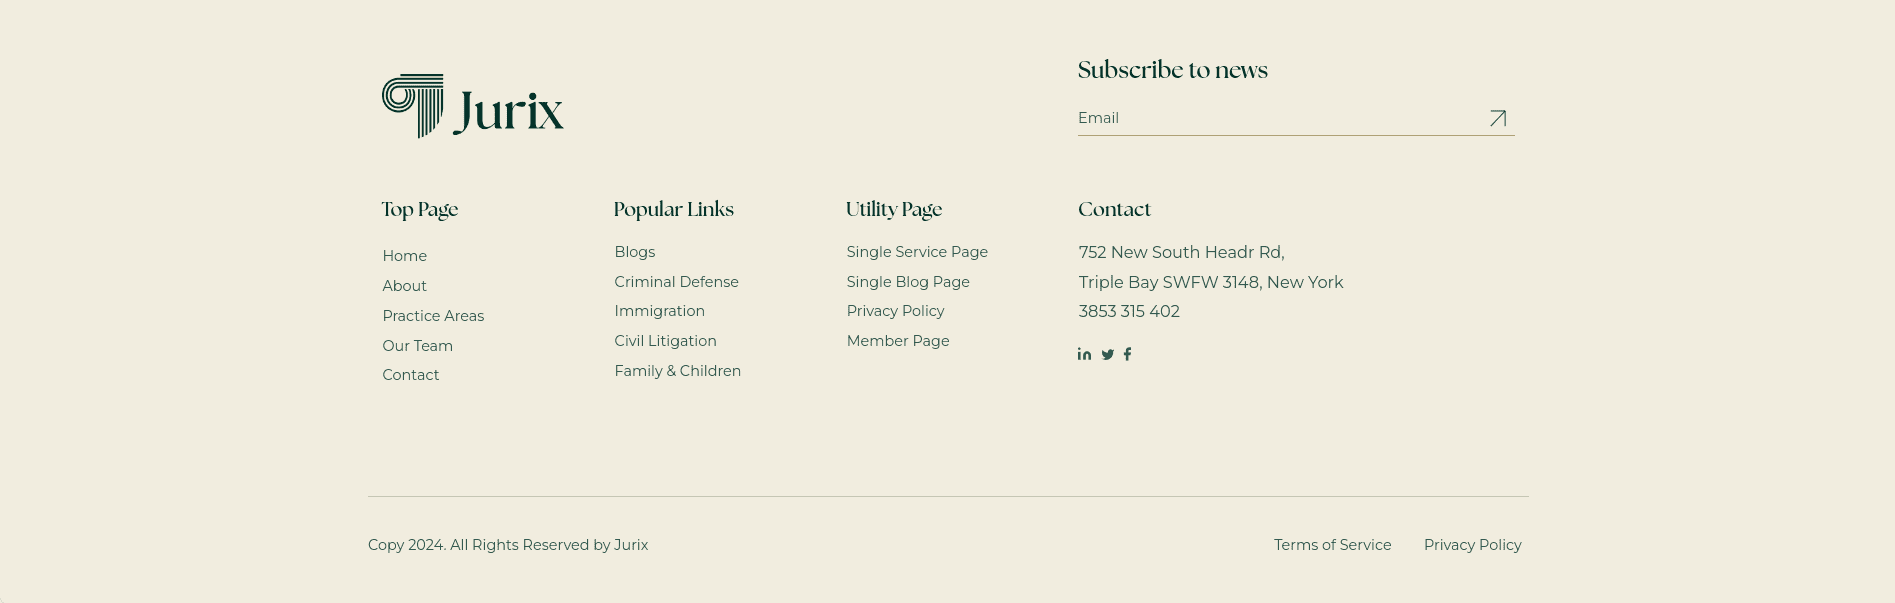
Footer Setup
We will setup the footer now. Our footer looks like this.
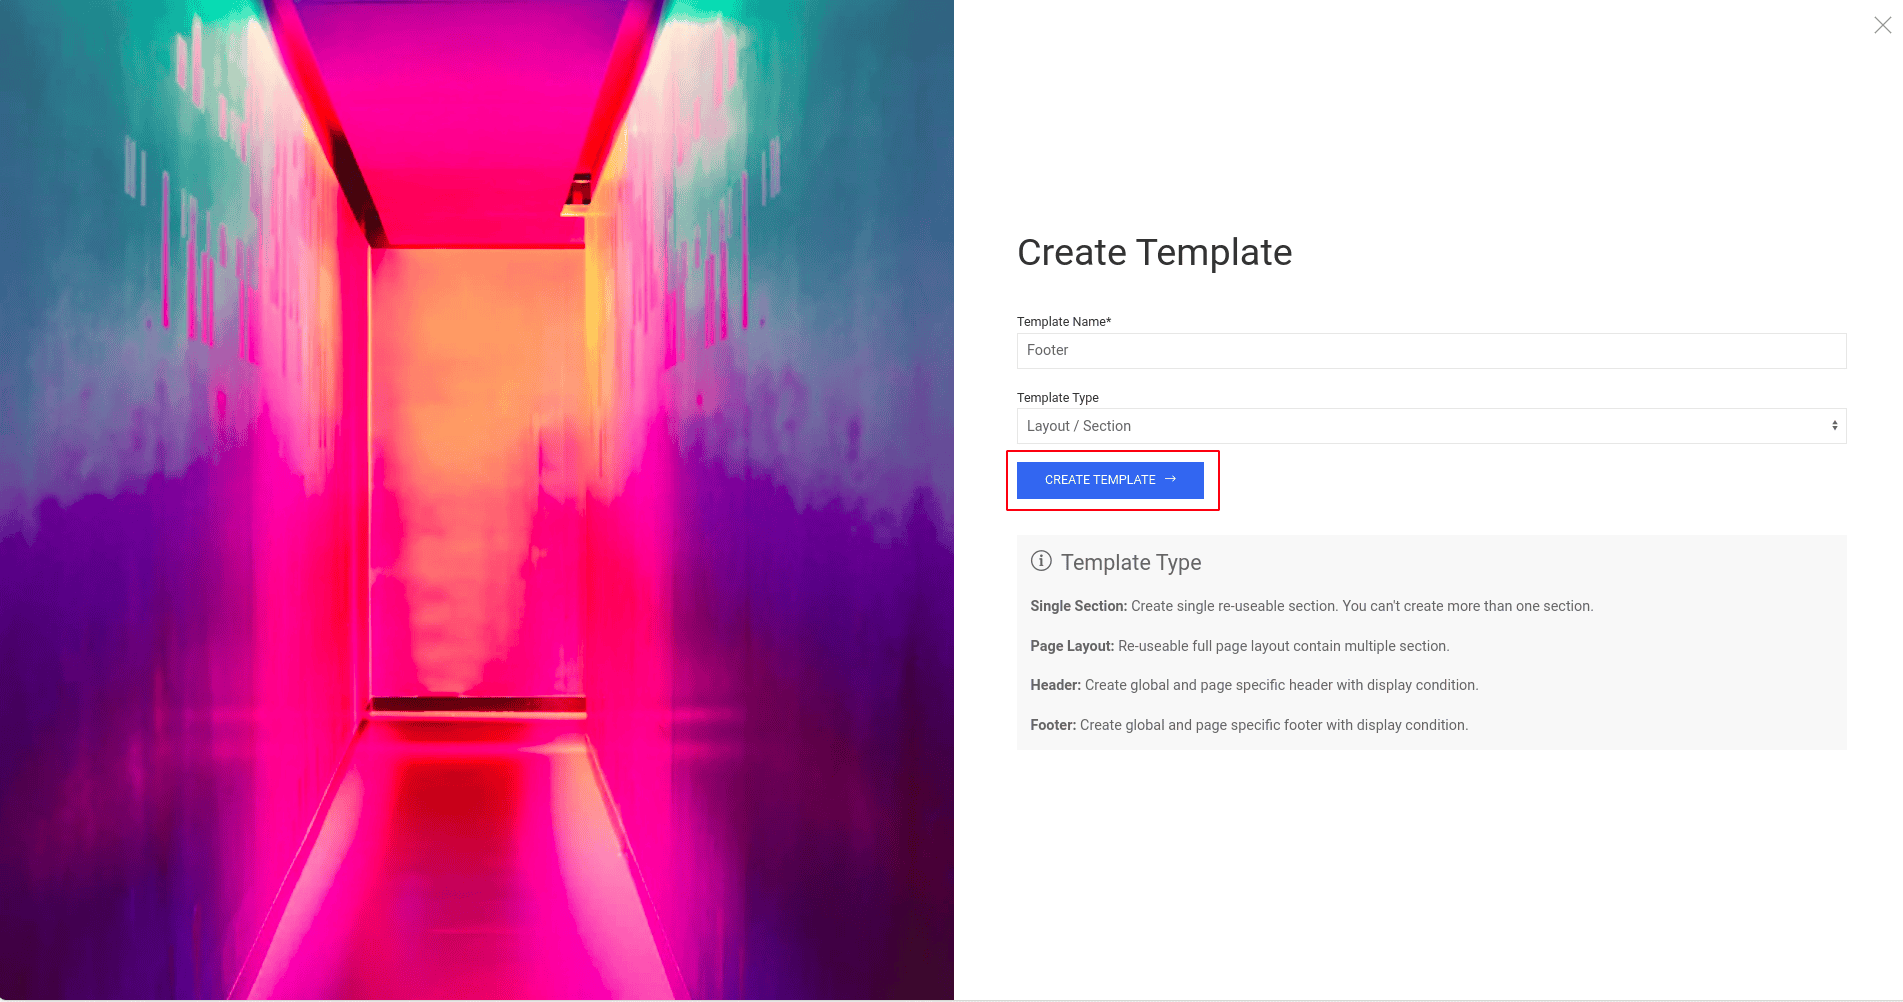
To create a footer layout using the Quix page builder, follow these steps:
- Go to Quix by clicking on "Quix Page Builder" from the left side of the site administrator panel.
- Click on the "Footer" panel within Quix.
- Next, click on the "New Template" button.
- In the Template Name field, enter "Footer".
- From the Template Type dropdown menu, select "Footer".
- Click on the appropriate options to save your settings.
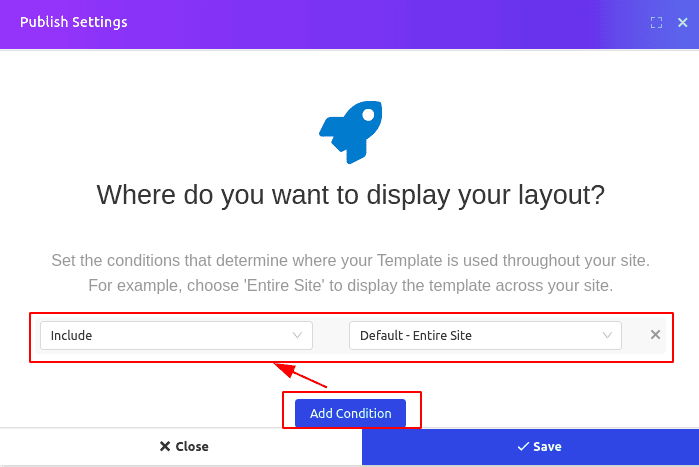
Once created the Footer, click on the Add Template button. Now insert the footer.

After inserting the footer, click on the "Save" button. This will bring up the Publish Settings. Click on the "Add Condition" button, where you'll see two options: "Include" and "Default - Entire Site" is chosen by default.
Choosing "Include" will place the footer in the designated footer position on your site. Opting for "Default - Entire Site" will display the footer when visiting any menu item you choose.
Activate Quix License
To unlock the full potential of Quix and access all its features, you need to activate the license. Here's a step-by-step guide on how to activate the license (https://www.themexpert.com/docs/quix-builder/how-to-activate-quix-4-license).
Upgrade Instruction
Take a full backup
It's smart to make a complete backup before you start any upgrade. This helps you avoid losing important data if something goes wrong. If there's a problem, you can use the backup files to restore your data and make sure everything stays safe and protected.

Grow rapidly with our Joomla SEO service done by the veterans
With over 12 years of business and a vast array of Joomla templates and extensions, we know Joomla SEO better than anyone you could possiblly hire.
Improve my ranking