Hexus

Hexus provides a complete overview of your SEO services, which are displayed prominently with icons and summaries. This allows you to showcase your expertise in various areas, such as technical audits, local SEO, link building, and site speed enhancements. You can give your customers a deep dive into each service by providing detailed descriptions that go beyond surface-level explanations and illustrate the proprietary frameworks behind your proven performance. By using comparison tables, you can highlight the value of each solution, enabling your customers to make more informed decisions.
Download packages
Login your account on ThemeXpert.com. Go to the Downloads > Joomla Templates > Hexus from Dashboard.
Hexus template download section includes the following files:
1. Hexus Quickstart Package
2. Hexus Template
3. Quix Presets
In the Quix panel includes following files:
1. Quix 4 (J3, J4 & J5)
2. Quix Installer (Recommended)
Quickstart (Demo) Installation
The quickstart should be installed like the Joomla 5 installation. It is not possible to install the quickstart package inside an existing Joomla 5 website via the extension manager. Because, the Quickstart package includes the Joomla 5 core files. So, you hve to install quickstart package like the Joomla 5 installation process. Follow the guide of quickstart installation.
Manual Installation
Install the Hexus template, and Quix page builder (pro) on your existing Joomla website.
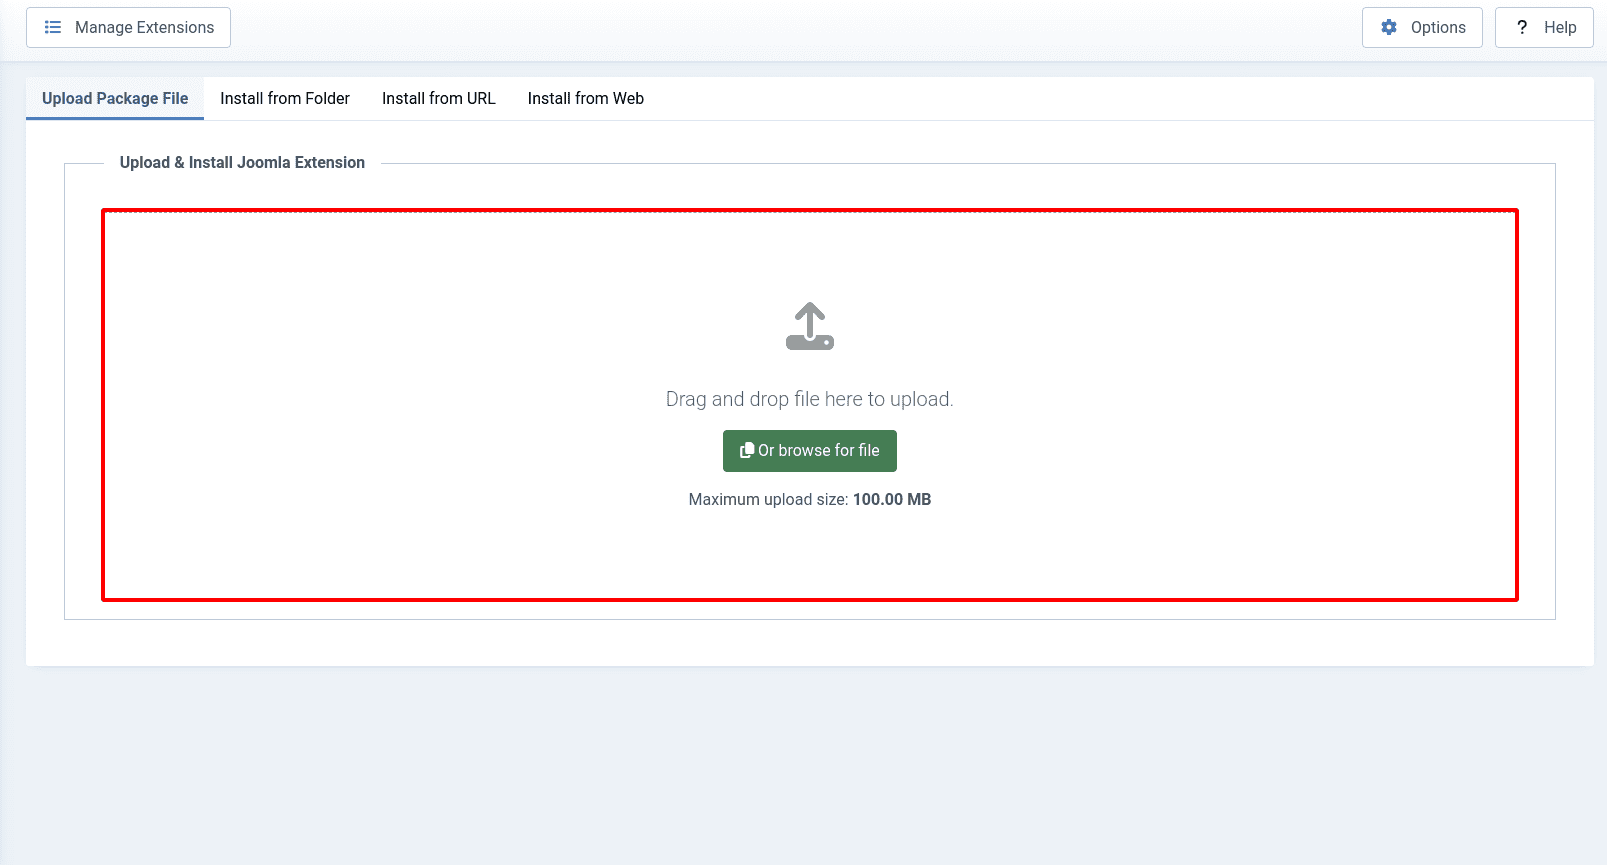
In the site administrator panel System Dashboard, go to Extensions > Upload Package Files from Install section. Drag n Drop or Browse following files:
1. Hexus Template
2. Quix Pro
Hexus Template Installation
The Hexus template made by the Helix Ultimate framework. There is no need to install the framework separately. The framework includes the Hexus Template .zip file. The framework will be installed with the template installation.
Once installed the template, go to the Plugin manager from the Manage section of the System Dashboard. Now write Helix Ultimate in the search field, and press on the Enter key from your keyboard or click on the Search icon.
You will get the System - Helix Ultimate Framework plugin. Click on the check box, now hit on the Enable button to enable the plugin.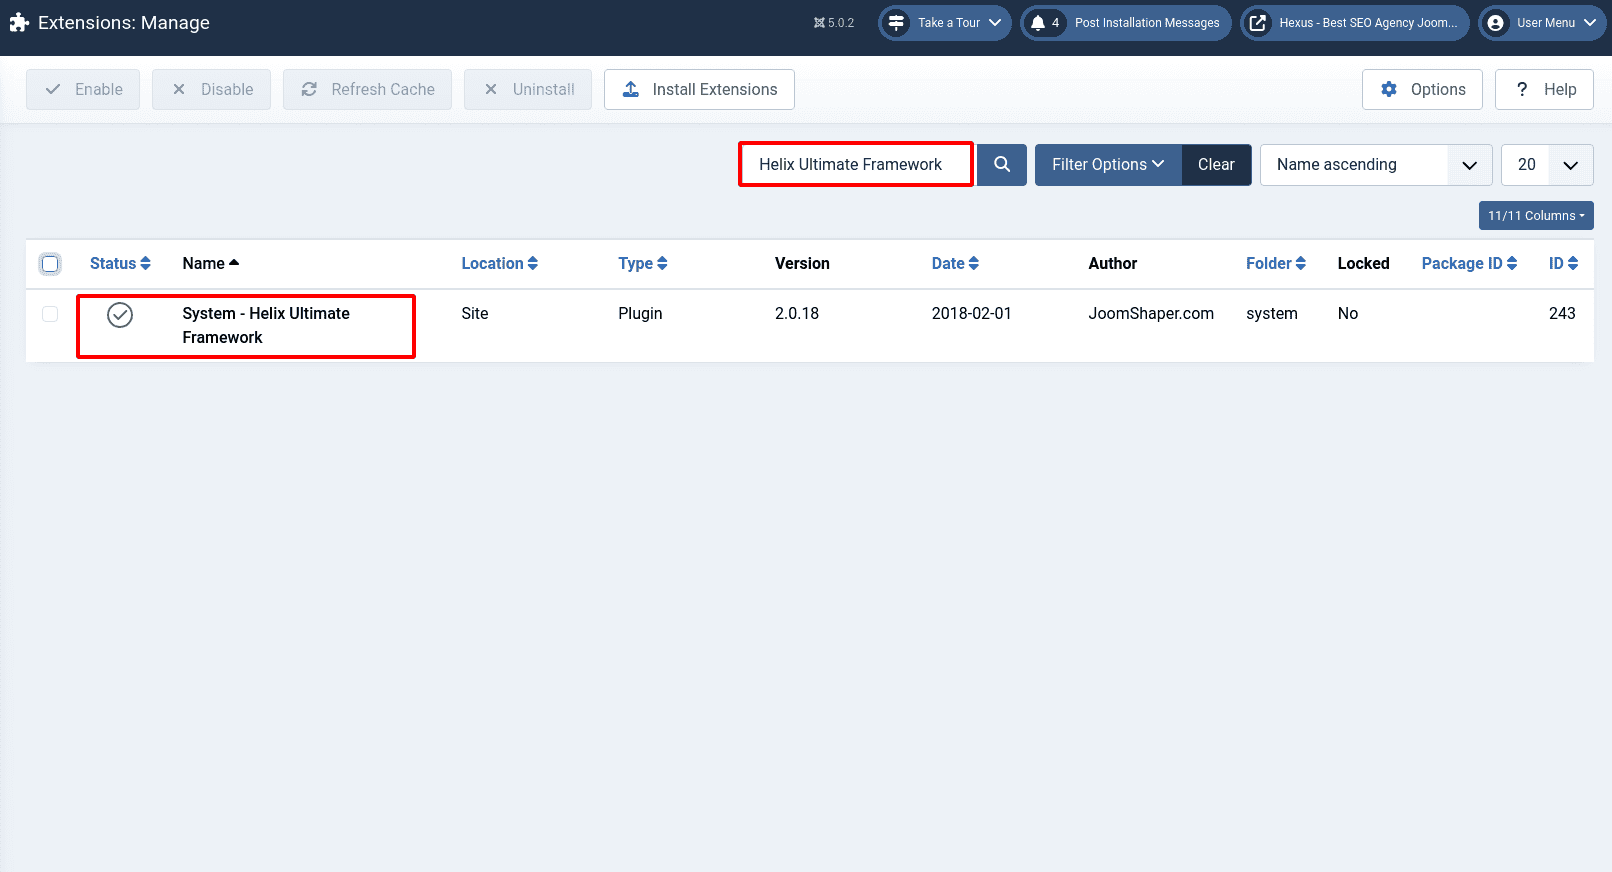
Quix Pro Installation
There are two files of Quix. First one is Quix 4 which is a full package of Quix page builder. The Quix 4 package file name is pkg_quix_pro.zip, the file size is 11MB. Joomla allows you to upload maximum 2MB size files for the installation. It is difficult to increase the upload maximum file size from the server/cPanel for a user who does not have technical knowledge.
That is why we are recommending our users to install the Quix installer file. The Quix installer file name is com_iquix-1.7.0.zip and the size is only 48KB. Any users can install the Quix page builder by the Quix installer by clicking only 5 steps. You will get the detailed instructions here (https://www.themexpert.com/docs/quix-builder/basics/installation).
Import Quix Presets
You already downloaded the quix-presets.zip file, extract the file at first. Now go to the Joomla site administrator panel. On the left side, you will get the Quix - Page Builder.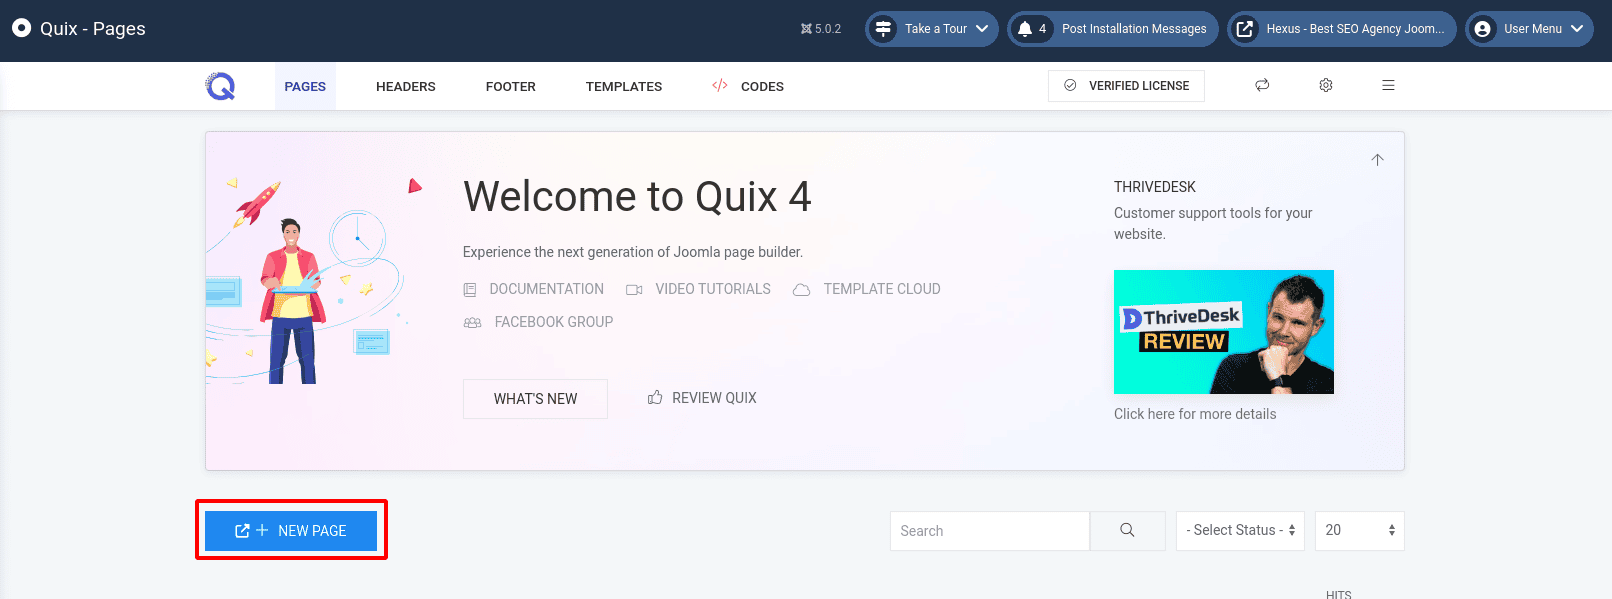
Click on the Quix - Page Builder, you will get the Quix Panel. Click on the New Page button, and write down the page name in the field and hit on the OK button. In the meantime, we will write Home in the field. Once the Home page is created, open the builder. Now we will import the Quix presets. 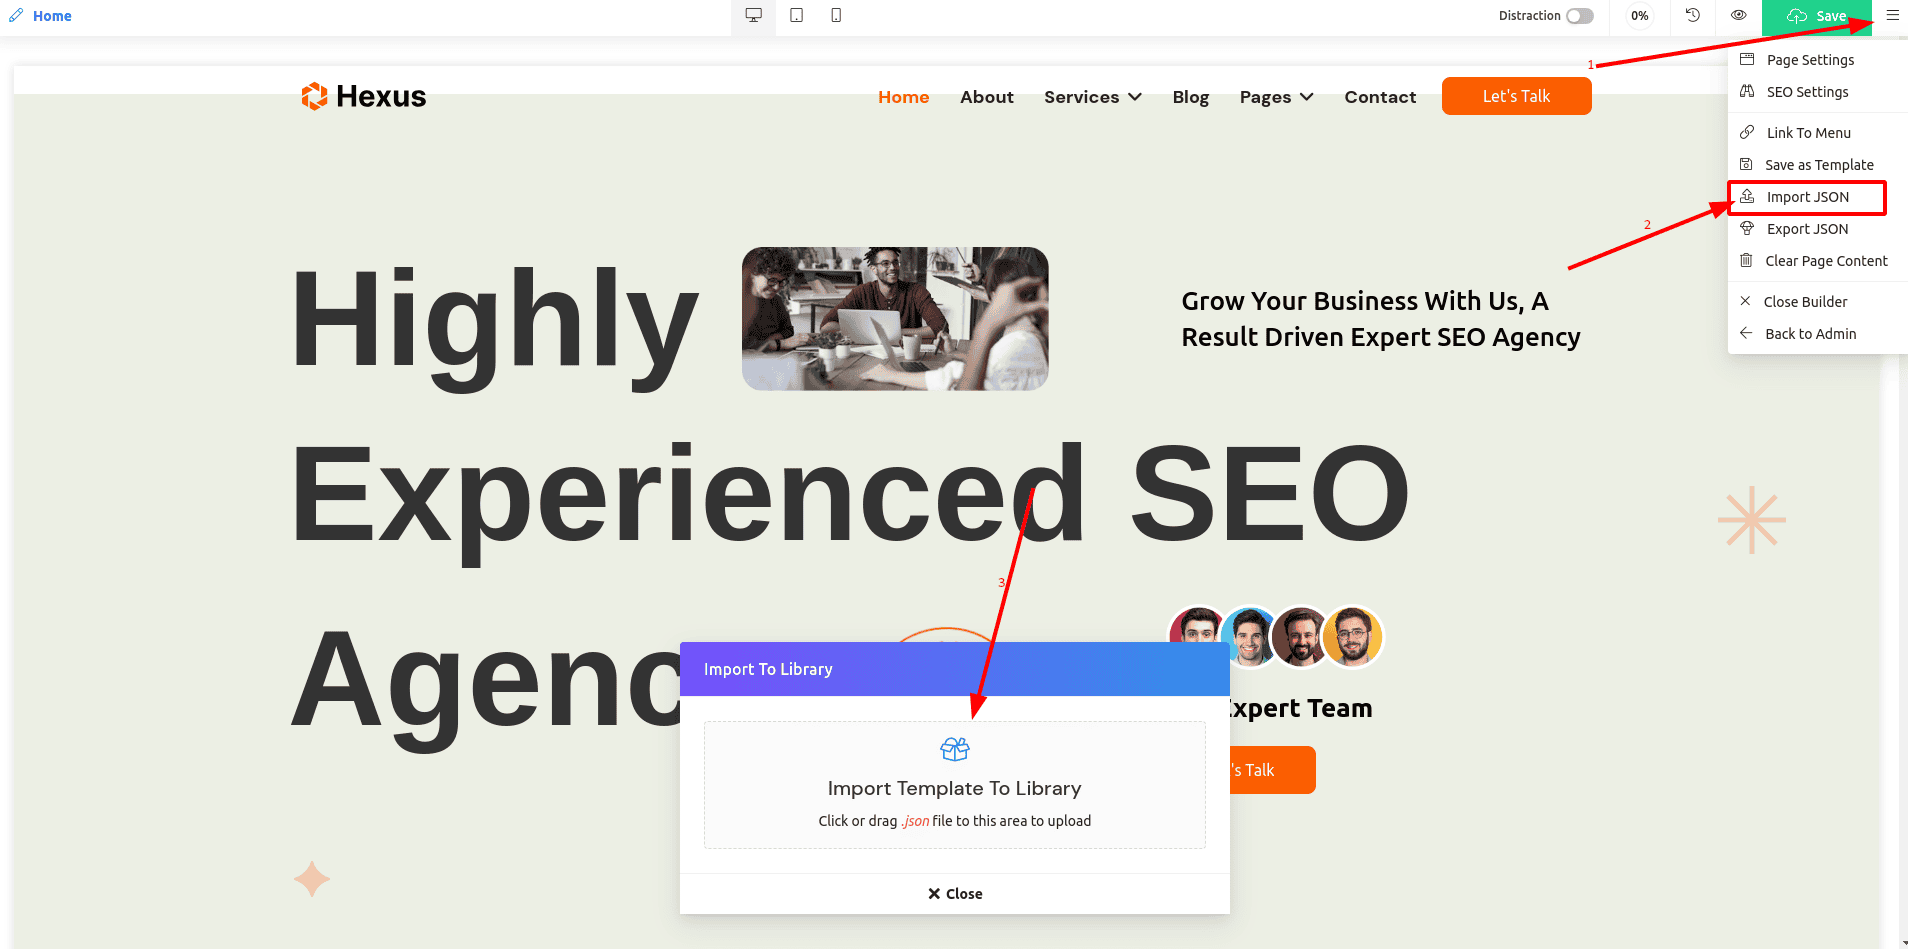
By following these steps we will import Quix presets.
1. Click on the Bar icon on the right side of the top bar.
2. Click on the Import JSON
3. Import to Library panel is open.
The Hexus template Quix presets are: home.json, about.json, blog.json, pages.json, project-details.json, contact.json, footer.json, and let's talk.json.
Drag n drop the json files in the Import field or click and upload one by one. Once all json files are imported.
Now open the My Templates panel by clicking on the Add template button that you will get below the builder.![]()
Home Page Setup
We already created the Home page. Now we will insert the Home presets by clicking the Insert button from the My Templates panel. After inserting the home page will be like this.
These steps we followed to create the home page of Quix and insert the layout.
1. Click on the New Page button, and write down the page name in the field and hit on the OK button.
2. Click on the Add template button, open the Quix Library panel
3. Click on the My Templates tab and click on the Insert button of the Home page.
By following the steps you have to create and insert other pages of Quix. The pages are:
- About
- Services
- Blog
- Pages
-- Team
-- Case studies
-- Case study details - Contact
Header Setup
It’s time to add the header. Our header will be like this.
We are going to the templates panel by clicking on the Site Template Styles of the Templates section from the System Dashboard. Click on the Tx Hexus template, now click on the Template Options button.
Select Header
Now we will select the Multi Rows header style from the Basic panel of the Header settings.
Navigate to the settings:
-> Templates Option -> Basic -> Headers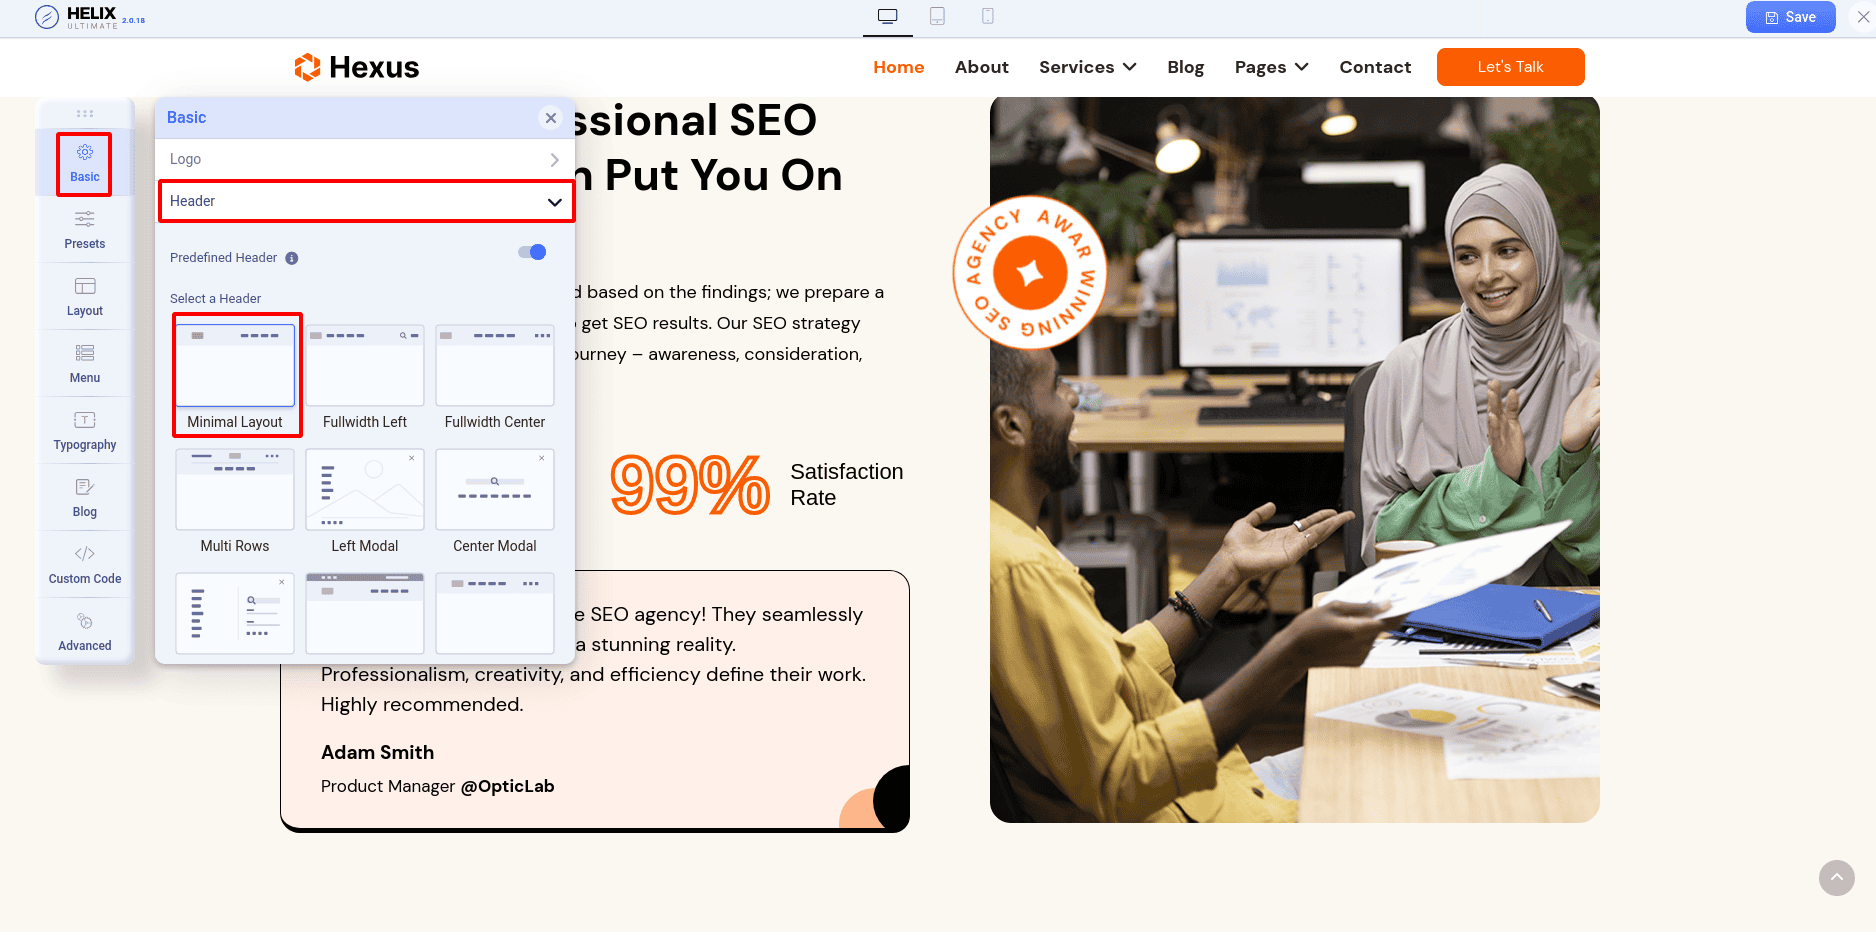
Add Logo and Favicon
In the Basic settings Logo panel, we will add our site logo and favicon.![]()
Add Main Menu
The menu is an important part for a website. Now we will add the main menu. In the Menu settings Menu Builder panel has the Select Menu Type dropdown option, you have to select the Menu that you want to show. Generally its main menu of your site.
Offcanvas Menu
In the Menu settings Off Canvas panel has the off canvas menu control options. The settings help you to show the site menu on our small devices like phone and tablet. There are three important settings of the off-canvas menu.
Off-canvas Position: There are two options, one is Left and Right. The options change the mobile menu icon left or right. The following screenshot, the menu icon has on the right site as we selected the Right from the Off-canvas position option.
Select Off-canvas: There are three styles of the off-canvas menu. The styles are: Left align, Left Bordered, Center Align. If you select Left align style, the mobile menu will get the style.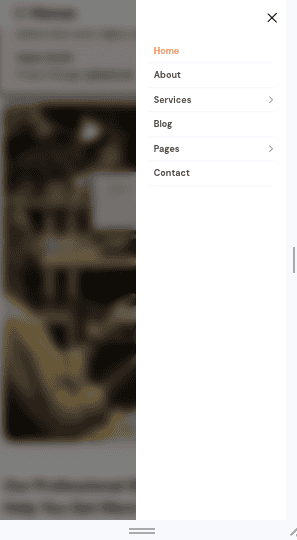
Select Off-canvas Menu: In the small device will show the menu which you selected from the Select Off-canvas Menu drop-down.
Extra asset: How to Change Navigation Menu on Selected Page
Add Let's Talk Button
The Let's Talk comes from the Quix. At first, you have to create a Quix layout. Go to the Quix dashboard from the left side of the site administrator panel. Now click on the Templates from the Quix menu bar.
To create a layout, click on the New Template button, write the name Let's Talk in the layout name field and select the type Layout/Section from the Layout Type drop-down, hit on the Create Layout button. You will be able to create header and footer layout also from here. We will discuss it later.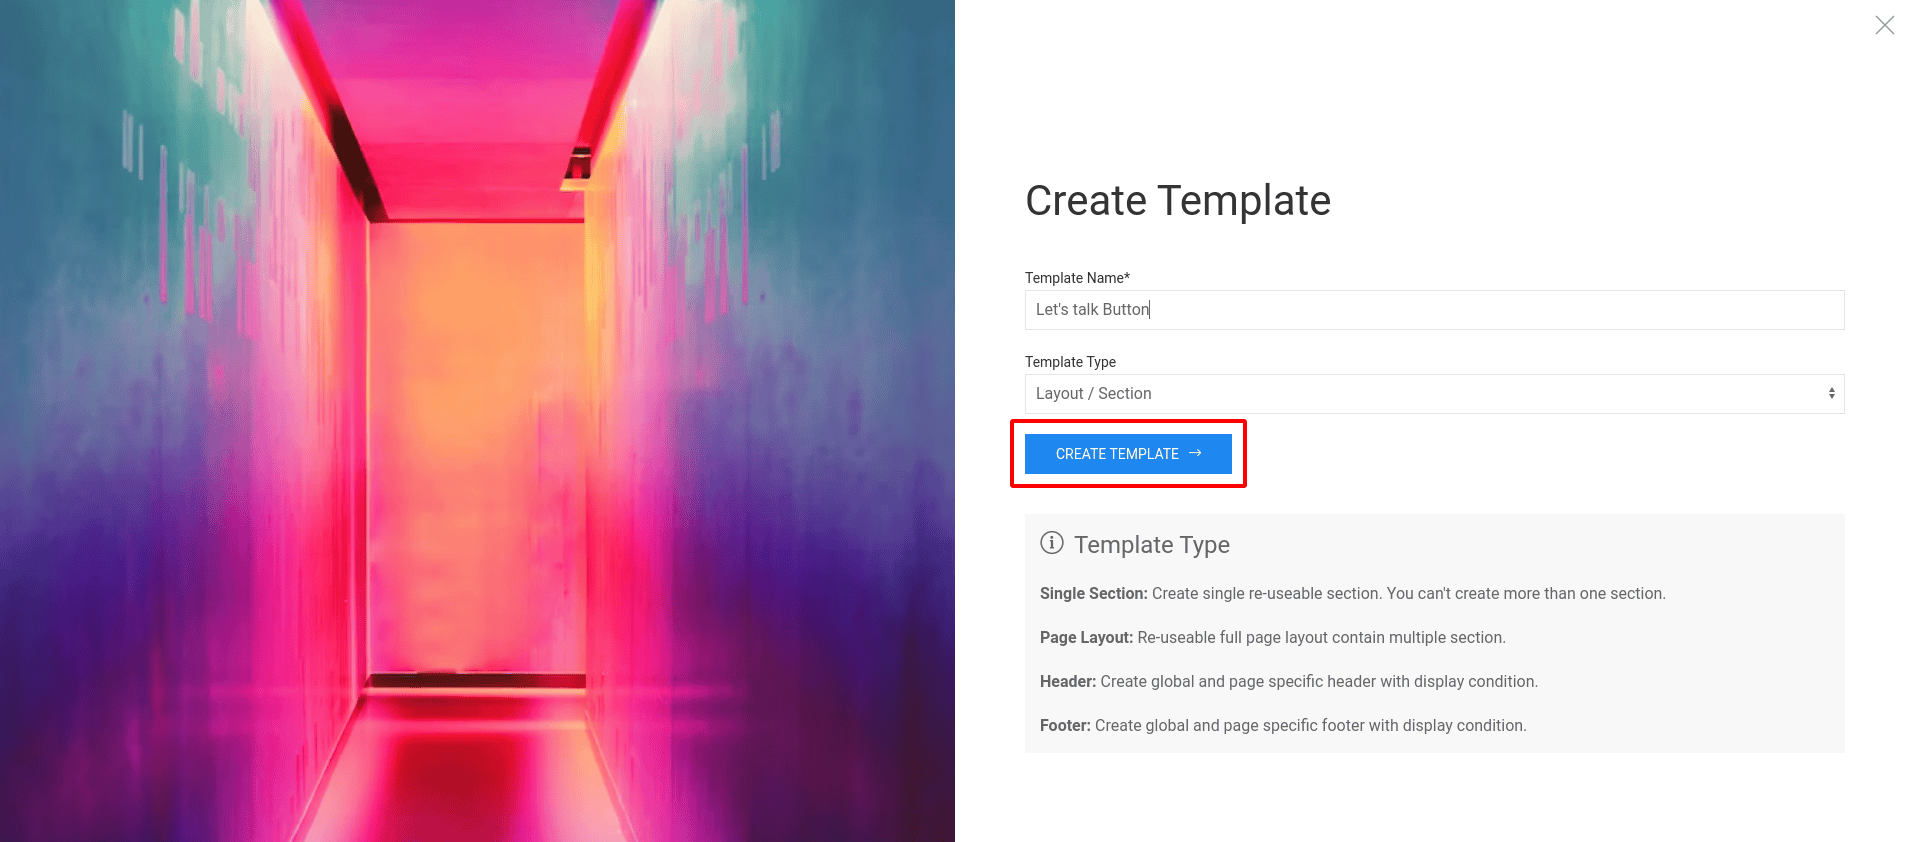
Once the Let's Talk layout is created, click on the Add Template button. Now insert the Let's Talk item by clicking on the Once the Let's Talk layout is created, click on the Add Template button. Now insert the Let's Talk item by clicking on the Insert button.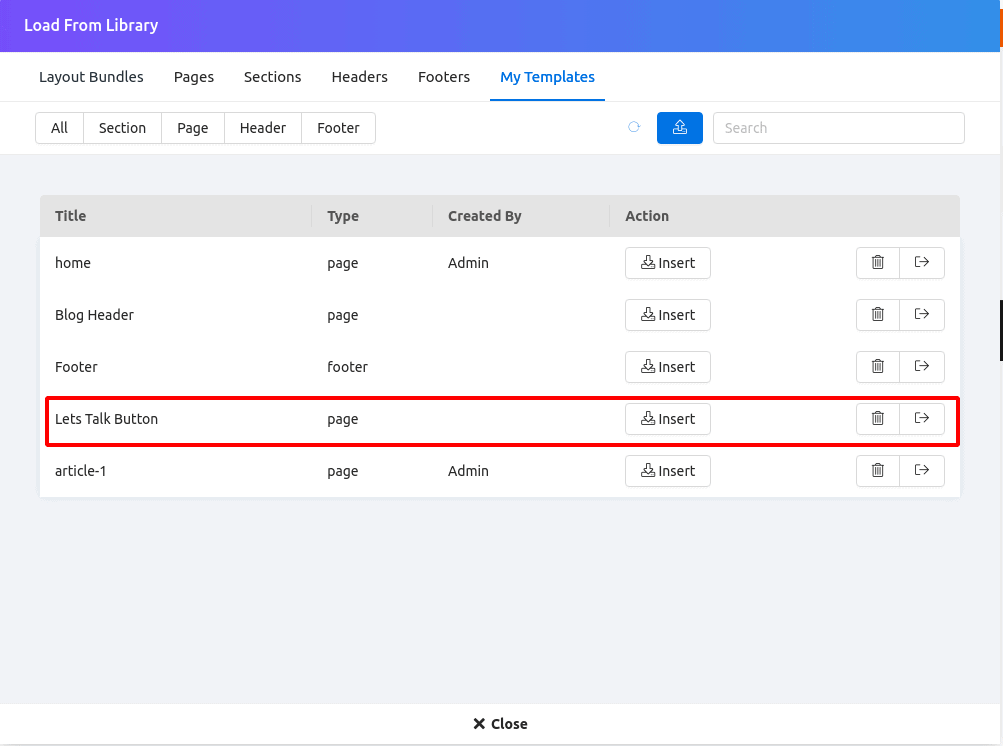
We will add the Let's Talk button in our header right side through the module position. We have a module position on our selected header. The module position name is Header Button. We will use the Quix module to achieve it.
Now click on the Site Module under Module section from the site System Dashboard. Click on the New button, select Module - Quix type. Write the module name Let's Talk in the Title field.
Click on the Select button from the Select Template field and insert the Let's Talk by clicking on the Insert button.
Now select the module position Header Button from the Position dropdown and select Published under Status drop-down. We will assign the module by selecting the On All Pages from Menu Assignment tab Module Assignment drop-down. Hit on the Save & Close button.
Footer Setup
We will setup the footer now. Our footer looks like this.
We will create a footer layout in the Quix page builder Footer panel. Go to the Quix > Footer panel clicking the Quix Page Builder from the site administrator panel Left side. Now click on the New Template button, write Footer in the Template Name field, select Footer from the Template Type dropdown.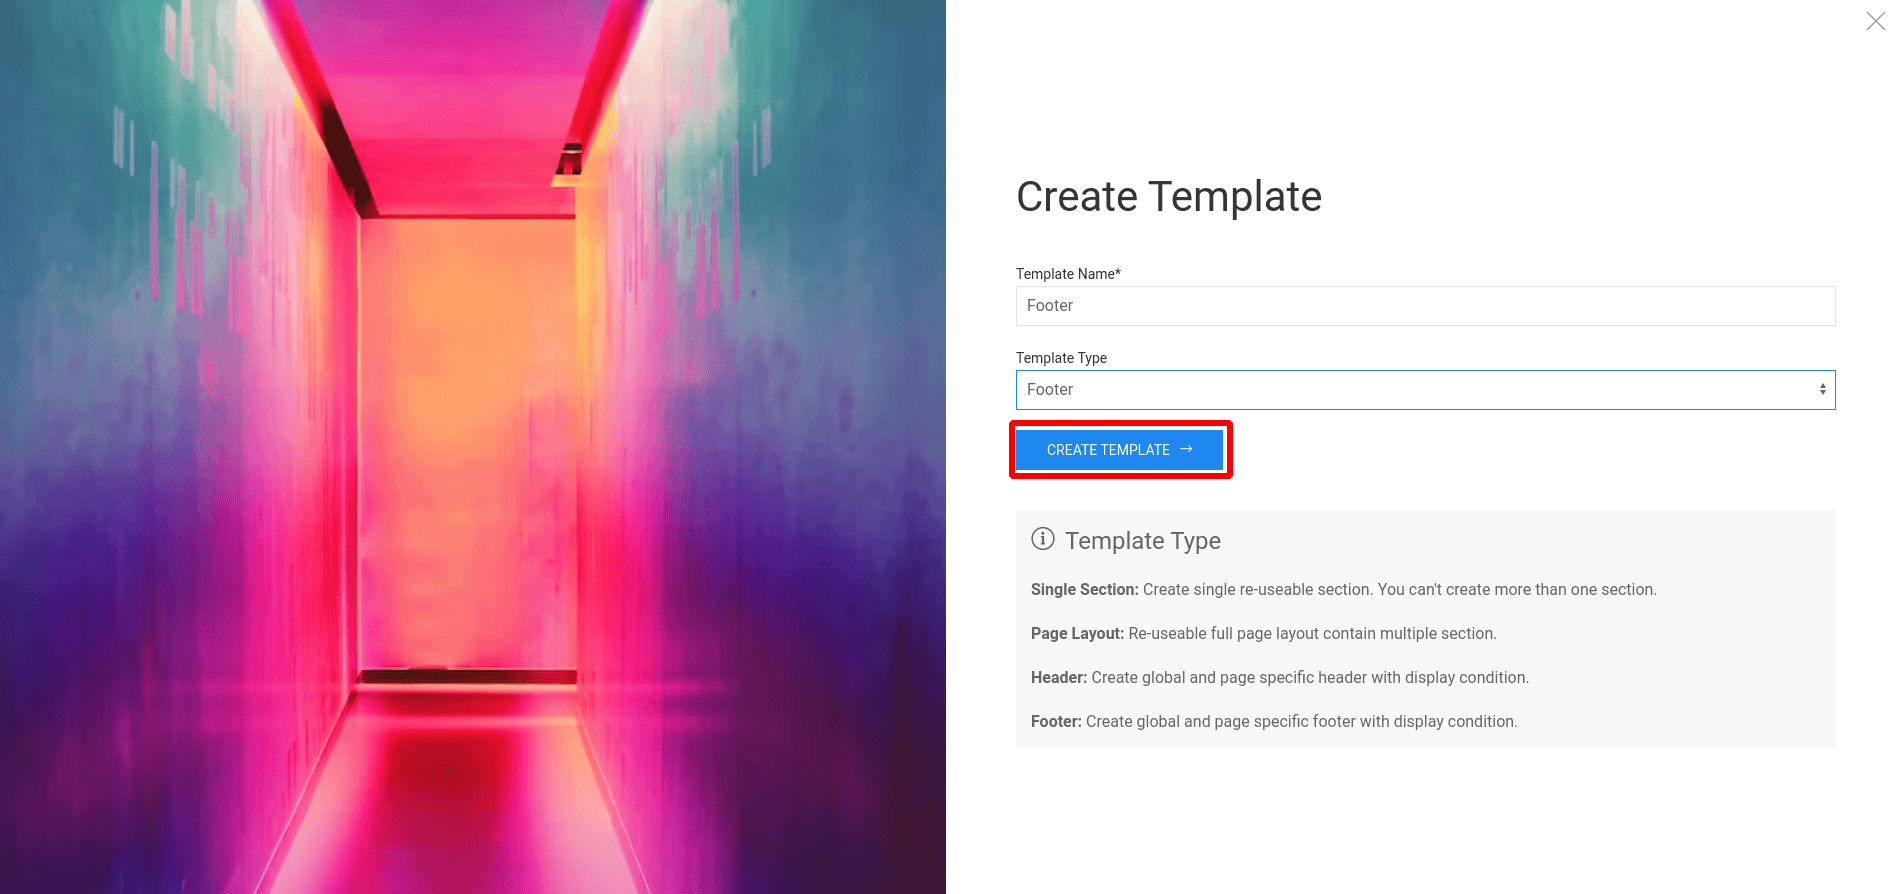
Once created the Footer, click on the Add Template button. Now insert the footer.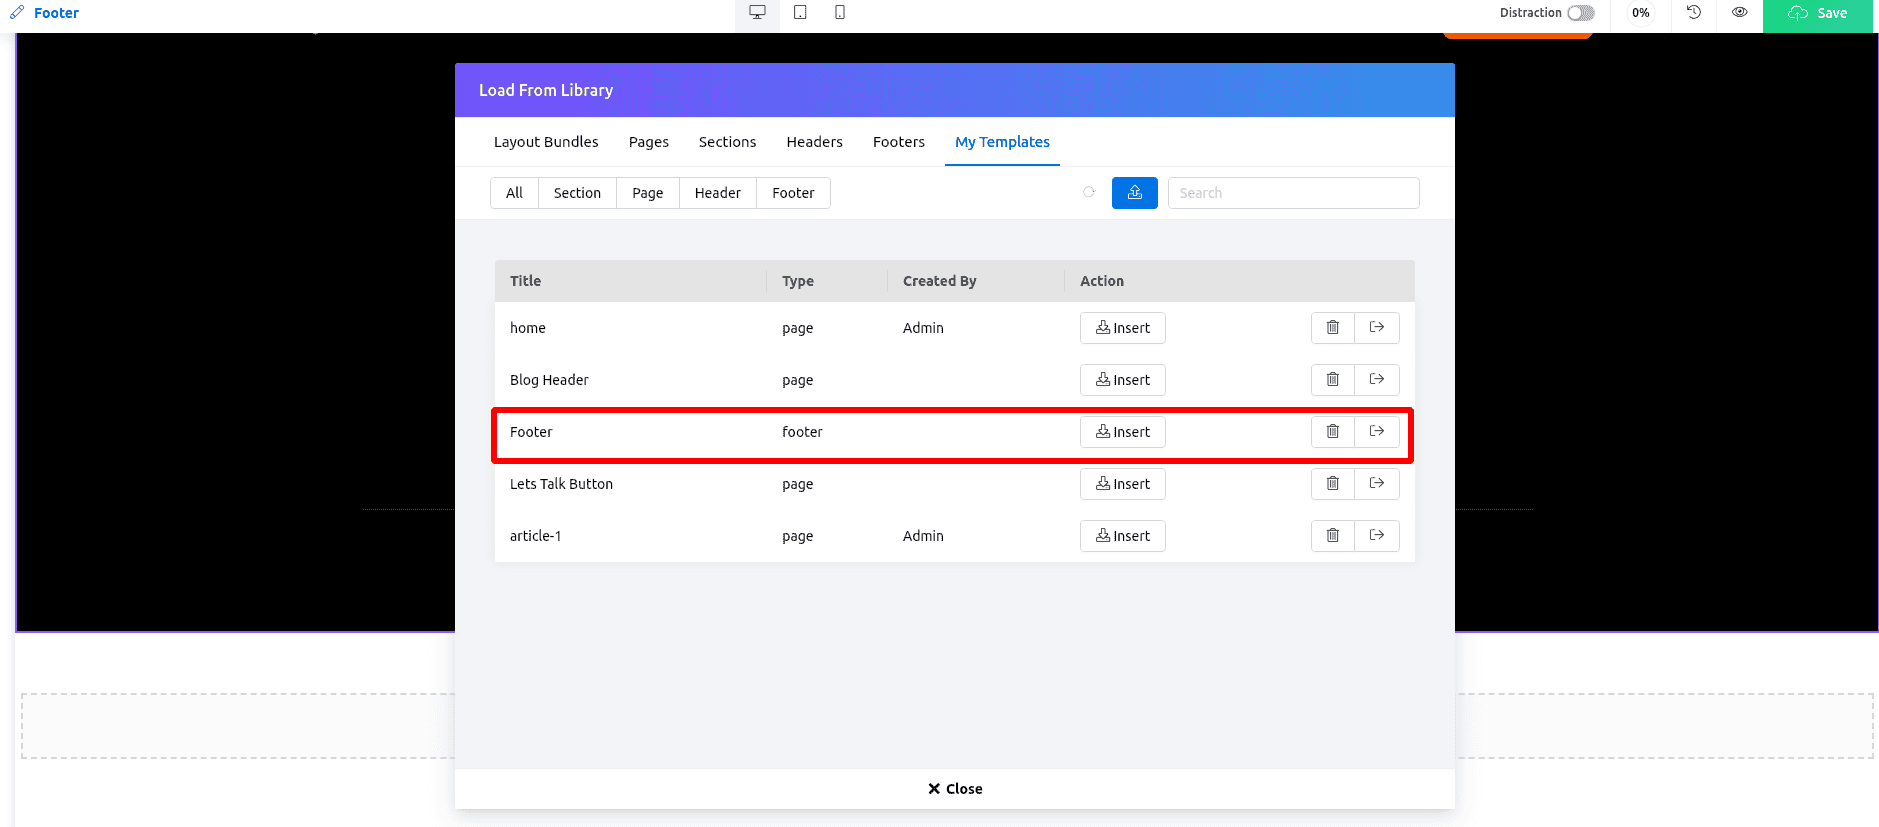
Once the footer is inserted, click on the Save button. There will open the Publish Settings. Click on the Add Condition button, there will open two options Include and Default - Entire Site by default. The Include option will add the footer on the site footer position, and the Default - Entire Site option will allow the footer to show that menu item which you want to visit.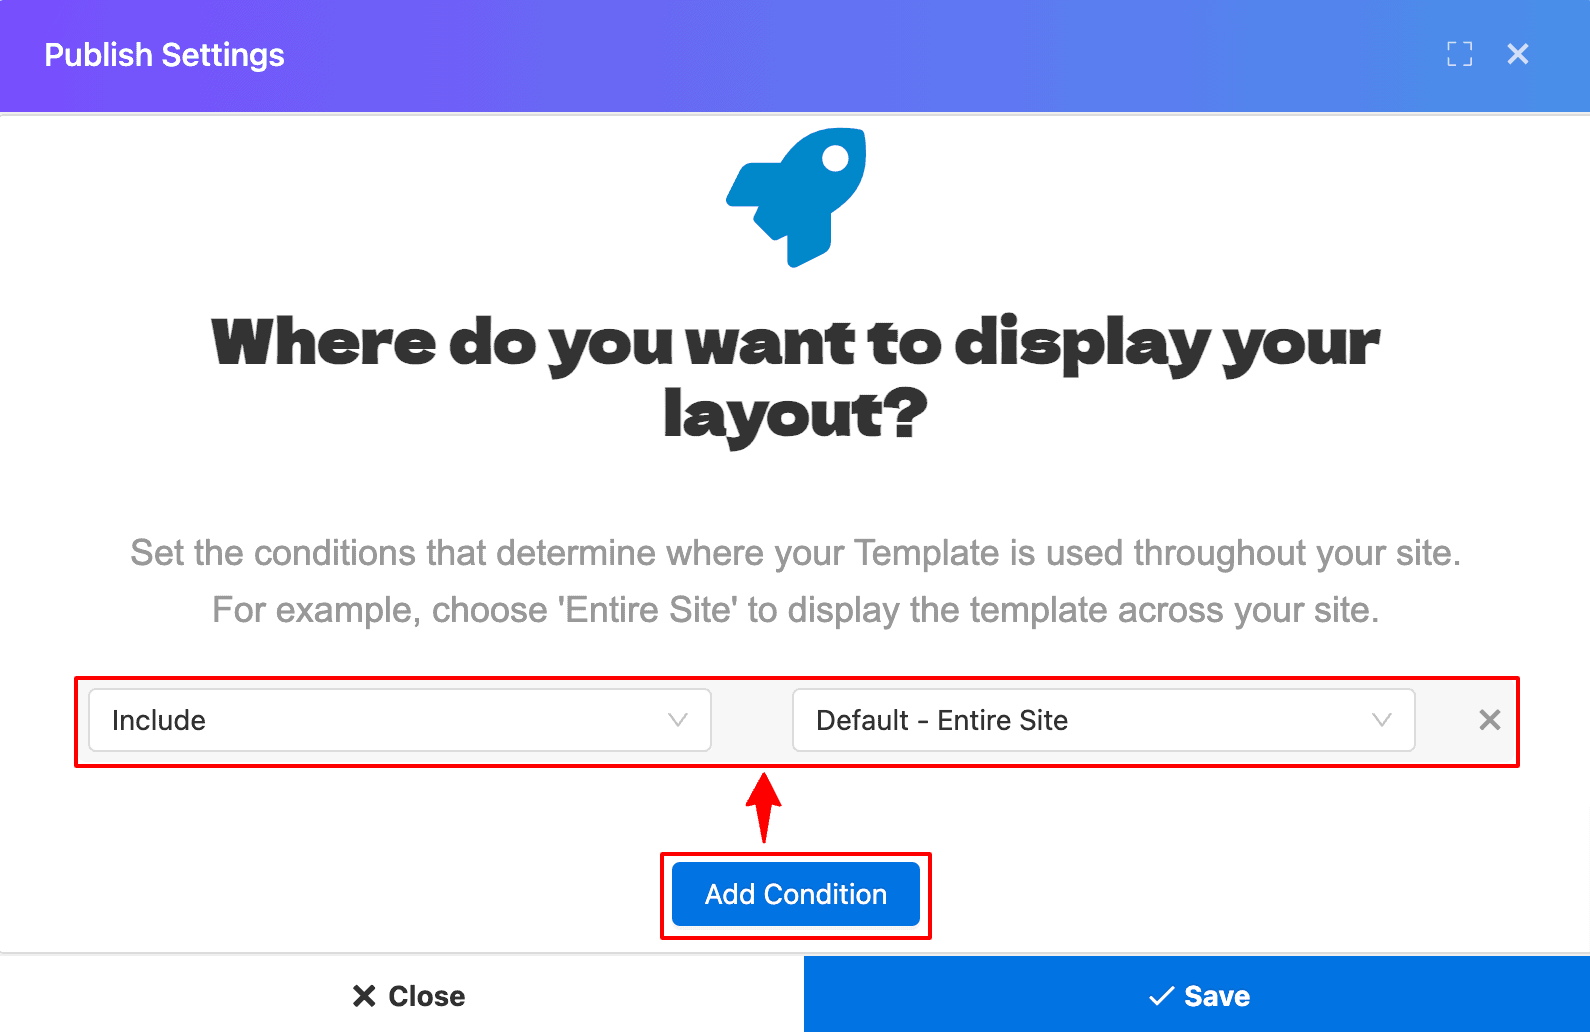
After completing the Publishing settings, click on the Save button again. You will see the footer when you reload the home page.
Activate Quix License
To unlock the full potential of Quix and access all its features, you need to activate the license. Here's a step-by-step guide on how to activate the license (https://www.themexpert.com/docs/quix-builder/how-to-activate-quix-4-license).
Upgrade Instruction
Take a full backup
It's always a good idea to take a full backup before starting any upgrade process. This way, you can avoid losing any important data in case something goes wrong during the process. In the event of any issue, you can restore the backup files and ensure that your data is safe and secure.

Grow rapidly with our Joomla SEO service done by the veterans
With over 12 years of business and a vast array of Joomla templates and extensions, we know Joomla SEO better than anyone you could possiblly hire.
Improve my ranking