Let's pick the very first question most likely arising on your mind having seen the topic- Is that worth to create onepage templates for the marketp...
Let's pick the very first question most likely arising on your mind having seen the topic- Is that worth to create onepage templates for the marketplace?
Before I make any statement regarding this, I want you to have a quick peek at the following statistical information of onepagelove. It's a planet for onepage lovers, and more than a hundred thousands of websites/ templates are there from developers all over the world.
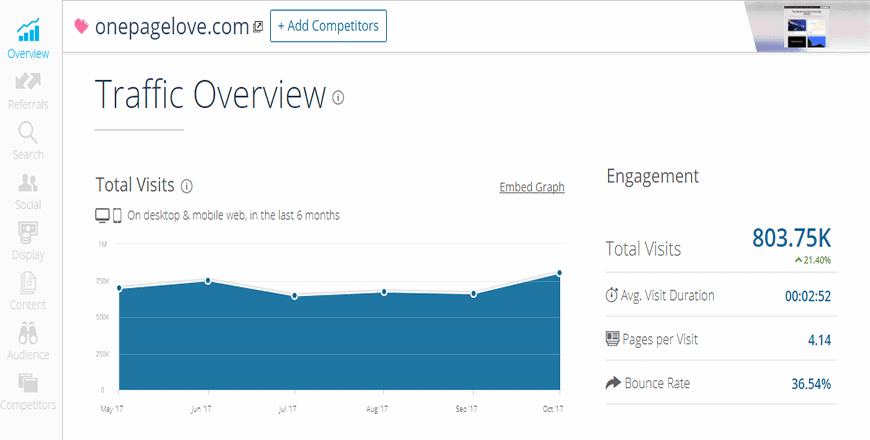
As you can see their traffic overview,- the monthly visitors is estimated 803K, Oh My Gosh!! and each of the template gets more than 2K views every day. It clearly defines people's craze about onepage templates, isn't it?
Now, think of another aspect- Simplicity.
Creating a onepage template is way less troublesome compare to multi-page, and requires less time to be built. Else, performing any modification or changes is easier as it involves just a single page. So, the pressure to deal with various pages having different purposes is no longer exists on a onepage site.
What is Called Onepage Template?
A one-page website is basically a single page that smartly combines all your business information within that page. An onepage website is able to get indexed by search engines way faster than a multi-page template. And you know the most glittering news is? Its popularity is continuously increasing due to its simplicity and usability.
Now, let's talk about some characteristics an onepage website should be present. Like - Marvel Multipurpose onepage Joomla template.
- It should be Minimalistic, Simple and able to hold the user's attention to the most important content.
- Menu navigation assigning each section with individuals - is important but not mandatory though.
- Its entirely easy to update and quick to customize due to having just a single page.
So, for example- have a peek at the following onepage template and think- doesn't it seems to be satisfied all the criteria above?

It's not that- an onepage template isn't allowed to have any other pages in anyways, in fact- EU German Law stays the opposite. It's a mentionable example that defines the exception case for an onepage template.
Impressum and EU German Law
According to EU German Law, every website (both multipage and onepage) should have the additional Impressum page. Impressum is a Latin word and alternately known as Imprint in the USA. It basically legalizes the authorship of the site including all its content.
As per the Law, the following information to be covered on the Impressum page.
- Name of company
- Registered address
- Board of directors
- Contact details and
- Web address
Now, let's begin- how you can easily create onepage templates and sell them on various marketplaces. In this tutorial, I am going to show you creating a onepage template with one of our most popular Joomla templates.
Note that : this lesson is applicable for any of our template, meaning that- you can turn any of our Joomla templates into onepage template, just following the approaches I am going to mention below.
Requirements
The following stuffs you are going to need here.
- T3 Framework
- Joomla page builder - Quix
- Morph Joomla Template (optional but great starting point)
- Akeeba Backup
- singlepagenav.js (for smooth scrolling and onepage navigation system)
Installing Required Stuffs and Let's Begin
Before begin, install all required stuffs mentioned above. You can install T3 Framework,Joomla page builder - Quix, Morph Joomla Template and Akeeba Backup using Joomla Native Installer with its intuitive Drag and Drop Interface. Absolutely no chance to face any trouble.
Step 1 : Creating a new Template
This is the very first step you should do before making any changes, although it's not mandatory. You can else override the existing template but- it's wise to create a new one and make all your required changes in it.
To create a new template, first duplicate an existing template then rename it as you prefer.
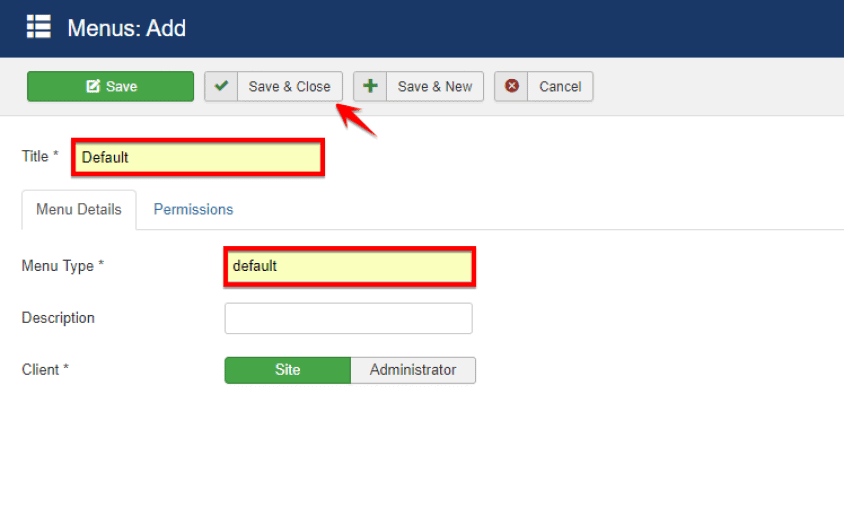
- Go to Extensions> Templates and put check mark on an existing template. Click on the duplicate button at the top.

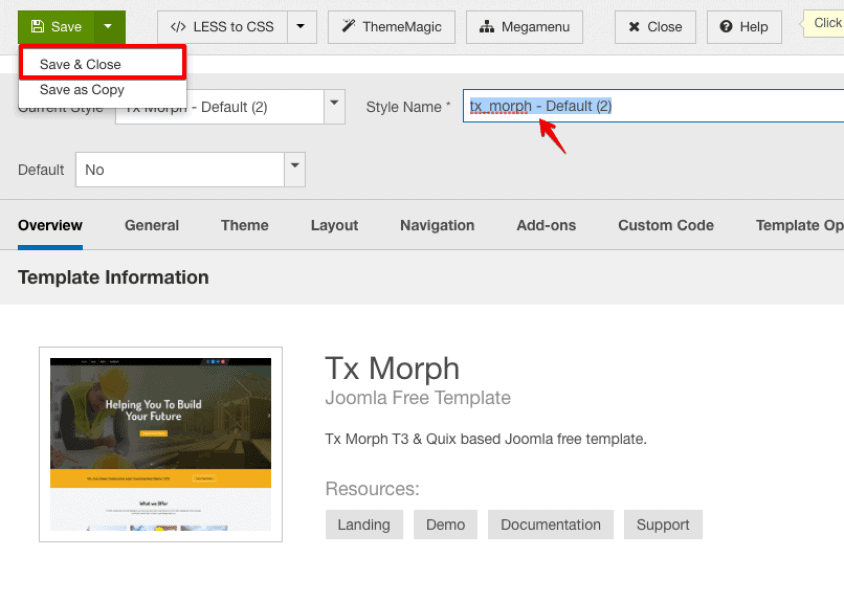
- Put the check mark on the just copied template, click on the Edit button at the top and it will open up the template customization module.
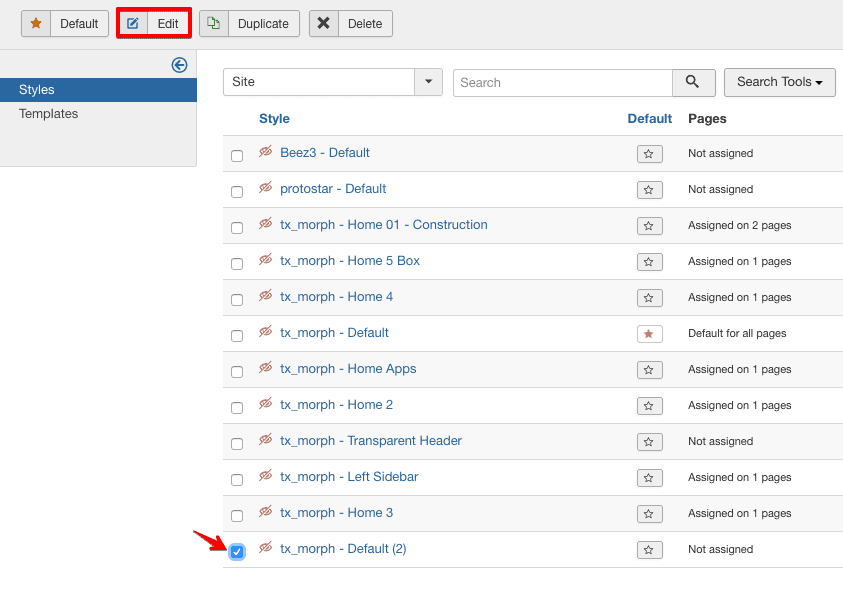
- Rename the Style Name field and give your desired template name here. Click on the Save & Close button from the left-top in order to successfully save your new template.
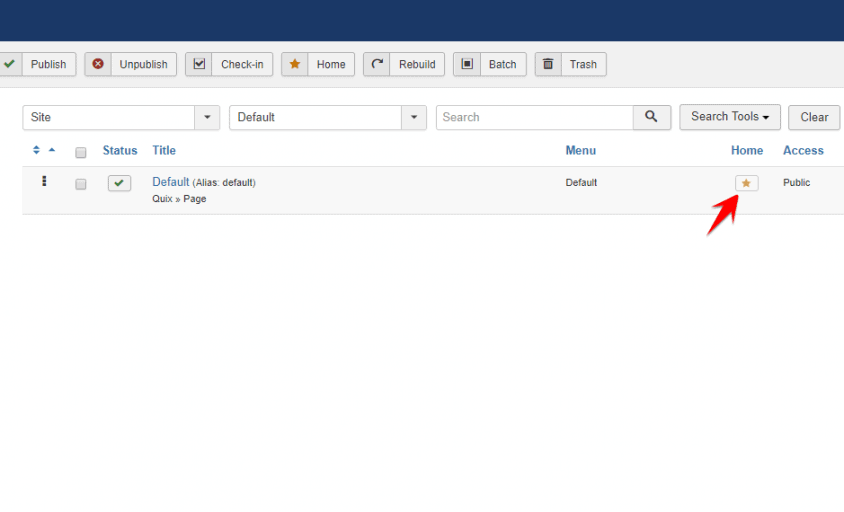
- Now, you are one step behind to proceed. What you need to do is- make your new template as the default template just by clicking on the Star icon as pointed in the screenshot below.

Step 2 : Adding new Sections
Quix lets you the flexibility to create sections, columns, and customize the layout effortlessly. Here- I will not talk about Quix in detail. To explore Quix Customizability, you are always welcome to check our Video Tutorial page.
However, creating new sections is absolutely straightforward.

- Go to Quix > Pages and click on the New button from left-top
- Give a title on the empty title field.
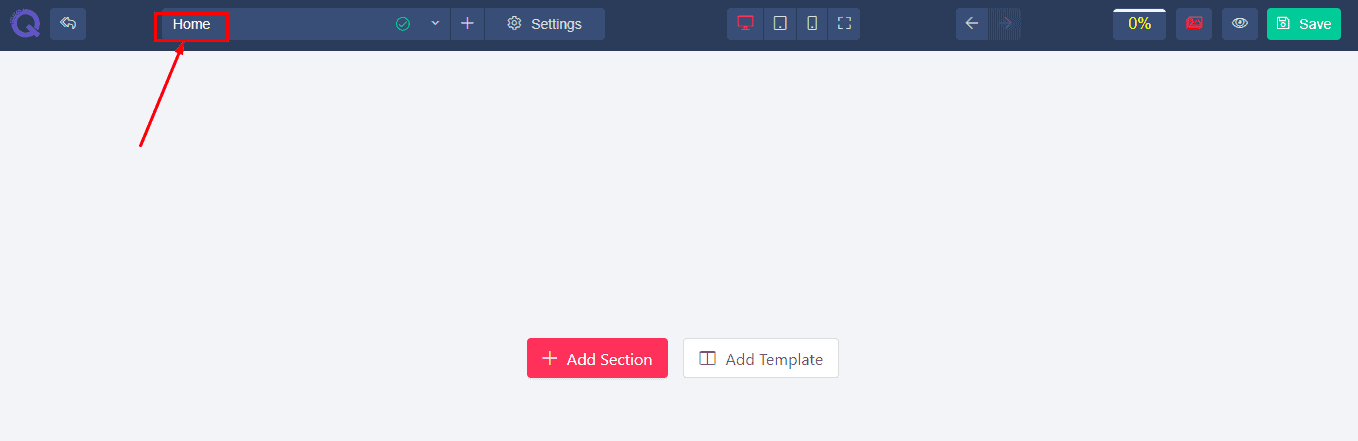
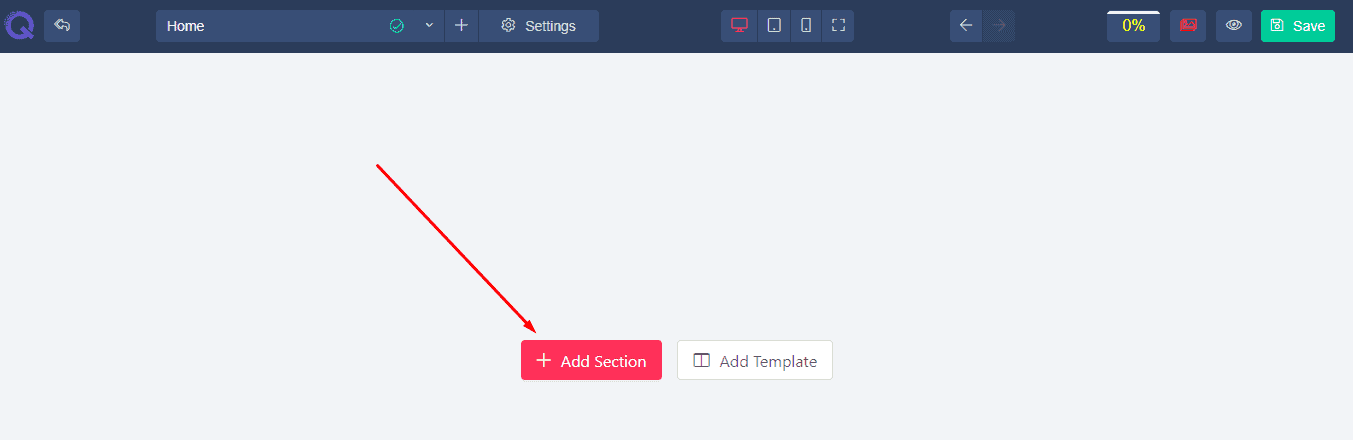
You can either add pre-ready sections from our library or add them manually. If you want to add pre-made Sections, click on the Add Template next to the Add Section button. But if you want to make sections by your own, follow the below steps.
- Let's make some beautiful sections.
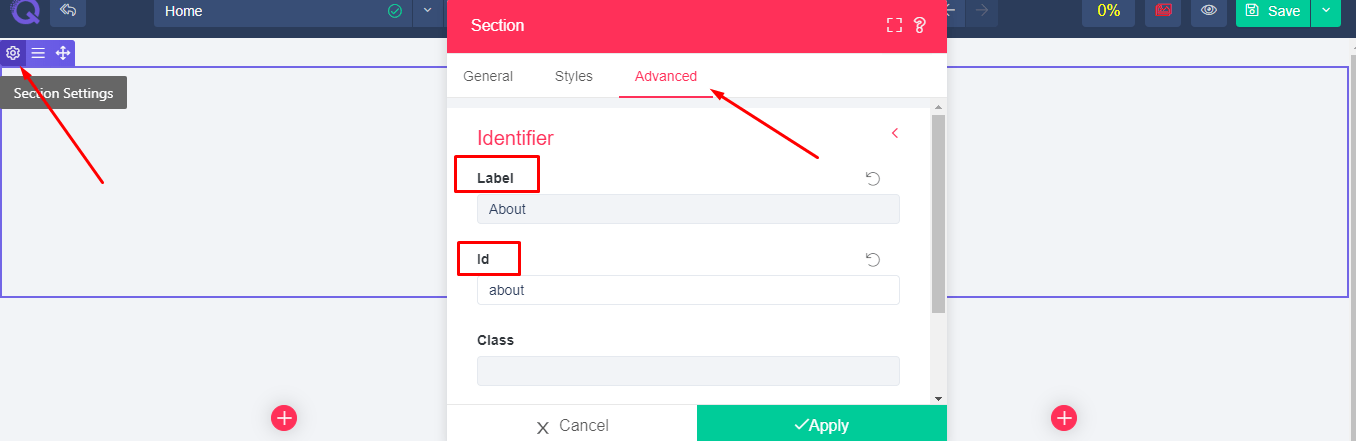
Step 3 : Renaming Section IDs according to Section Name
It is important to rename the section ids- according to the name of the sections. Although it's optional, it ensures the later frequent uses.
- Click on Section Settings. From the advanced tab, modify and put a unique section id in the Id field.
Change all other section ids based on their name accordingly and hit the Save button at the top.
Step 4 : Creating Menus
Now, it's time to create a main menu in order to assign the homepage into then create menu items for each section. Its pretty simple, just to follow the straightforward steps mentioned below. Let's create the main menu first.
- Go to Menus> Manage> Add New Menu
- Give a suitable menu title, define the menu type on the corresponding field and click on Save & Close at the top.
- Click on the newly created Menu and click on New button from the left-top to create menu items.
- Put a title on the Menu Title field,
- Click on the Select button next to the Menu Item Type option and choose Quix> Page
- Click on the Select button next to the Select The Page option and choose the your Homepage- created by Quix a bit earlier.
- Click on Save & Close button at top.
- Click on the Star icon to make it as the default homepage as pointed on the screenshot below.
- Now, let's create the menu items for each sections. Go to Menus> Main Menu and click on the New button at left-top.
- Give the menu title
- Click on the Select button next to the Menu Item Type option and choose System Links > URL
- On the Link field, put # symbol and click on Save & New button at the top to save and create another menu item.
- Create the rest of the menu items (the number of sections you have) similarly.
Step 5 : Assigning each menu with the Corresponding Sections
You have to now assign the created menu items with the corresponding sections. It's beyond simple. But, you need to go back to the Quix page one more time- in order to take a look the section ids. Better- copy or well memorize them since its a must to put the exact section ids on the corresponding menu item's URL fields.
- Now, go to Menus> Main Menu and you can find the list of all menu items here.
- Click on a menu item, on its Link field- put the section id with whom you want to assign the menu item.
Assign the other menu items with the corresponding sections with the same procedure.
Step 6 : Enabling Sticky Header
Although, we're done creating our onepage template still we got a problem. When we scroll down the homepage or jump to a section, we can no more find the navigation menu and are to scroll again to hit another item from the navigation.
This situation can be handled by enabling the sticky header/ navigation menu. No worry, you needn't code for making a sticky header, so we did. You just have to enable, and that's it.
- Go to Extensions > Template and click on the template that is currently set as default.
- Under Template Options, you can find Sticky Header option. Set the option ON and save it.
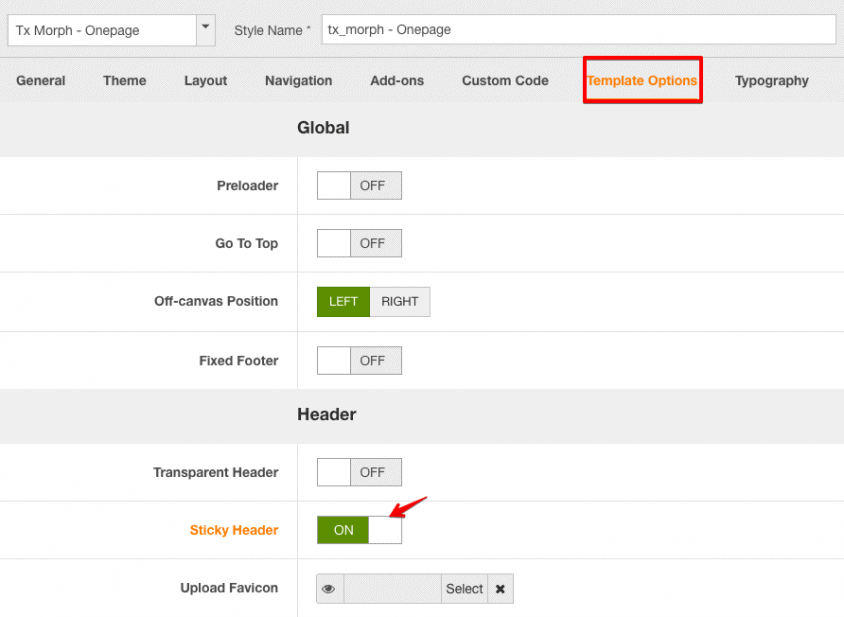
Now you can find a sticky header at the top of the site which allows to jump to your desired section even while you scroll down to any other sections.
Step 7 : Integrating singlepagenav.js (Optional)
You may still feel - the navigation between sections is still not that smooth and it's normal since we haven't yet applied any .js script to make it act so. But, the good news is- making navigation as smooth as you want is just a few second facts.
To do so, you require an additional singlepagenav.js file which can be found on google and absolutely free of cost. Download and rename it as singlepagenav.js and follow the further approach below.
- Go to Extensions> Templates
- Put the checkmark to the currently used template and click on template name under Template column and it will take you to its source files.
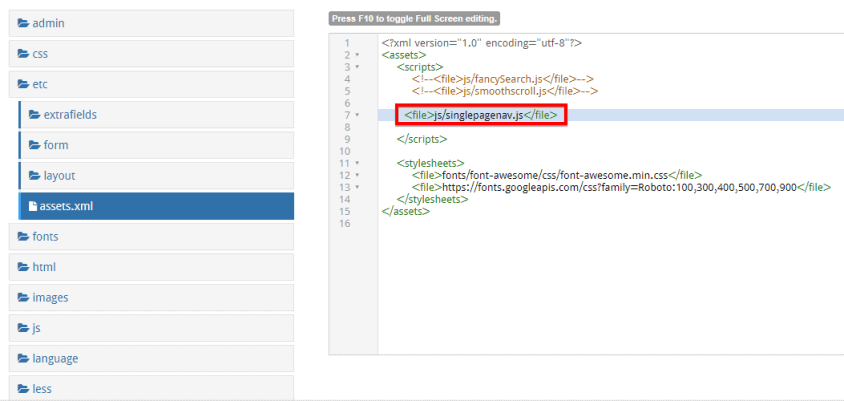
- Click on the etc folder from the list of resource folders at left, and you can find assets.xml file as soon as etc expands.
- Click on the assets.xml file and it will take you to its edit mode.
- Paste the following script between <scripts> and </scripts>
- Now, click on New File button at the top and select the folder js from the list of recourse folder at left.
- Select the singlepagenav.js file using the Choose button and click on the Upload button next to it.
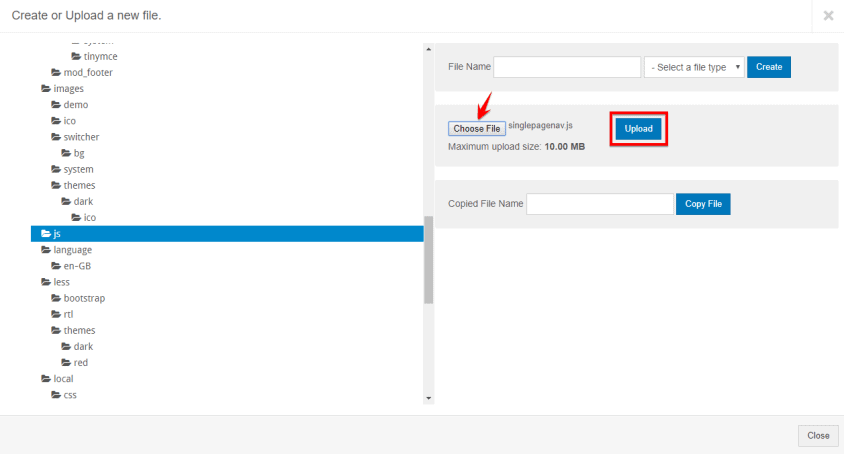
- Save and close the window using Save & Close button.
Step 8 : Exporting QuickStart Package
You're all done creating your desired onepage template, just step behind. You are to create the package file includes all the demo data does have in your onepage template. It allows the users to install your template along with the demo data you put in it.
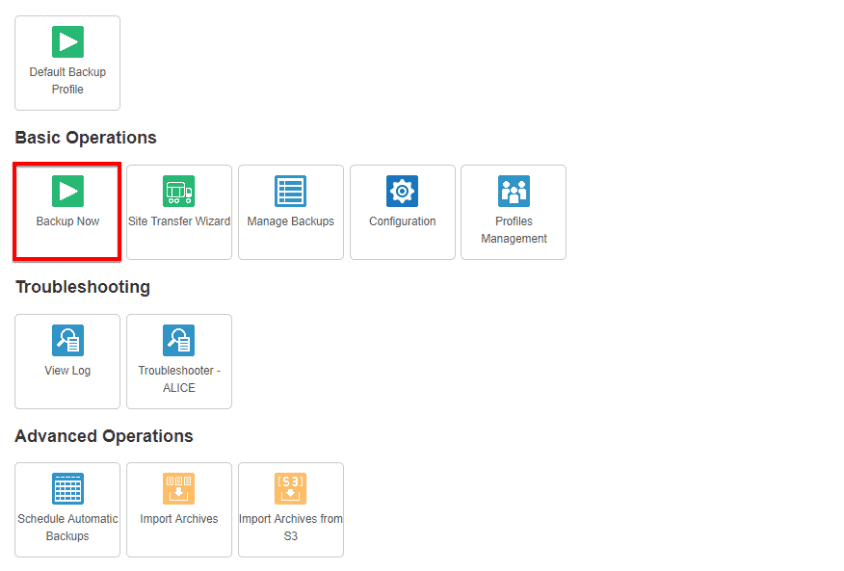
However, preparing QuickStart (template including demo data) package is pretty simple. Akeeba Backup is one of the most popular tool for this purpose. It required to be installed before you start making the QuickStart package. Find the steps below.
- Go to Components> Akeeba Backup and click on Backup Now button.
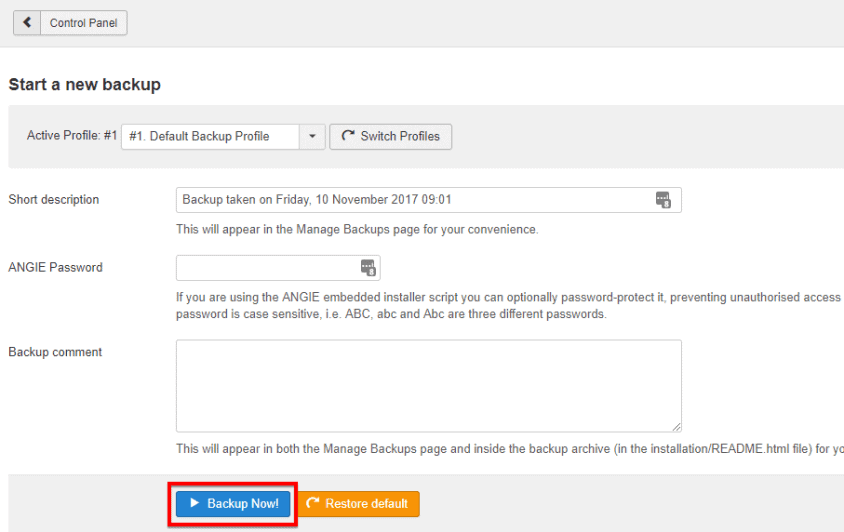
- You'll find another Backup Now button on the next screen. As soon as you click on it, the QuickStart package generating process will begin that takes a few moments depending on the amount of content you've put on your template.
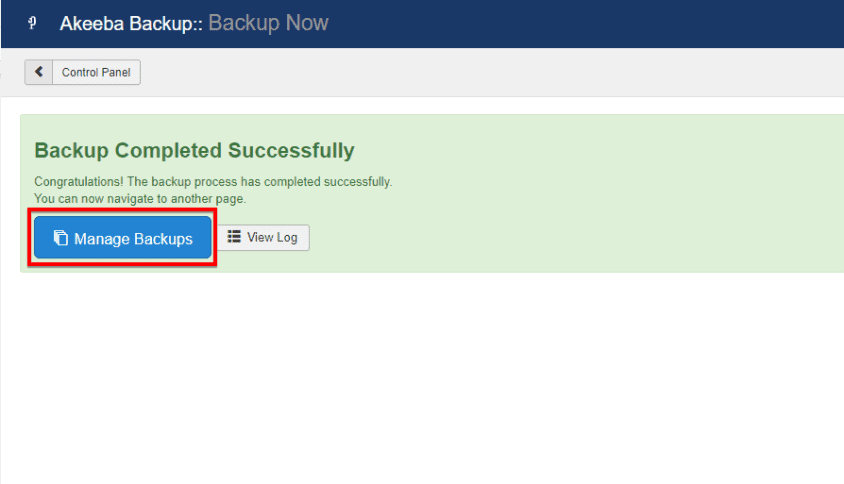
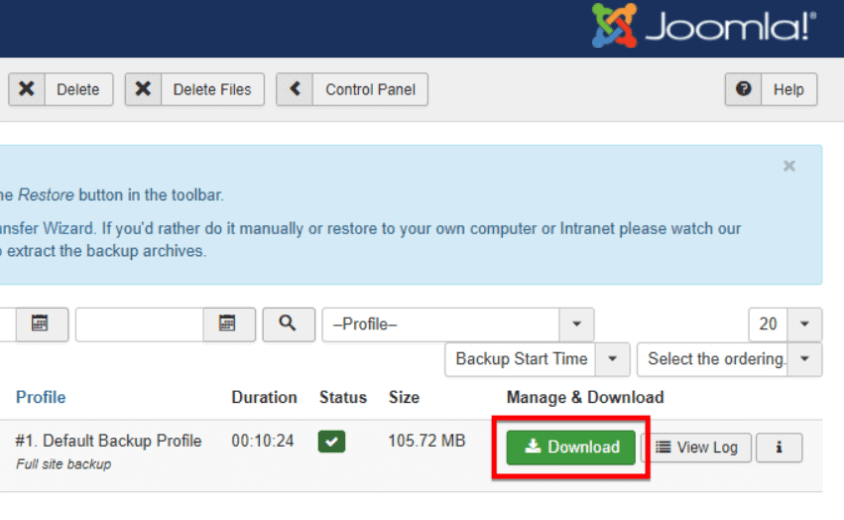
Once the process is done, you would be notified with a successfully completion message. Besides, you can find a Manage Backup button within the same window. Now, what you have to do is to- download the backed-up file and rename as QuickStart.zip or as you prefer.
- Click on the Manage Backup button
- Click on the Download button and it will let you download the backed-up file which is literally the QuickStart package. After the download is done, rename it as you prefer and you're done.
Front-end Appearance
Preparing for Marketplace
Now, you are ready to submit your onepage template on a marketplace to sell. But, you might have concerned about- every marketplace has some prerequisites to submit a product. Well, don't get panic; I'm here to guide you through the entire process step by step for Envato marketplace. But, before going through the process, let's have a look on the requirements for themeforest.
Requirements (Themeforest)
- Package File
- Preview Image
- Thumbnail Image
- Presentation Copy
- Live Demo Link
Step 1 : Creating the package file
To create the template package file-
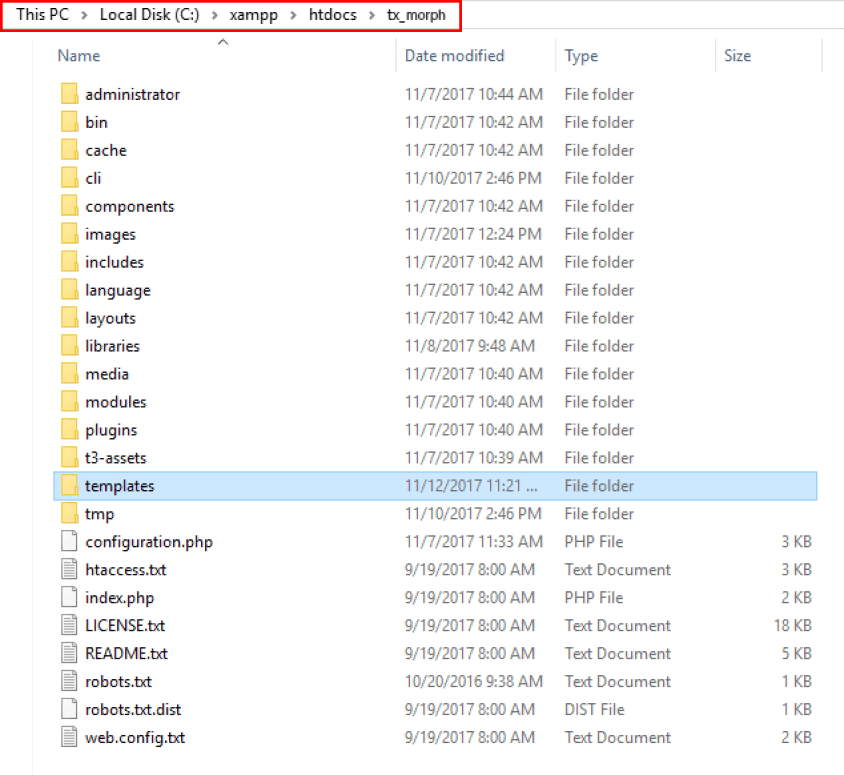
- Go to your template installation directory
- Double Click on your template and inside your template folder- find a folder named templates
- Right click on tx_morph and select Send to > Compressed (zipped) folder
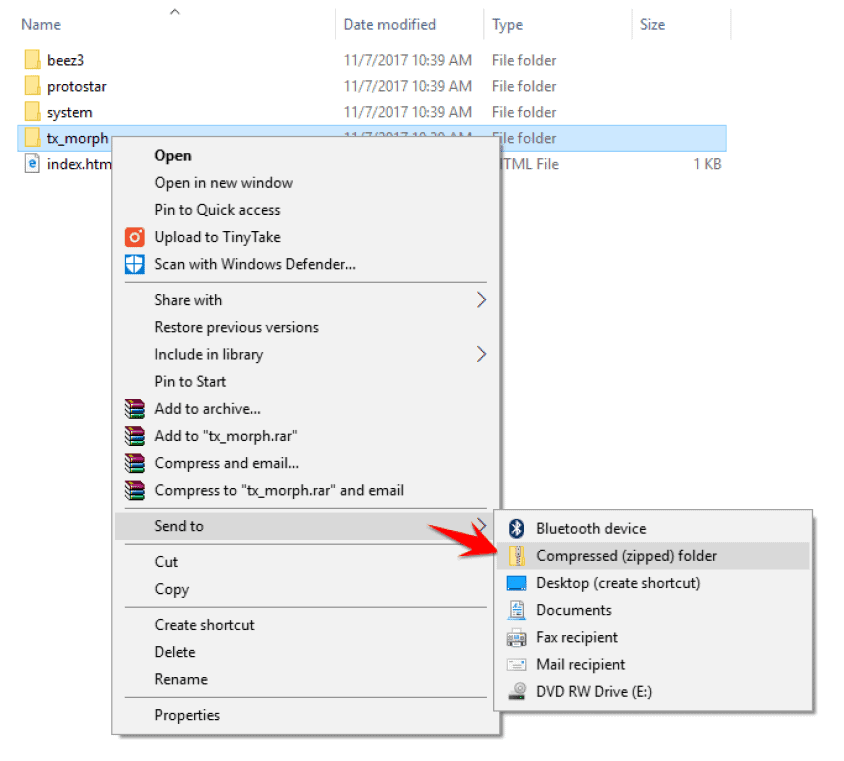
This may take 2 or 3 seconds at best, and the process is done means you have the theme package on your hand to submit.
Step 2 : Create an account and Submit
Congrats! You're about to finish, just one step behind. If you have an existing Envato account- sign in or create a new Envato account. After logged in-
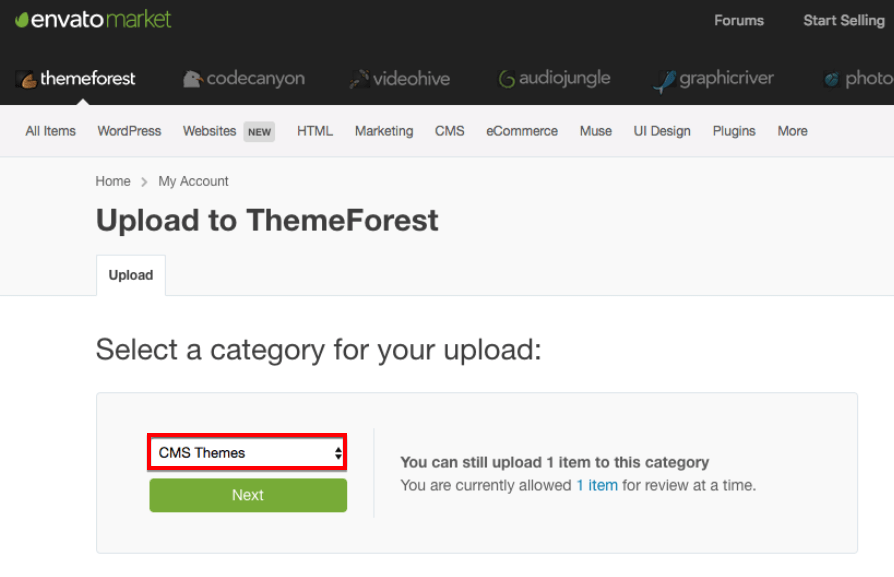
- Go to Dashboard> Upload and select CMS Themes from the dropdown and hit the Next button.
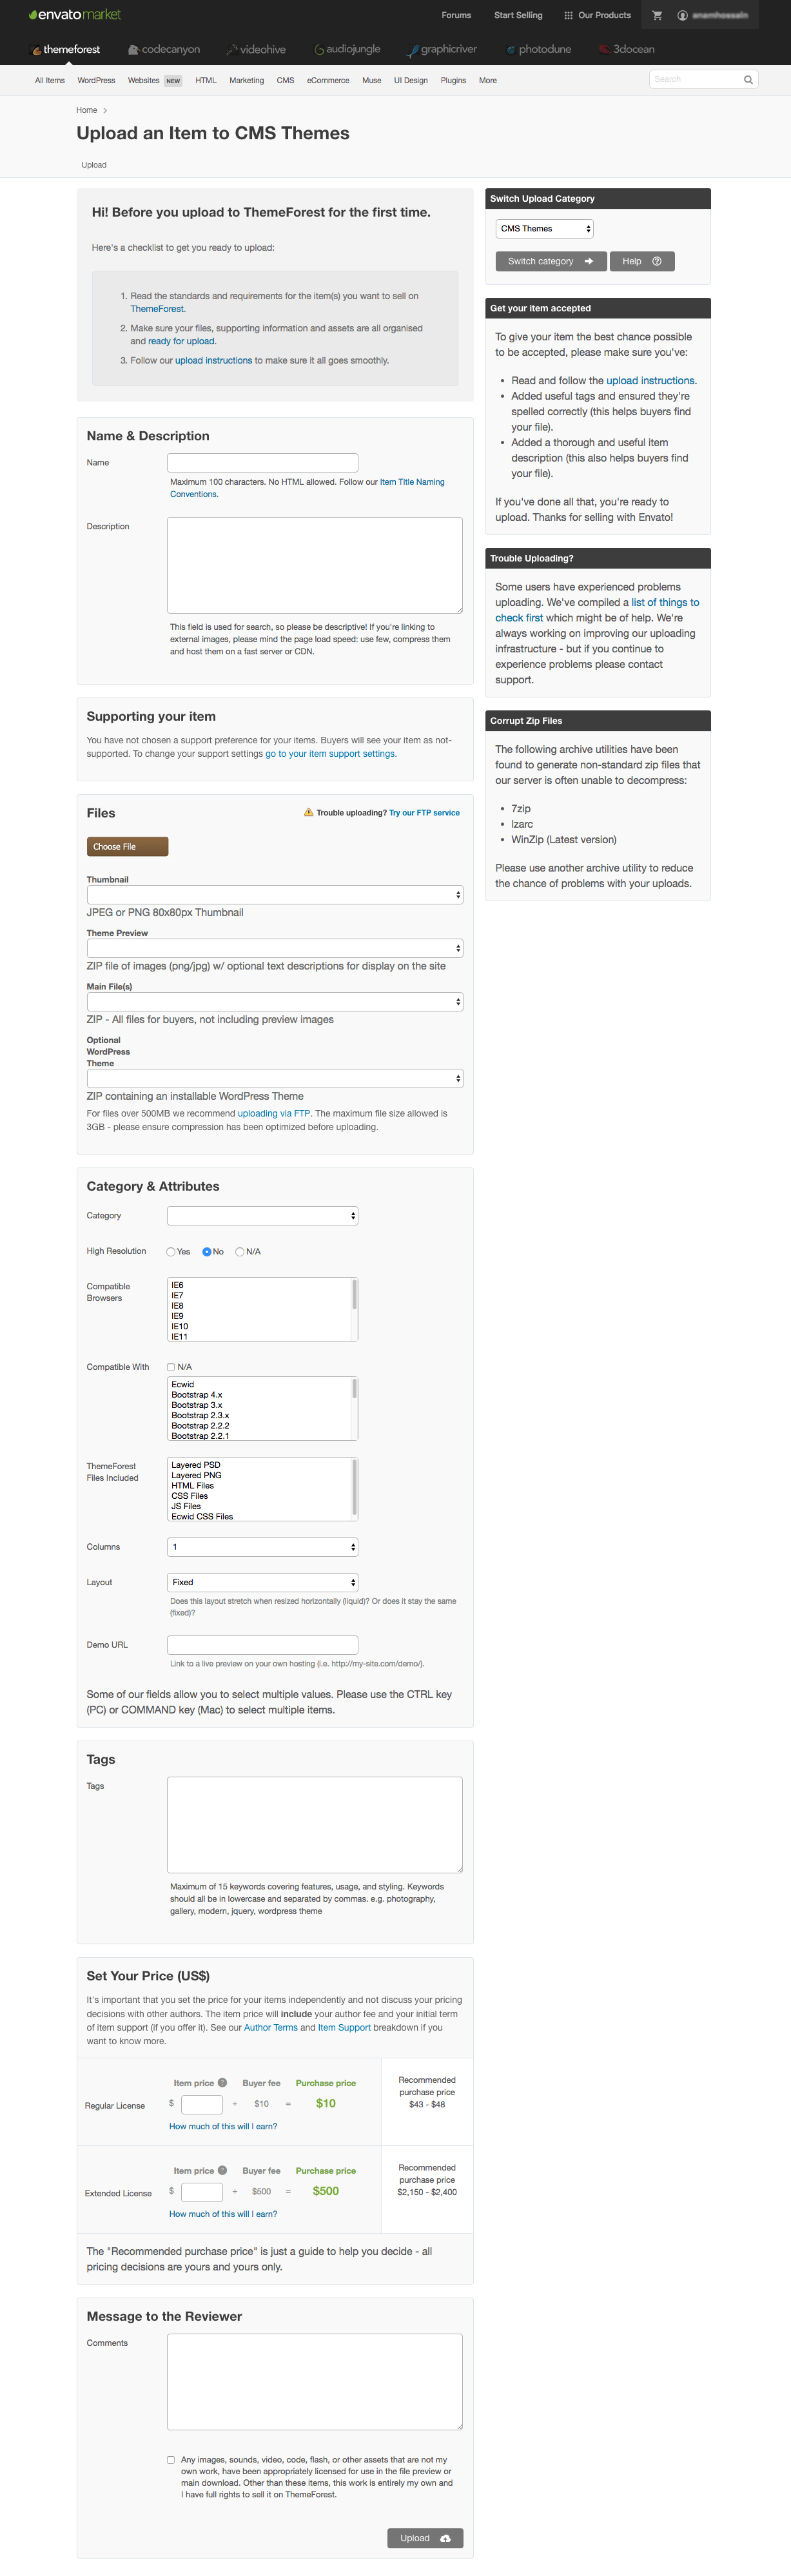
Put all the information according to your template and, click on the Upload button at bottom-right. That's all you have to do.
Conclusion
Once you're done submitting, wait few days for further feedback. They will thoroughly go through your template including the presentation copy and other documents you attached with the template in order to ensure- there is no issue exists. At the same time, they will make you concern if any changing is needed.
This process depends on how many tasks they usually handle a day, and how many are currently on their hand. So, keep patient waiting for the review. Happy Earning. :-)