Gamez
Gamez is one of our most trendy Gaming WordPress theme with huge gorgeous homepage variations that can surely make your site more attractive than ever before. Drag and Drop page builder makes your tasks easier.
Key Features
- Fully Responsive
- Fast Loading
- One Click Demo Import
- Stunning Layout
- Multiple Attractive Home Variations
- Huge Built-in Pages
- SEO Optimized
- RTL Supports
- Dynamic Navigation Menu
- Smooth Collapsing Transaction
- Quick Social Sharing
- Multiple Social Commenting
- Revolution Slider and Carousel
- Best fit for Gaming and Movie site
- Drag and Drop page builder
- Color Variations
- Sticky Headers
- Eye-catching Slider
Requirements
In order to run Gamez smoothly on your server, you need to fulfill this requirement listed below:
- Wordpress: 3.9+
Download
Head over to Gamez download page on www.themeforest.net then download the GamezPackage.zip file. In this .zip file, you have everything you need.
Installation
Installing WordPress
To install this theme, you must have a working version of WordPress already installed on your server. If you need help installing WordPress, go through the link and follow the instructions: Installing WordPress
Installing Theme
There are a couple of simple steps to install Gamez theme on your server. Its quite straightforward.
If you are starting from the scratch, we recommend you to follow the installation guide below to install with the pre-built existing demo data. This is the simplest way to get started.
On the other hand, if you already have an existing WordPress site and want to apply Gamez theme, in that case, you just need to install the following package:
- gamez.zip
You can find this package inside the downloaded .zip file of Gamez theme. So, before getting started with the installing process, Extract the .zip file and you'll find the desire gamez.zip in the Theme folder after the extraction.
- Log in to the WordPress Administration Panels.
- Now, go to
Appearance> Themes> Add New> Upload Themethen click on the Choose File button then select the gamez.zip file and hit upload. - After installation being done, roll over to
Appearance> Themes. - Find just uploaded theme on the Theme Thumbnail area.
- Click the Activate button below to the theme's thumbnail, to set it as default.
Do not forget to Activate the theme as default after installation process successfully been done.
To know more, visit WordPress Codex
Active Required Plugins
There are four plugins, required for Gamez theme to work properly. Those are listed below:
- Gamez Core: theme core functionality (CPTs and shortcodes).
- Visual Composer: combine pages with flexible grid and shortcodes.
- WooCommerce: For selling Posters, Game Characters, T-Shirt etc.
- Slider Revolution: For amazing sliders.
- Contact Form 7 (optional). We recommend this for the contact form.
Before activating those plugins, you have to install them manually. To do so,
- Go to
Appearance> Install Plugins - Select those required plugins.
- From the drop-down menu, select Install and click on Apply.
After plugins installation been completed, to activate those required plugins, simply go to Plugins
- Select all those four required plugins.
You can use the search module to find the desired plugins. The search box can be found on the right-top side of the module.
- Select Activate from the drop-down menu just above the list of plugins.
- Click to the Apply button next to the drop-down box and you are done.
To know more about the installation process of plugins, visit here: WordPress Codex
If there is any problem with automatical plugin installation, install them manually. You can find plugin bundle in your theme's /lib/plugins subdirectory. WooCommerce and Contact Form 7 can be found in WordPress plugins repository, install them through Plugins Screen
Import Gamez Demo Data
- Log in to the WordPress Administration Panels.
- Go to
Appearance> Import Demo Data
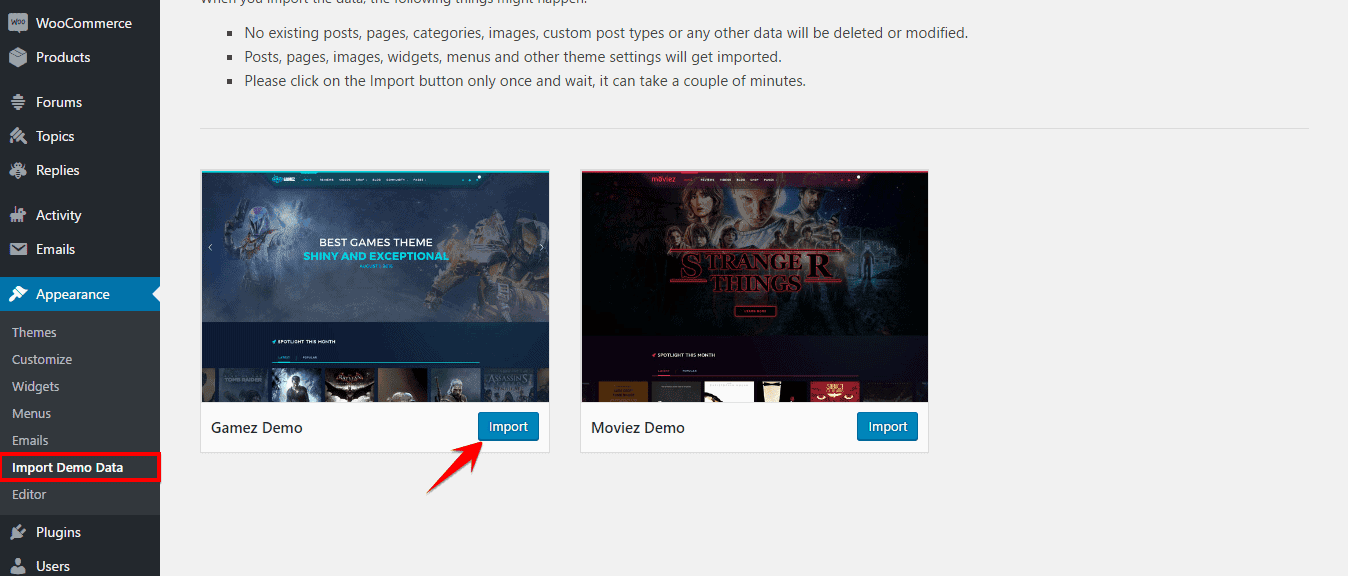
You'll find two previews on the screen.
- Click on the Import button right-bottom of the Gamez preview.
- Click on Yes, Import to confirm importing and you are done.
Import Moviez Demo Data
- Log in to the WordPress Administration Panels.
- Go to
Appearance> Import Demo Data
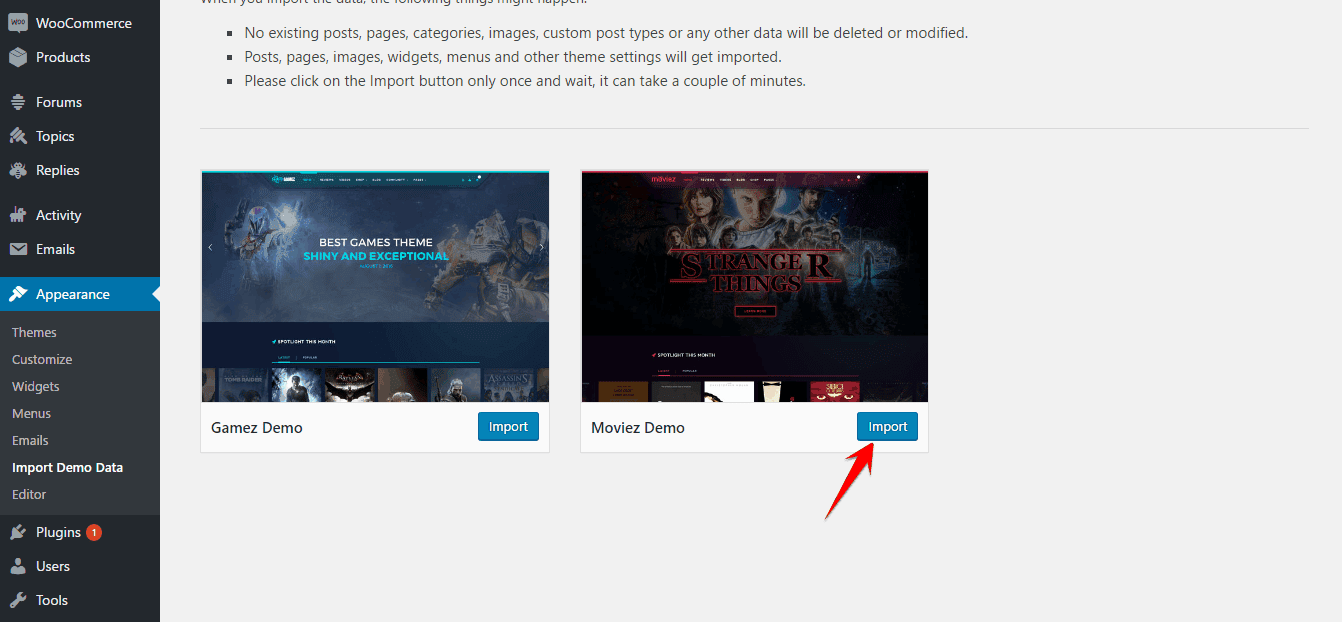
You'll find two previews on the screen.
- Click on the Import button right-bottom of the Moviez preview.
- Click on Yes, Import to confirm importing and you are done.
Import Demo Data Manually
You can import demo data manually with the following procedures.
- Log in to the WordPress Administration Panels.
- Go to
Tools> Import - Select the WordPress from the list. It can be found at the bottom of the list of plugins, normally.
- Install the WordPress Importer plugin, if you haven't installed it yet.
- After being installed, click on Run Importer to open the module.
It allows you to select the demo data file from your local drive and upload into your server.
- Now, click on Choose File. Once you click on it, it prompts up a screen, allowing you to select the demo data file from your local drive.
- Choose the content-gamez.xml file for configuring Gaming site and content-moviez.xml for configuring movie site, then click Upload file and import.
Demo data files can be found in Demo folder after you extract the theme package.
- On the second screen, set up an author and don't forget to check the Download and import file attachments. After making sure it is checked in, click on Submit button.
You can also import widget setting via this widget Importer Plugin
Widget setting file can be found in Demo folder after you extract the theme package and the path should be
/Demo/widget.wie.
Theme Settings
You can differently customize theme according to your need using Easy Customization feature.
- Click on Gamez at left-bottom corner of the module screen to open up Theme Setting panel.
General Settings

- Select Theme Color : Choose a color preview to be applied as the theme's primary color.
- Logo : Upload your site logo for branding.
- Enable Nicescroll? : Allows you to enable or disable the nice scrolling feature.
- Enable Preloader? : You can enable preloader with this feature.
- Enable Breadcrumb? : Allows you the control over enabling or disabling breadcrumb for your site.
- Social Icons : Allows you to enable social icon appearing on your site. Enable this option first, then empty text boxes will appear next to corresponding social site label. You just need to provide your individual social profile link on the specific text box and you are done configuring the social icon for your site.
Header Settings

- Select Header Variation : Select the header variation from the right side preview.
- Sticky Menu : Allows you to enable or disable sticky menu for your site.
- Review Header Background : Upload header background image for review list page.
- Video Gallery Header Background : Upload header background image for video gallery list page.
- Search Page Header Background : Upload header background image for the search page.
- Buddypress Header Background : Upload header background image for BuddyPress activity page.
Theme Style

- Custom Style : To enable this option, allows you to huge customize over theme styling.
- Header Primary Color : Allows your to set header primary color.
- Header Link Color : Allows your to set header Link color including Regular color, Hover color, and Active color as well.
- Menu Color : Allows your to set Menu color including Regular color, Hover color, and Active color as well.
- Top Menu Color : Allows your to set Top Menu color including Regular color, Hover color, and Active color as well.
- Body Primary Color : Allows your to set a primary color for the body.
- Body Link Color : Allows your to set Body Link color including Regular color, Hover color and Active color as well.
- Footer Primary Color : Allows your to set footer primary color.
- Footer Link Color : Allows your to set Footer Link Color including Regular color, Hover color and Active color as well.
Those above seven settings can be found only if you enable the Custom Style feature.
- Custom CSS : Write custom CSS code here.
- Custom JS : Write custom JS code here.
Typography Settings

- Custom Typography : This option allows you to use thousands of google fonts in different sections in your site. First, enable this to get the customization settings to appear.
- Select Header Font and Style : Allows you to select a font style and font type for the header section.
- Select BodyFont and Style : Allows you to select a font style for the body.
- Select FooterFont and Style : Allows you to select a font style and font type for the footer section.
- H1 Font Size : Choose a font size for the H1 texts.
- H2 Font Size : Choose a font size for the H2 texts.
- H3 Font Size : Choose a font size for the H3 texts.
- H4 Font Size : Choose a font size for the H4 texts.
- H5 Font Size : Choose a font size for the H5 texts.
- H6 Font Size : Choose a font size for the H6 texts.
- P Font Size : Choose a font size for the Paragraph texts.
Layout Settings

- Default Shop Column : Select number of columns to show in your site's shop module.
- 404 Page Background : Upload an background image for the 404 page.
Sidebar Settings

- Default Blog Sidebar Position : Set the default sidebar position for the blog. You can either choose Left or Right position from the drop-down menu.
- Default Shop Sidebar Position : Set the default sidebar position for the shop. You can either choose Left or Right position from the drop-down menu.
If you don't wanna show the sidebar on blog or shop, select No from the drop-down menu.
Permalink Settings
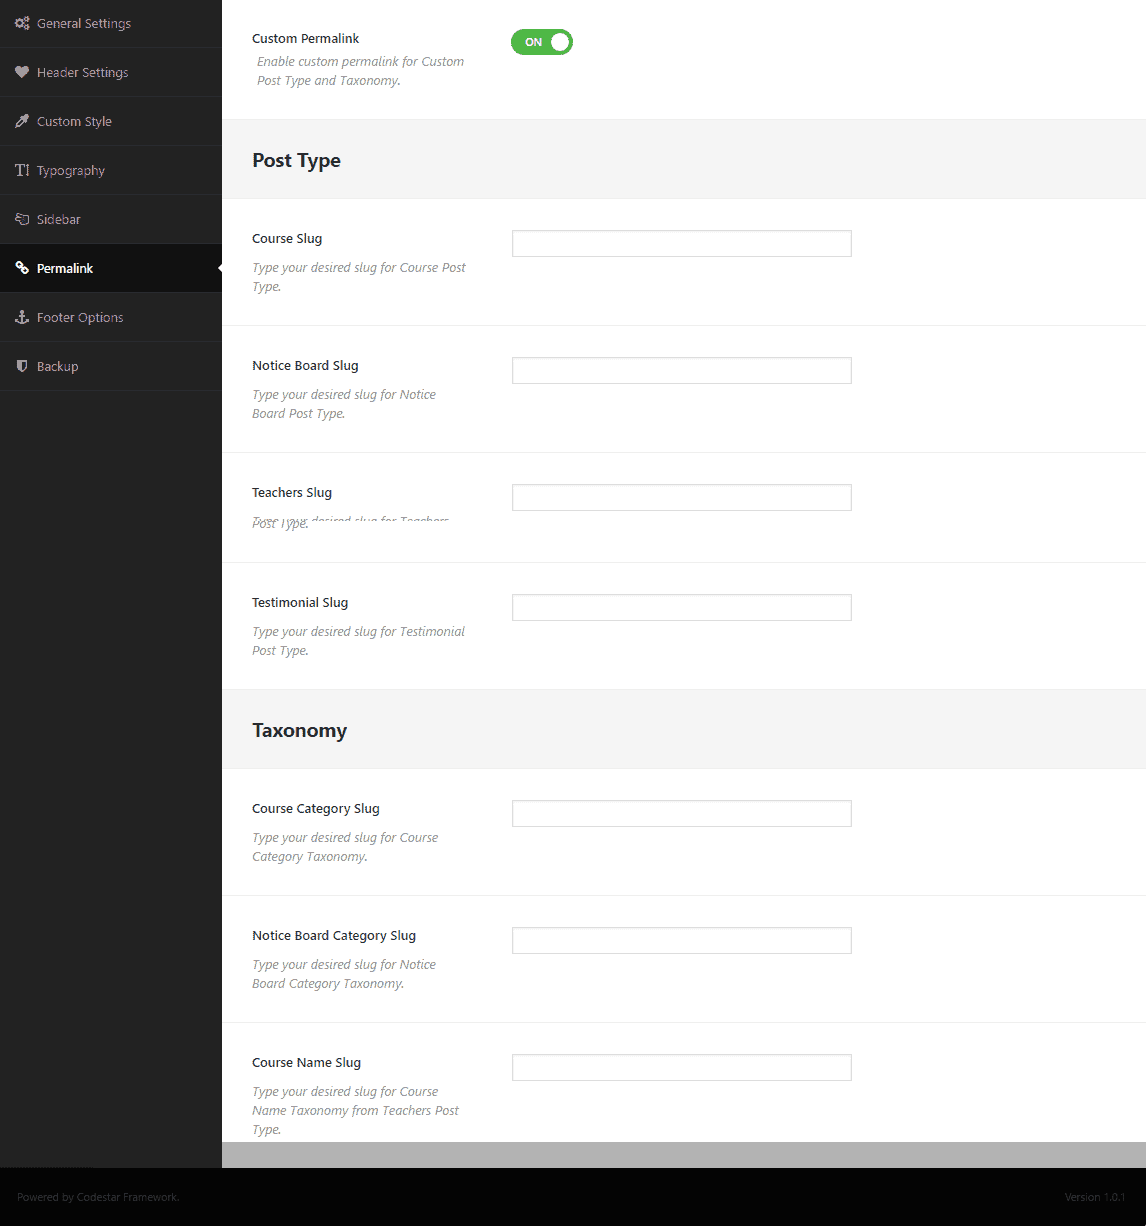
- Custom Permalink : To enable this feature allows you to customize permalink according to your needs.
Post Type
- Course Slug : Write your desired custom slug for the Course Post Type in the empty text box next to this option.
- Notice Board Slug : Write your desired custom slug for the Notice Board Post Type in the empty text box next to this option.
- Teachers Slug : Write your desired custom slug for the Teachers Post Type in the empty text box next to this option.
- Testimonial Slug : Write your desired custom slug for the Testimonial Post Type in the empty text box next to this option.
Taxonomy
- Course Category Slug : Write your desired custom slug for the Course Category Taxonomy in the empty text box next to this option.
- Notice Board Category Slug : Write your desired custom slug for the Notice Board Category Taxonomy in the empty text box next to this option.
- Course Name Slug : Write your desired custom slug for the Course Name Taxonomy in the empty text box next to this option.
After you generate your own preferred custom slug, its IMPORTANT to go to
Settingsmodule from the left sidebar and click on Save Changes button in the bottom-left corner.
Footer Option

- Footer Column : Define the number of columns you need in your site footer.
- Footer Variation : Select footer variation from the drop-down menu.
- Footer Logo : You can upload footer logo with this option.
- Custom Background : Choose a footer background color.
- Copyright Text : Write your copyright text here.
- ThemeXpert Credit : Keep it enabled if you want to give us credit. You can disable this option either.
Backup Settings

- Import and Backup : This button allows you to import a backup theme. Just to paste the backed up string on the empty text box and then click this button.
- Import and Download Backup : With this button, you can make a backup of your current theme.
How To's
Setup Gamez Homepage
- Go to
Settings > Reading - Select A Static page on Front page displays option.
- Choose Home from the Front-page drop-down menu.

- Select Blog from the Post page drop-down menu.(optional)
- Use the left-bottom Save Changes button to save the settings.
Setup Moviez Homepage
- Go to
Settings > Reading - Select A Static page on Front page displays option.
- Choose Moviez from the Front-page drop-down menu.
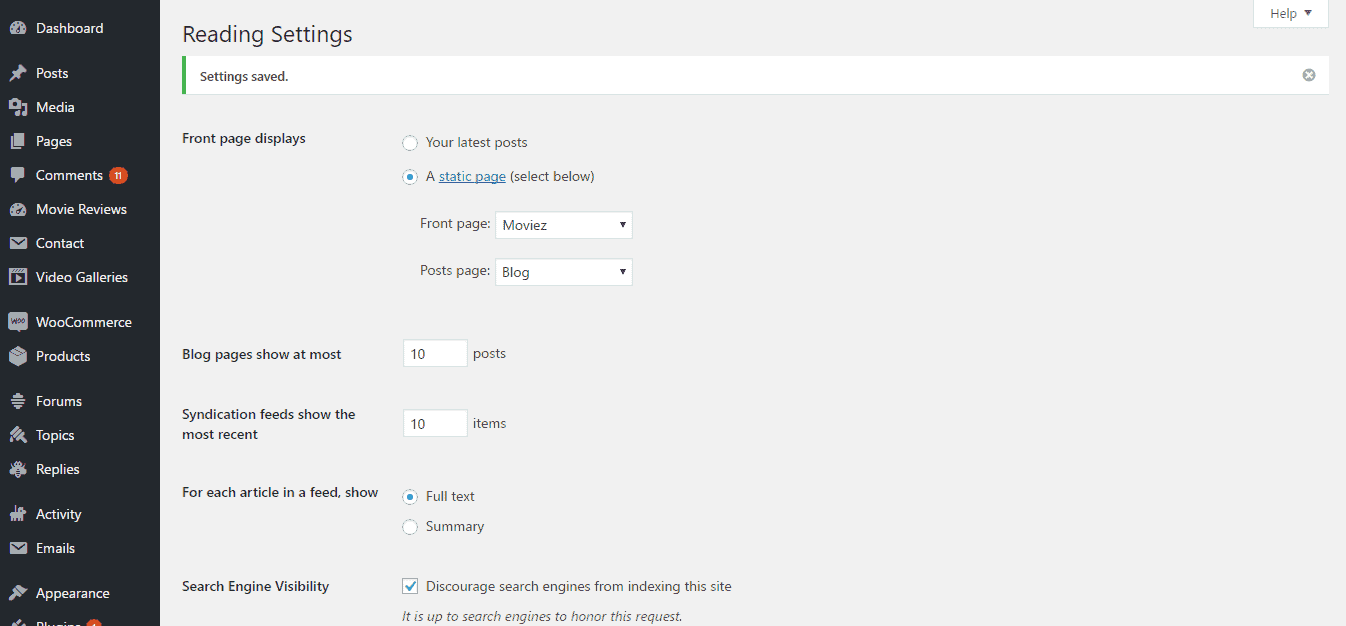
- Select Blog from the Post page drop-down menu.(optional)
- Use the left-bottom Save Changes button to save the settings.
Creating Pages
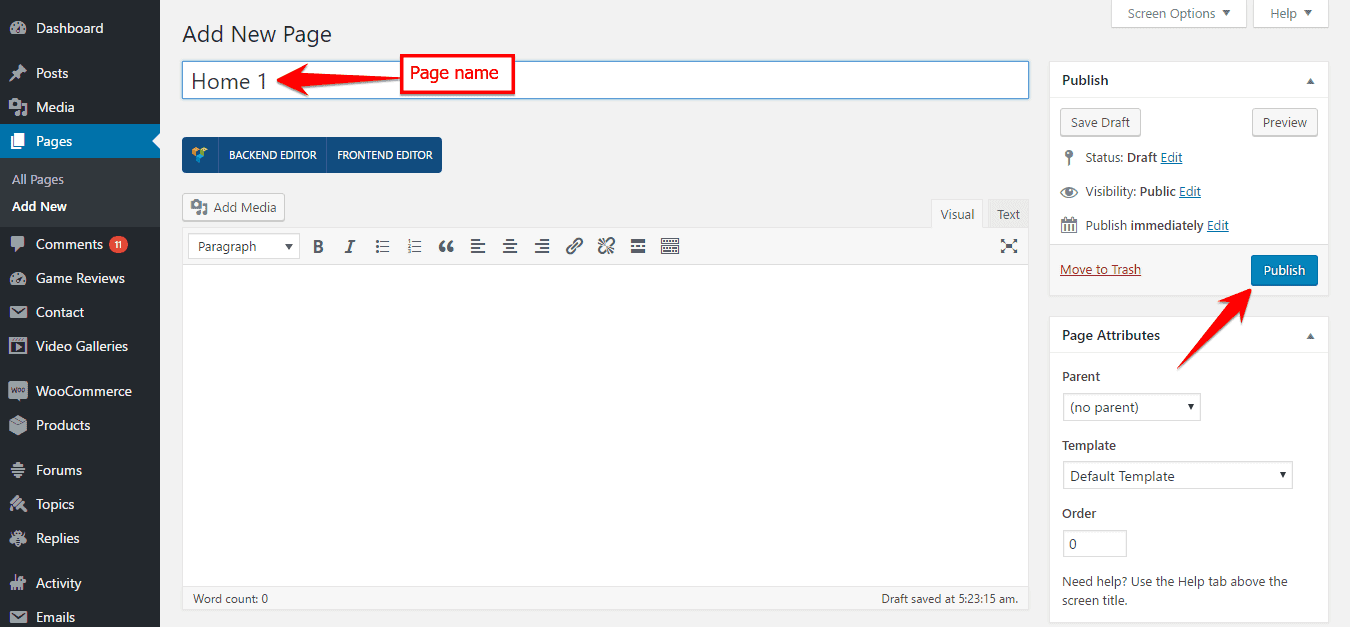
- Go to
Pages> Click Add New button. - Give a page title on the Add New Page text box.

- Click on Publish button to save the page.

If everything is done ok then you can find those created pages on Appearance> Menus.

Now, you can create Menu and assign those pages in different menus.
Creating Dropdown Menu
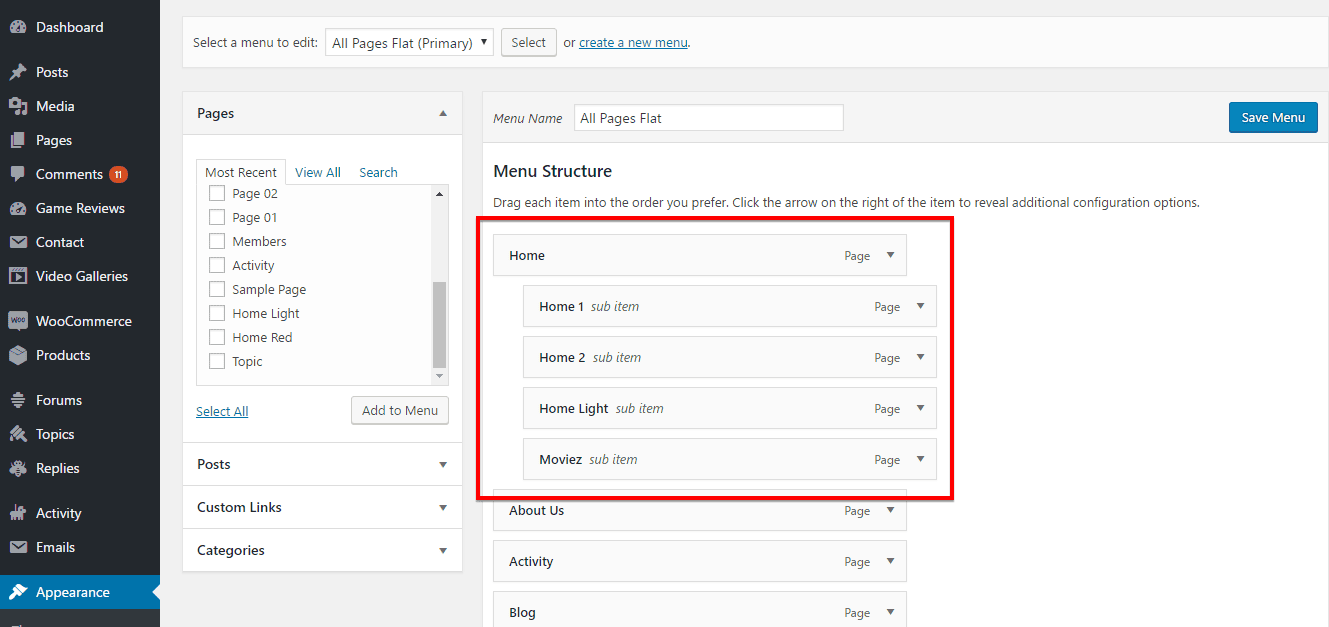
- Go to
Appearance> Menus - Select the main menu and drag the submenu items right below the main menu.
- Click on Save Menu on the right-bottom side of the module and you are done.
Add a Gamez Review
To add a new gamez review, you just simply follow a couple of steps, listed below;
- Go to
Game Reviews> Add New - Write the game title on the very first empty text box of the module.
- You can customize the permalink if you want with the Edit option next to the permalink.
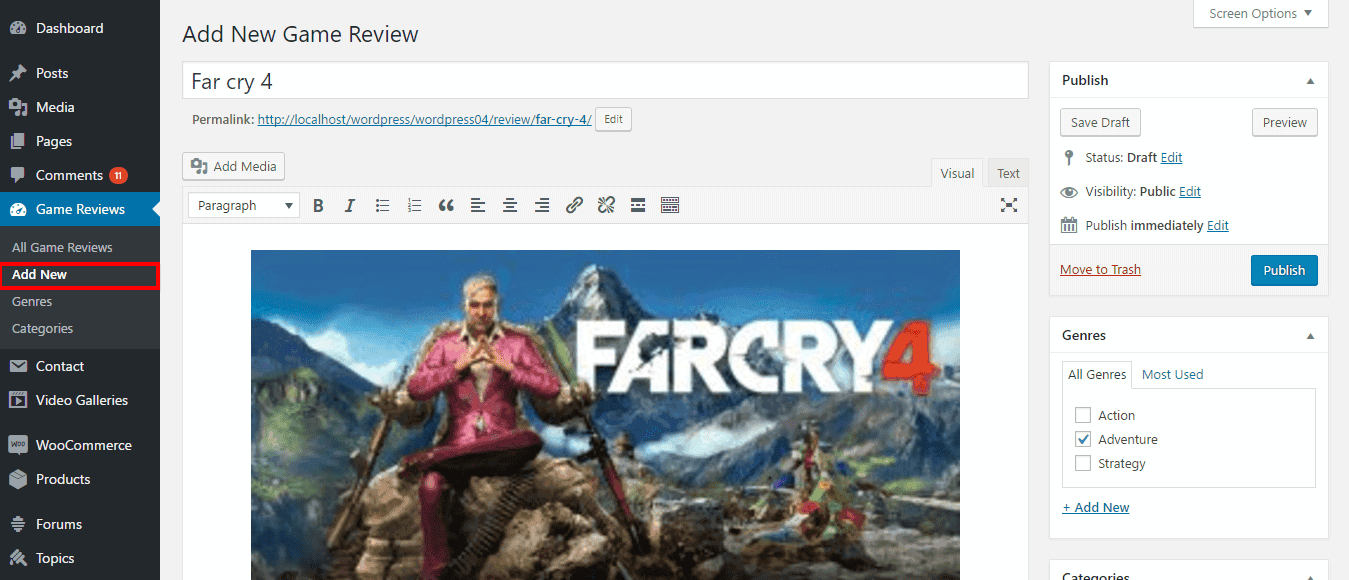
- Write your review texts on the content are. You can also add images to the content section with the Add Media button just above the content section.
At the bottom of the module, you will find to add game information.
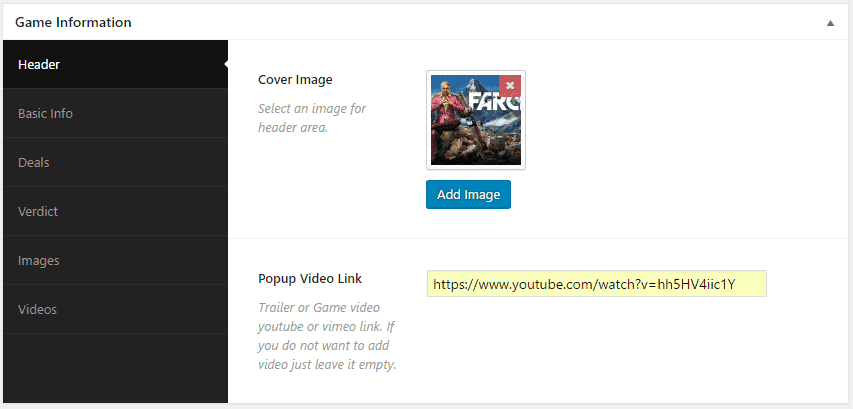
- Selecting the header tab, you can add a cover image as well as pop-up video link for your review.
- Selecting the Basic info tab, you can add Release date, Developer and Publisher information.
- You can add detail information, selecting the Deals tab like Site, Price, Currency, Game Link, and etc.
- Selecting the verdict tab, you can add rating info of the game,
- Selecting the Image as well as videotab, you can add an image as well as video gallery on the particular section for the review.
You can add a featured image with the Featured Image option and can select genres with the Genres option on the right side of the module.
Add a Moviez Review
To add a new moviez review, similarly like adding a new gamez review, you need to follow a couple of steps listed below;
- Go to
Movie Reviews> Add New - Write the movie title on the very first empty text box of the module.
- You can customize the permalink if you want with the Edit option next to the permalink.
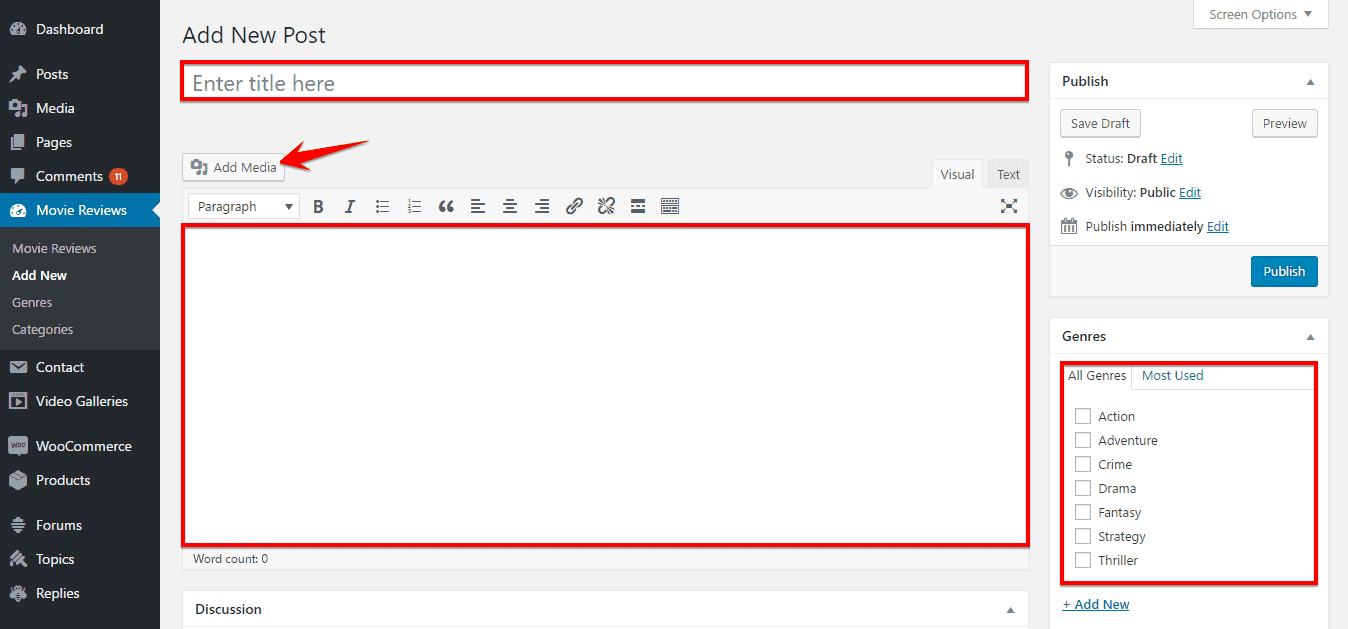
- Write your review texts on the content are. You can also add images to the content section with the Add Media button just above the content section.
At the bottom of the module, you will find to add game information.
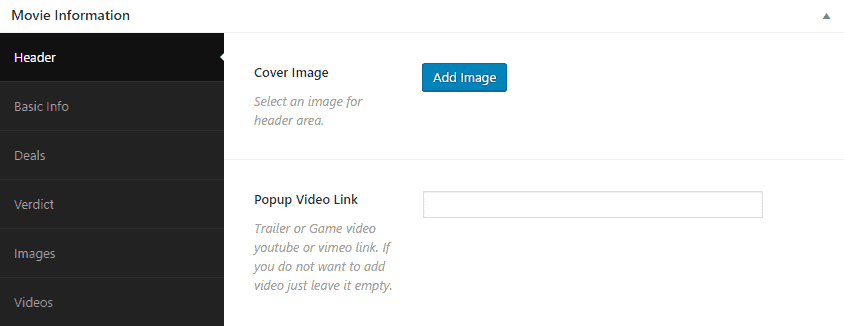
- Selecting the header tab, you can add a cover image as well as pop-up video link for your review.
- Selecting the Basic info tab, you can add Release date, Developer and Publisher information.
- You can add detail information, selecting the Deals tab like Site, Price, Currency, Game Link, and etc.
- Selecting the verdict tab, you can add rating info of the game,
- Selecting the Image as well as videotab, you can add an image as well as video gallery on the particular section for the review.
You can add a featured image with the Featured Image option and can select genres with the Genres option on the right side of the module.
Elements
Elementor Page Builder
Elementor page builder is the best Drag and Drop visual editor for building pages, posts, custom post type etc. in a WordPress site. If you are not familiar with Elementor, we recommend you to take a look at the following videos:
-
Create a New Page with Elementor Getting Started With Elementor - YouTube
- Introducing with Elements How to use Elements with Elementor for WordPress - YouTube
Our developed elements those are only for Gamez Elements theme can be found in Gamez Elements under Elementor editor.
Gamez Elements

Recent Posts
Manual Process :
To add Recent Posts element on a page, first-
- Go to
Pages - Click on Edit With Elementor
- Click on Just drag and drop to add Elements
- From Gamez Elements tab, click on the element named Recent Posts
- Configure the settings module according to your preferences and then
- Click on Update to save the settings.
Recent Posts Settings
- Order : Display post in either Ascending or Descending order.
- Order By : Display Recent Posts in order by Title, Date, Name or Random.
- Post Item : Define the number of posts you want to show on this module.
- Select Layout : Able to change the layour from there.
Recent Posts By Category
- Order : Display post in either Ascending or Descending order.
- Order By : Display Recent Posts in order by Title, Date, Name or Random.
- Category : Can choose category from here.
-
Post Item : Define the number of posts you want to show on this module.
Ajax Video Tab
- Video Shows : Display the video items.
-
Tad Style : Select the tab style from here.
Reviews
- Layout : Can select the layout(default, popular, trending).
- Style : 2 style added with this element(Carousel, Grid).
- Order : Display post in either Ascending or Descending order.
- Order By : Display Recent Posts in order by Title, Date, Name or Random.
-
Post Item : Define the number of posts you want to show on this module.
Reviews By Category
- Category : Can select the category.
- Style : 2 style added with this element(Carousel, Grid).
- Order : Display post in either Ascending or Descending order.
- Order By : Display Recent Posts in order by Title, Date, Name or Random.
-
Post Item : Define the number of posts you want to show on this module.
Products
- Products Shows : Display product items.
-
Carousel Shows : Display carousel of product.
Best Selling Products
- Section Heading : Can write any kind heading.
-
No of product : Display number of product.
Featured Products
-
Featured Product : Can select any feature product from here.
Section Title

- Icon : Any icon can set from from here.
- Title Text : Can change title text.
-
HTML Tag : Select HTML tag from here
Recent Reviews

- Style : 2 style added with this element(Carousel, Grid).
- Order : Display post in either Ascending or Descending order.
- Order By : Display Recent Posts in order by Title, Date, Name or Random.
-
Post Item : Define the number of posts you want to show on this module.
Review Category

-
Title : Showing here your review categories, whcih you can set on the side bar.
Review Rating
-
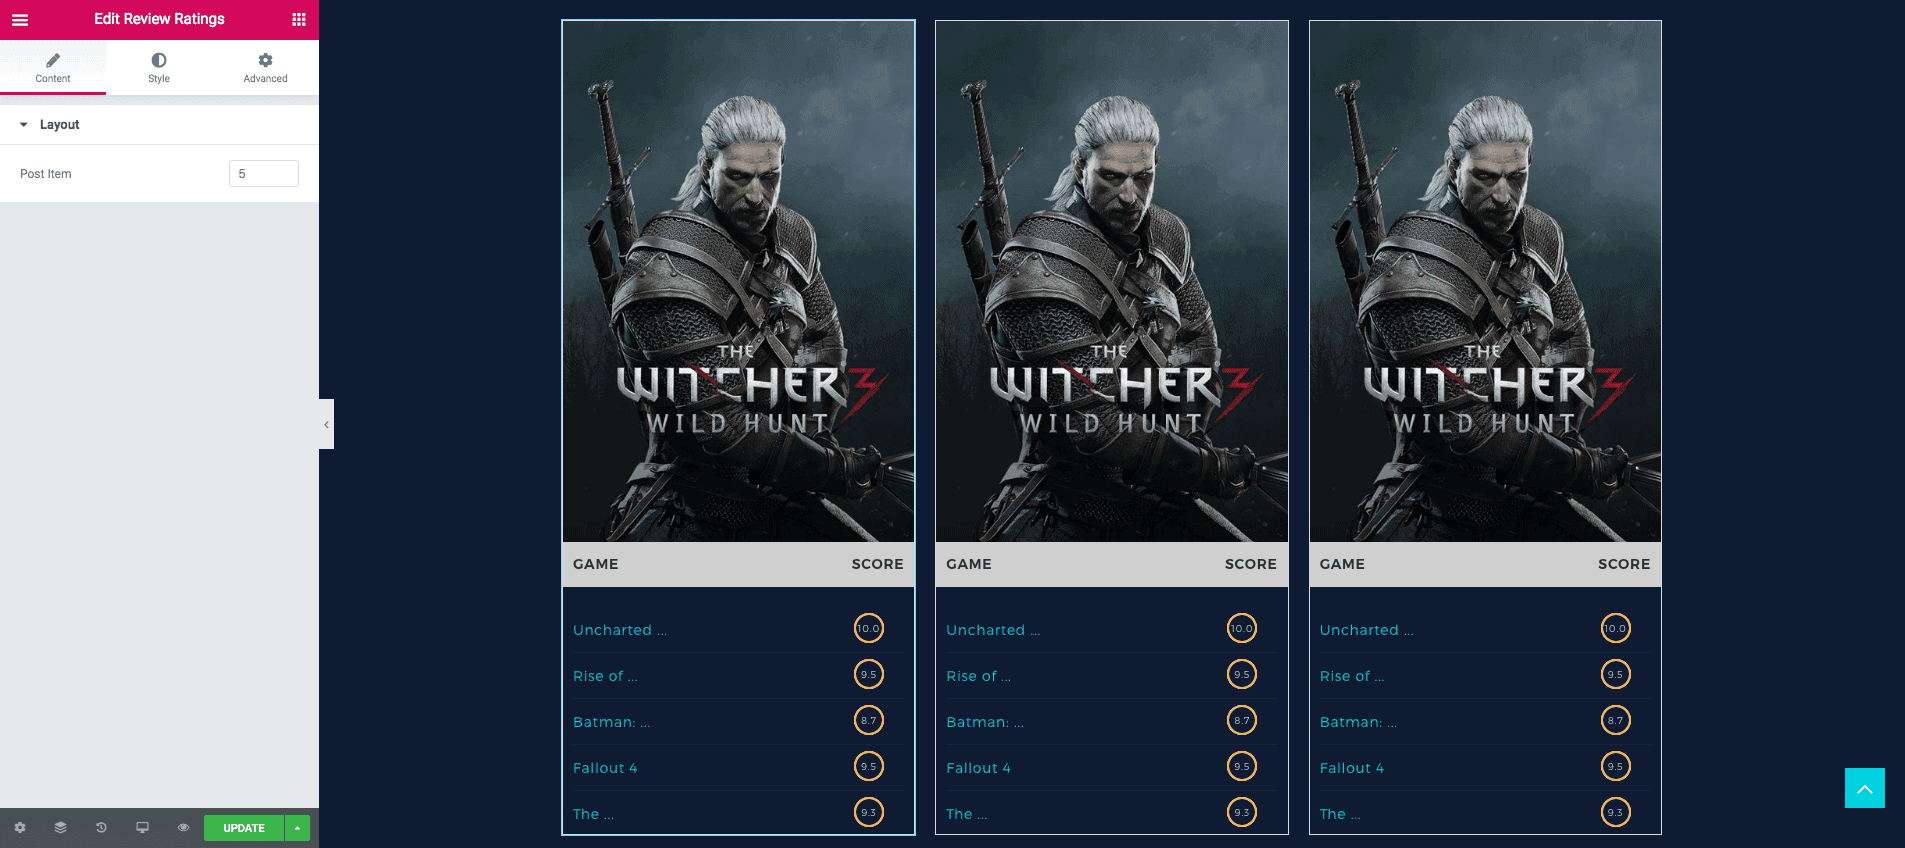
Post Item : Showing review rating, whcih you can set on the side bar.
Recommend Review
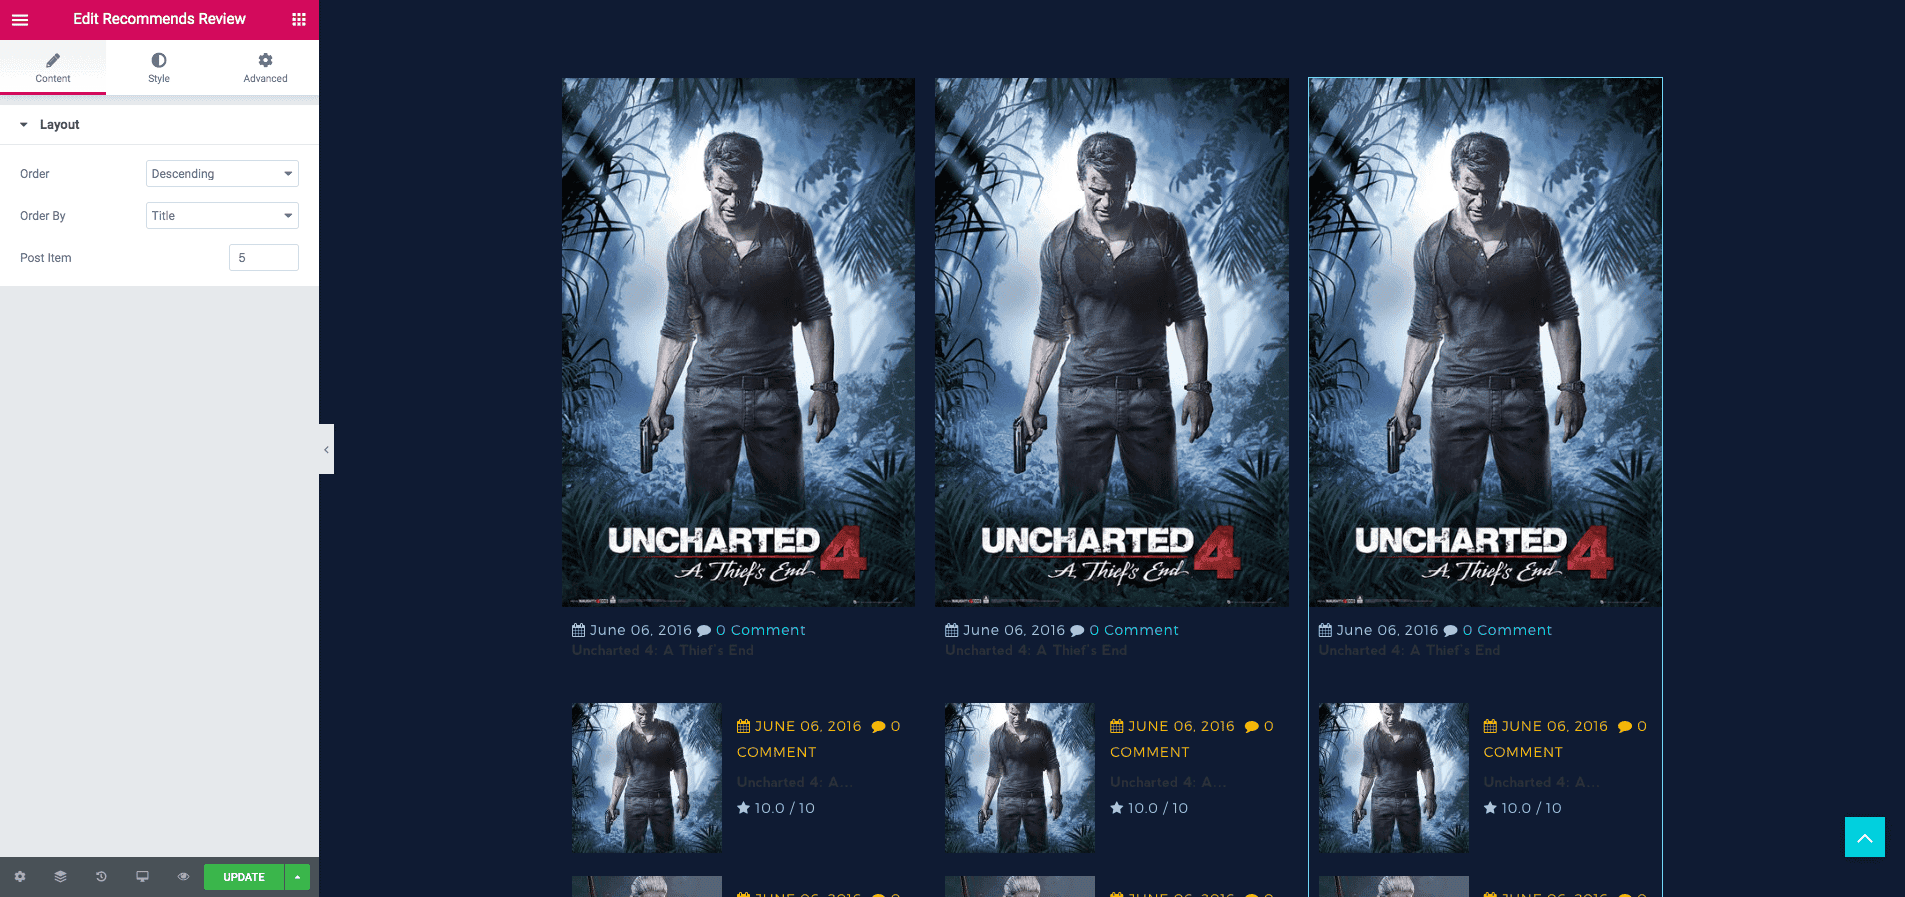
- Order : Display post in either Ascending or Descending order.
- Order By : Display Recent Posts in order by Title, Date, Name or Random.
- Post Item : Define the number of posts you want to show on this module.
Visual Composer
Visual Composer is the best Drag and Drop visual editor for building pages, posts etc. in a WordPress site. If you are not familiar with Visual Composer, we recommend you to take a look at the following videos:
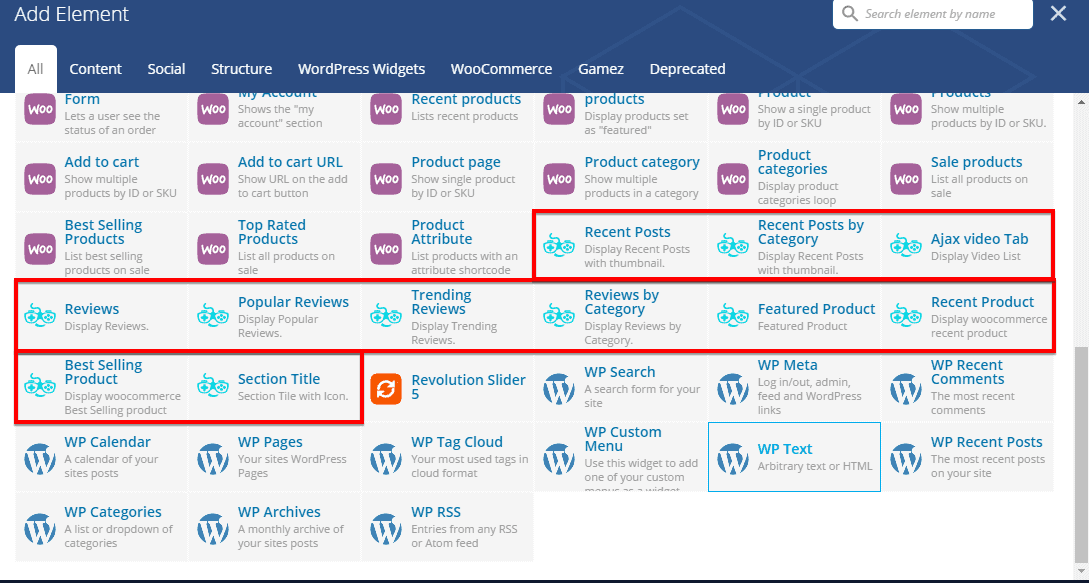
You can add an element on a page in two different ways. Either you can use just the simple shortcode on the content area of that page or you can add element manually. You will have plenty of default elements to add or you can add our developed elements those are only for Gamez theme from the Gamez tab.
-
Getting Started with Visual Composer Getting Started With Visual Composer - YouTube
-
Cloning Elements How to Clone Elements with Visual Composer for WordPress - YouTube
-
Rows & Columns How to Add Row and Column with Visual Composer for WordPress - YouTube
- Create & Re-use Templates How to Use Templates in Visual Composer How to save separate Row or Section as a Template
Our developed elements those are only for Gamez theme can be found in Gamez tab under Visual Composer.
Recent Posts

Manual Process :
To add Recent Posts element on a page, first-
- Go to
Pages - Click on Edit With Visual Composer
- Click on Add Elements
- From Gamez tab, click on the element named Recent Posts
- Configure the settings module according to your preferences and then
- Click on Save Changes to save the settings.
Recent Posts Settings
- Order : Display post in either Ascending or Descending order.
- Order By : Display Recent Posts in order by Title, Date, Name or Random.
- Post Item : Define the number of posts you want to show on this module.
- Select Layout : Able to change the layour from there.
Recent Posts By Category

Manual Process :
To add Recent Posts By Category element on a page, first-
- Go to
Pages - Click on Edit With Visual Composer
- Click on Add Elements
- From Gamez tab, click on the element named Recent Posts By Category
- Configure the settings module according to your preferences and then
- Click on Save Changes to save the settings.
Recent Posts Settings
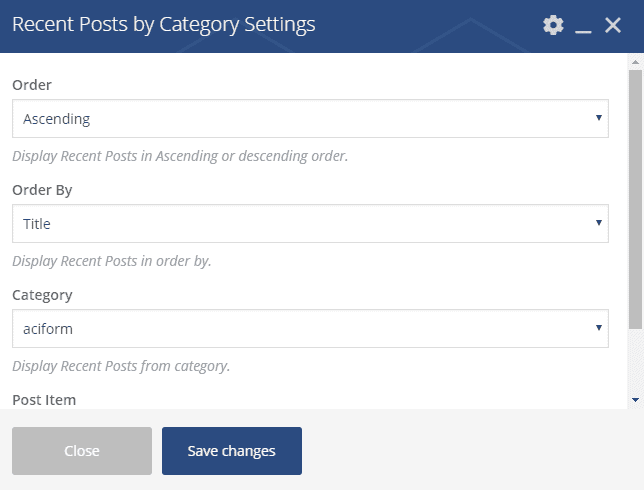
- Order : Display post in either Ascending or Descending order.
- Order By : Display Recent Posts in order by Title, Date, Name or Random.
- Post Item : Define the number of posts you want to show on this module.
- Select Layout : Able to change the layour from there.
Ajax Video Tab

Manual Process :
To add Ajax Video Tab element on a page, first-
- Go to
Pages - Click on Edit With Visual Composer
- Click on Add Elements
- From Gamez tab, click on the element named Ajax Video Tab
- Configure the settings module according to your preferences and then
- Click on Save Changes to save the settings.
Ajax Video Tab Settings
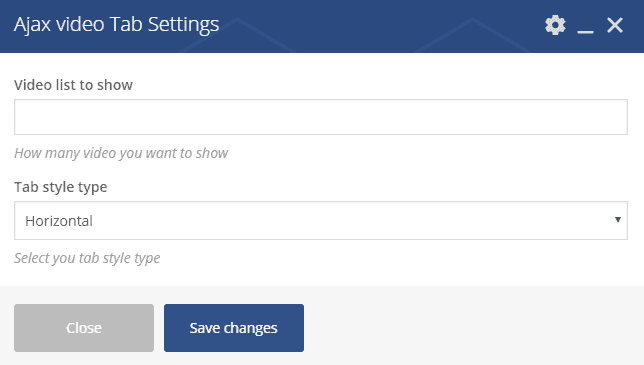
- Video List to Show : Define how many videos you want to show.
- Tab Style Type : Choose tab style type. You can either select Vertical or Horizontal.
Horizontal Style
Vertical Style 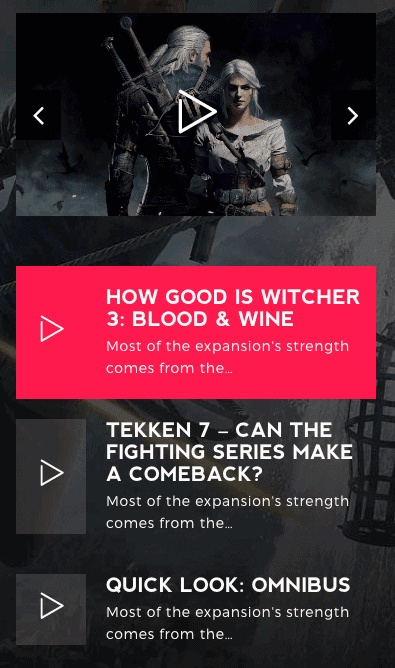
Reviews

Manual Process :
To add Reviews element on a page, first-
- Go to
Pages - Click on Edit With Visual Composer
- Click on Add Elements
- From Gamez tab, click on the element named Reviews
- Configure the settings module according to your preferences and then
- Click on Save Changes to save the settings.
Reviews Settings
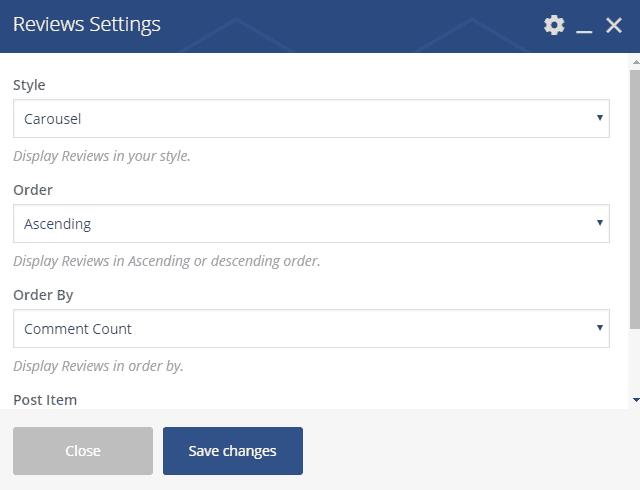
- Style : Choose a style from the drop-down menu.
- Order : Display reviews in either Ascending or Descending order.
- Order By : Display reviews in order by Title, Date, Name or Random.
- Post Item : Number of the item you want to show.
Popular Reviews

Manual Process :
To add Popular Reviews element on a page, first-
- Go to
Pages - Click on Edit With Visual Composer
- Click on Add Elements
- From Gamez tab, click on the element named Popular Reviews
- Configure the settings module according to your preferences and then
- Click on Save Changes to save the settings.
Popular Reviews Settings
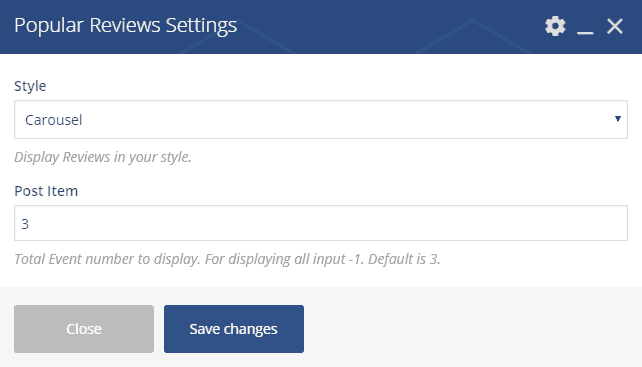
- Style : Choose a style from the drop-down menu.
- Post Item : Number of items you want to show.
Trading Reviews

Manual Process :
To add Trading Reviews element on a page, first-
- Go to
Pages - Click on Edit With Visual Composer
- Click on Add Elements
- From Gamez tab, click on the element named Trading Reviews
- Configure the settings module according to your preferences and then
- Click on Save Changes to save the settings.
Treding Reviews Settings
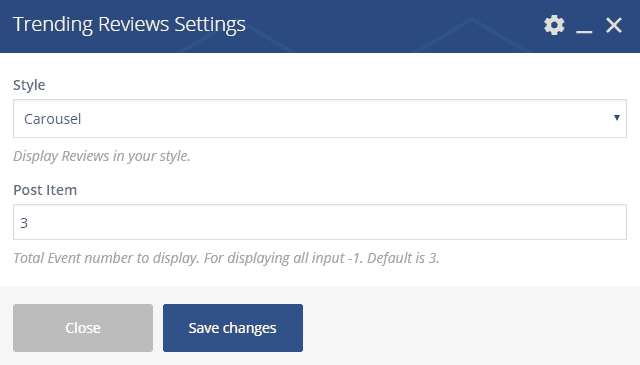
- Style : Choose a style from the drop-down menu.
- Post Item : Number of items you want to show.
Reviews By Category

Manual Process :
To add Reviews By Category element on a page, first-
- Go to
Pages - Click on Edit With Visual Composer
- Click on Add Elements
- From Gamez tab, click on the element named Reviews By Category
- Configure the settings module according to your preferences and then
- Click on Save Changes to save the settings.
Recent Posts Settings
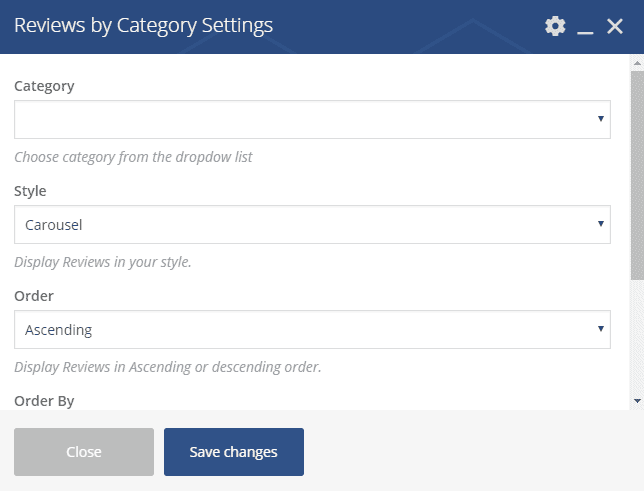
- Category : Select the posts category.
- Style : Choose a style from the drop-down menu.
- Order : Display post in either Ascending or Descending order.
- Order By : Display Recent Posts in order by Title, Date, Name or Random.
- Post Item : Define the number of posts you want to show on this module.
Featured Product

Manual Process :
To add Featured Product element on a page, first-
- Go to
Pages - Click on Edit With Visual Composer
- Click on Add Elements
- From Gamez tab, click on the element named Featured Product
- Configure the settings module according to your preferences and then
- Click on Save Changes to save the settings.
Featured Product Settings
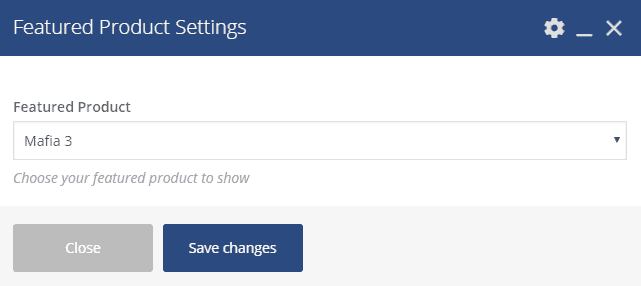
- Featured Product : Select featured product from the drop-down.
Recent Product

Manual Process :
To add Recent Product element on a page, first-
- Go to
Pages - Click on Edit With Visual Composer
- Click on Add Elements
- From Gamez tab, click on the element named Recent Product
- Configure the settings module according to your preferences and then
- Click on Save Changes to save the settings.
Recent Product Settings
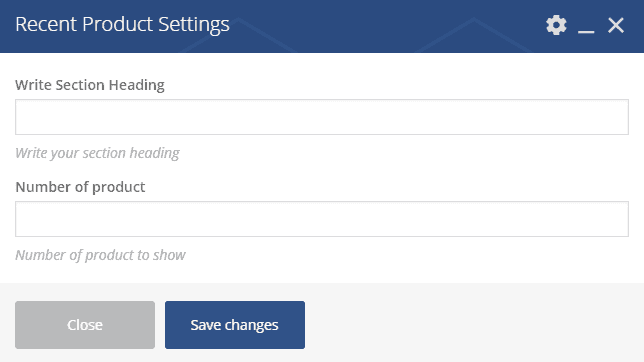
- Write Section Heading : Write a heading text for the section.
- Number of Product : Define the number of products to show.
Best Selling Product

Manual Process :
To add Best Selling Product element on a page, first-
- Go to
Pages - Click on Edit With Visual Composer
- Click on Add Elements
- From Gamez tab, click on the element named Best Selling Product
- Configure the settings module according to your preferences and then
- Click on Save Changes to save the settings.
Best Selling Product Settings
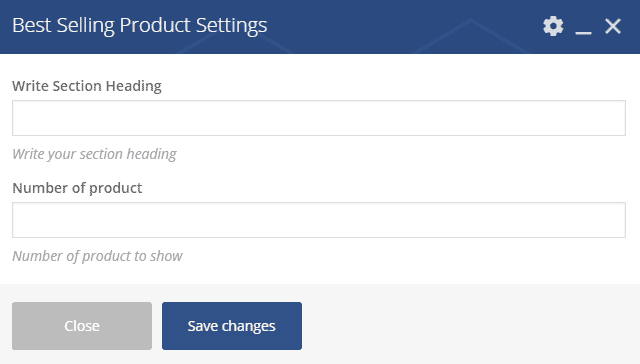
- Write Section Heading : Write a heading text for the section.
- Number of Product : Define the number of products to show.
Section Title

Manual Process :
To add Section Title element on a page, first-
- Go to
Pages - Click on Edit With Visual Composer
- Click on Add Elements
- From Gamez tab, click on the element named Section Title
- Configure the settings module according to your preferences and then
- Click on Save Changes to save the settings.
Section Title Settings
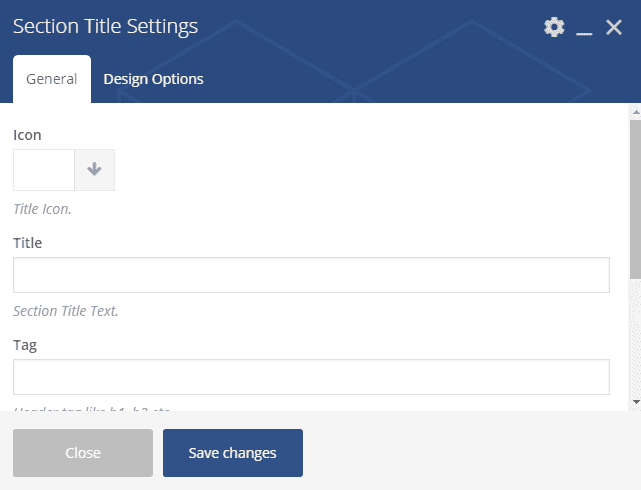
General
- Icon : Select an icon for the section.
- Title : Write a title text here.
- Tag : Set tag here. You can put multiple tags on a single item.
- Icon Color : Choose a color for the selected icon.
- Text Color : Choose a color for texts used in the section.
Design Options
- Border Color : Select a border color.
- Border Style : Select a border style from the drop-down menu.
- Border Radius : Define a border radius from the drop-down menu.
-
Background : Set a background color. You can set a background image either, from the + button and also can define the image type from the drop-down menu just below this option.
- Box Control : Allows you to either select simplify controls or not.
The front-end appearance would be like below if everything was just according to the instruction.

Helpers
Gamez has a few helper classes. Those can be used frequently in any div, sections in your site just by defining the class. Classes are listed below;
color-white for white text color.
See our other Joomla Template with detailed documentation.

