Have you ever search for best Joomla CCK that allows you to create Joomla custom fields within Joomla core articles? I know you find a lot, but failed to find a suitable advance custom field for Joomla. To provide ultimate flexibility and empower to create unlimited category specific or standalone custom field in Joomla articles, We, at ThemeXpert HQ has cooked a powerful Joomla extension called Xpert Custom Fields (XCF).##Why we developed the Joomla CCK extension called Xpert Custom Field (XCF) ?Glad you asked. We regularly help Joomla developers to accomplish their projects perfectly. The thing we find common that developers are found spending extra hours to add Joomla custom fields support to satisfy their clients requirement. To kick away all above limitation, we developed this advanced custom field extension. The extension allows you to create vast array of custom fields including multiple field types without touching single line of code.Features- Joomla Article Support + More coming- Unlimited Fields Group- Customized Rules for each group- Joomla Event support- 7 Fields + More coming- Shortcode Plugin to access the field data inside article- Intuitive API for developer- Category specify and standalone field support- Multiple event support
Download Xpert Custom Fields Now
##How to add Joomla custom fields in Joomla articles?I assume, you’ve already downloaded our XCF extension. I ain’t going to discuss about the installation process. The step is not different. Just head to the Extensions > Manage and install on your own. After installing Xpert Custom Fields(XCF), the entire process to get started is simple. For your convenience we’ve created a video tutorial for you. Have a look.Don’t like to watch tutorial video? I have chunked down the entire process in easy steps. Let’s get it. ###Step 01: Create Field GroupAfter installing XCF, navigate to Components > Custom Fields - XCF. In the Joomla Custom Fields manager, you will find two different tab in the right sidebar of screen. The sidebar includes Group and Fields. Before adding a new custom field in your Joomla Article, It requires to create group first.Click New button but make sure you have Group tab selected. Provide group Name, Content Type, Category, Description, Event and Status. Click save and close when done.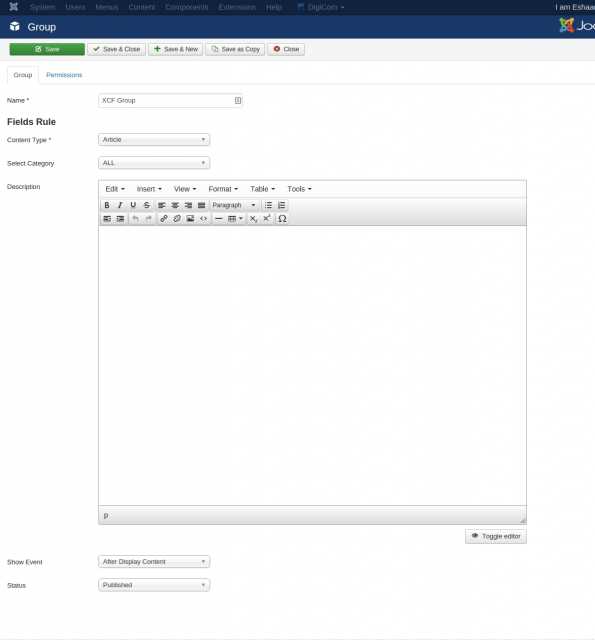 Name : Used for organizing the groups in back-end. Try to give some meaning full name.Content Type : Define where this group of fields load. Right now it only support Joomla Articles and more coming.Category(PRO) : For which category the group fields will load. If you want this group of fields load on all category you can select 'All'. You can specify specific group to load specific category.Description : Group description only use in admin area to give your more details about the group.Show Event : You can select where this group filed data will display. They includes After Display Title, Before Display Content, After Display Content and None.###Step 02: Create a new fieldSelect Fields tab and click New. Add Field label, Name, Group, Type, and Status.
 Field Label : Give your field a label so you can easily recognize it in backend.Field Name : Field name is used to call the field from article editor or code. This is very important to do not put any space and special charterer in Field Name.Field Group : Select group for this field you have created on Step 1**Field Type : Type of date you are going to receive. If you need simple text then select 'Text' field. If you need image the select 'Image' field.Field Instruction : Give instruction for this filed and it will show in popup.When you added all field data successfully, click save and close button.###Step 03: Add custom field in a Joomla ArticlesCreate a new or open an existing article where you want to present your custom field data. You can notice in the following image, a tab titled Xpert Custom Fields. Another button called Custom Fields added adjacent to editor bottom.
 Get into Xpert Custom Fields section and insert the data according to their type. For demonstration we added field to take image input.
 After adding all further necessary data, click save and close. Head to the article single view in frontend. As the follow image indicates, Advance custom field is working great in my end.
 ###Step 04: Show field data using ShortcodesYou may not want to show your custom field data according to the event provided. Because Joomla provides only 3 events, allow to present your custom data After Display Title, Before Display Content, and After Display Content. What if you want to show this data middle of the article ?To give ultimate power on your custom data presentation, we have created shortcode plugin. To use your custom data anywhere in your Joomla article, head to the field group, change After Display Content to None from Show Event** dropdown.
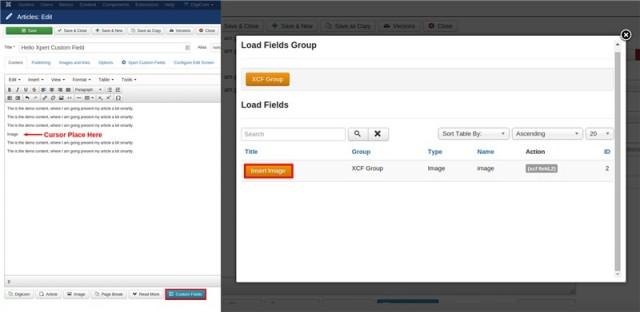
 Now head back to the article edit screen, place cursor where you want to display the field data. Click on Custom Field button down to the editor, and select the desired field button to insert shortcode in your editor.
 ##How to add layout override for Xpert Custom Field(XCF)The default look of Xpert Custom Field may not suit your site look and brand. So we have added a super capability to add personalized look according to your brand. But I ain’t going to cover this this feature in this article, I have prepared a separate article for you. Till then stay tune to ThemeXpert Blog
 Have you ever search for best Joomla CCK that allows you to create Joomla custom fields within Joomla core articles? I know you find a lot, but failed to find a suitable advance custom field for Joomla.
To provide ultimate flexibility and empower to create unlimited category specific or standalone custom field in Joomla articles, We, at ThemeXpert HQ has cooked a powerful Joomla extension called Xpert Custom Fields (XCF).
Why we developed the Joomla CCK extension called Xpert Custom Field (XCF) ?
Glad you asked. We regularly help Joomla developers to accomplish their projects perfectly. The thing we find common that developers are found spending extra hours to add Joomla custom fields support to satisfy their clients requirement.
To kick away all above limitation, we developed this advanced custom field extension. The extension allows you to create vast array of custom fields including multiple field types without touching single line of code.
Features
- Joomla Article Support + More coming
- Unlimited Fields Group
- Customized Rules for each group
- Joomla Event support
- 7 Fields + More coming
- Shortcode Plugin to access the field data inside article
- Intuitive API for developer
- Category specify and standalone field support
- Multiple event support
Download Xpert Custom Fields Now
How to add Joomla custom fields in Joomla articles?
I assume, you’ve already downloaded our XCF extension. I ain’t going to discuss about the installation process. The step is not different. Just head to the Extensions > Manage and install on your own. After installing Xpert Custom Fields(XCF), the entire process to get started is simple. For your convenience we’ve created a video tutorial for you. Have a look.
Don’t like to watch tutorial video? I have chunked down the entire process in easy steps. Let’s get it.
Step 01: Create Field Group
After installing XCF, navigate to Components > Custom Fields - XCF. In the Joomla Custom Fields manager, you will find two different tab in the right sidebar of screen. The sidebar includes Group and Fields. Before adding a new custom field in your Joomla Article, It requires to create group first.
Click New button but make sure you have Group tab selected. Provide group Name, Content Type, Category, Description, Event and Status. Click save and close when done.

Name : Used for organizing the groups in back-end. Try to give some meaning full name.
Content Type : Define where this group of fields load. Right now it only support Joomla Articles and more coming.
Category(PRO) : For which category the group fields will load. If you want this group of fields load on all category you can select 'All'. You can specify specific group to load specific category.
Description : Group description only use in admin area to give your more details about the group.
Show Event : You can select where this group filed data will display. They includes After Display Title, Before Display Content, After Display Content and None.
Step 02: Create a new field
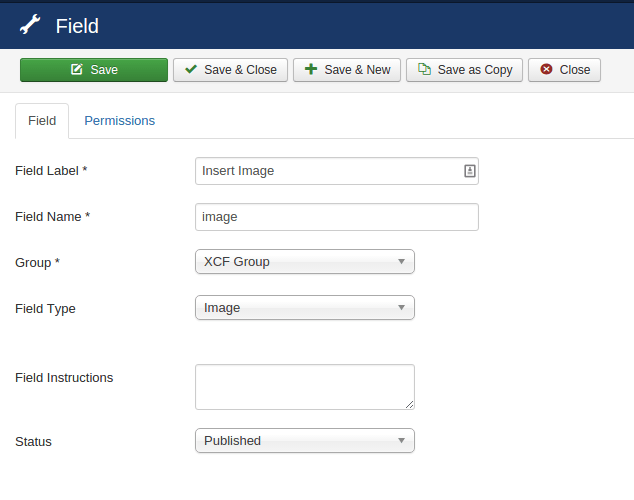
Select Fields tab and click New. Add Field label, Name, Group, Type, and Status.

Field Label : Give your field a label so you can easily recognize it in backend.
Field Name : Field name is used to call the field from article editor or code. This is very important to do not put any space and special charterer in Field Name.
Field Group : Select group for this field you have created on Step 1
Field Type : Type of date you are going to receive. If you need simple text then select 'Text' field. If you need image the select 'Image' field.
Field Instruction : Give instruction for this filed and it will show in popup. When you added all field data successfully, click save and close button.
Step 03: Add custom field in a Joomla Articles
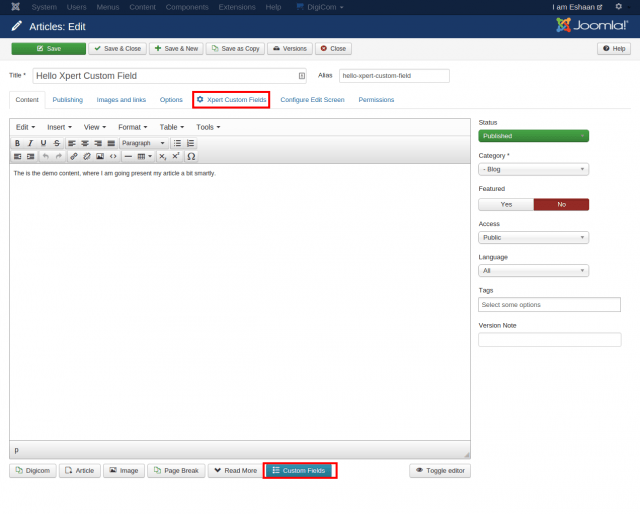
Create a new or open an existing article where you want to present your custom field data. You can notice in the following image, a tab titled Xpert Custom Fields. Another button called Custom Fields added adjacent to editor bottom.

Get into Xpert Custom Fields section and insert the data according to their type. For demonstration we added field to take image input.

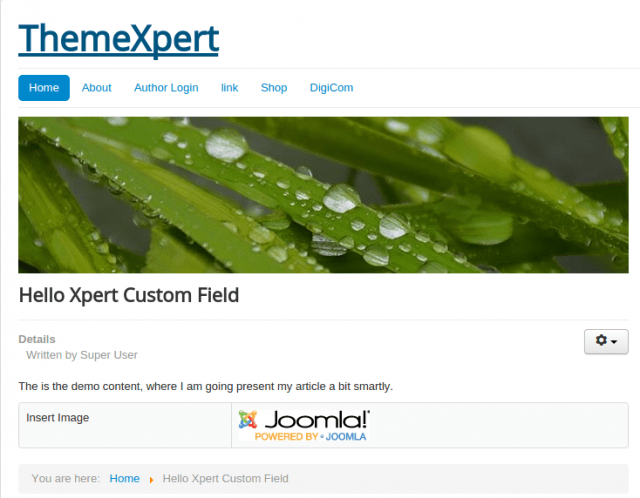
After adding all further necessary data, click save and close. Head to the article single view in frontend. As the follow image indicates, Advance custom field is working great in my end.

Step 04: Show field data using Shortcodes
You may not want to show your custom field data according to the event provided. Because Joomla provides only 3 events, allow to present your custom data After Display Title, Before Display Content, and After Display Content. What if you want to show this data middle of the article ?
To give ultimate power on your custom data presentation, we have created shortcode plugin. To use your custom data anywhere in your Joomla article, head to the field group, change After Display Content to None from Show Event dropdown.

Now head back to the article edit screen, place cursor where you want to display the field data. Click on Custom Field button down to the editor, and select the desired field button to insert shortcode in your editor.

How to add layout override for Xpert Custom Field(XCF)
The default look of Xpert Custom Field may not suit your site look and brand. So we have added a super capability to add personalized look according to your brand. But I ain’t going to cover this this feature in this article, I have prepared a separate article for you. Till then stay tune to ThemeXpert Blog

