
The most surprising fact of Joomla is its extensive customization facility. It makes Joomla one of the top powerful CMS nowadays. You can easily cus...
The most surprising fact of Joomla is its extensive customization facility. It makes Joomla one of the top powerful CMS nowadays. You can easily customize your Joomla login page with a little bit of effort. You just need to know the procedures to make it more visually stunning and decorating.
In this article, I will answer your almost every searched question regarding Joomla login system. I have attached here a huge number of screenshots and two video tutorials so that you can easily understand the customization process.
So let's check it in details.
How to Create a Joomla Login Page or Find Joomla Login URL?
A Joomla login page will help you to collect your user information. It is an easy but necessary feature for every Joomla website.
To create your Joomla login page, you can rely on the following steps.
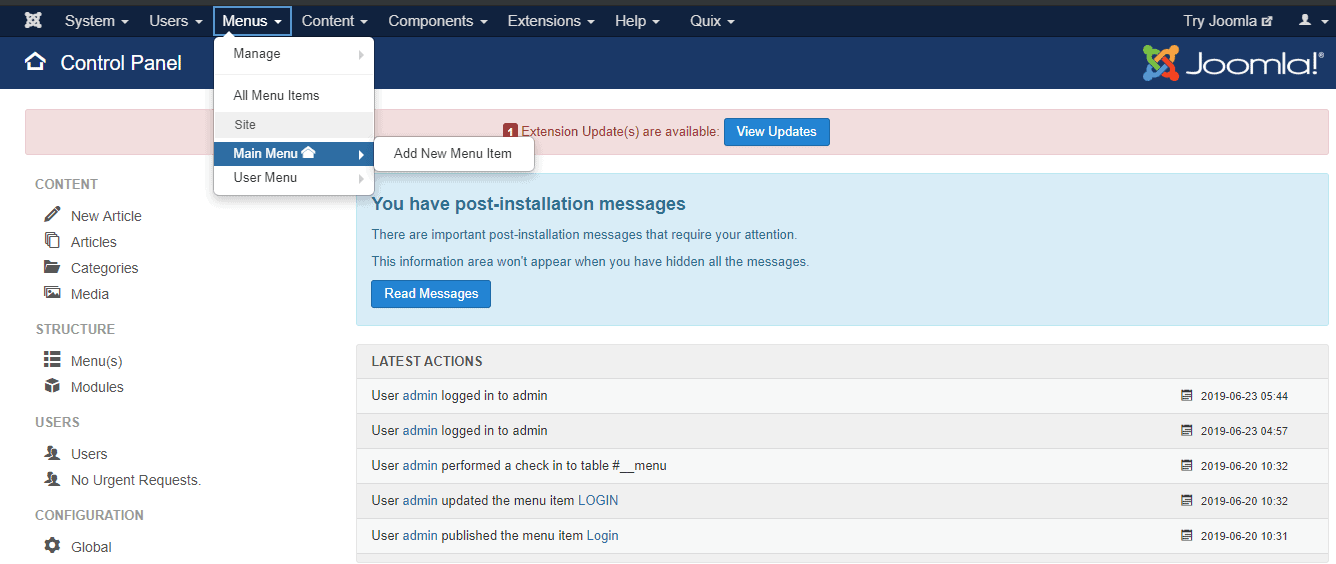
Step-1: After logging into your Joomla- Administration panel, click on "Menus", you will see a drop-down list, then click on Main Menus > Add New Main Menu.
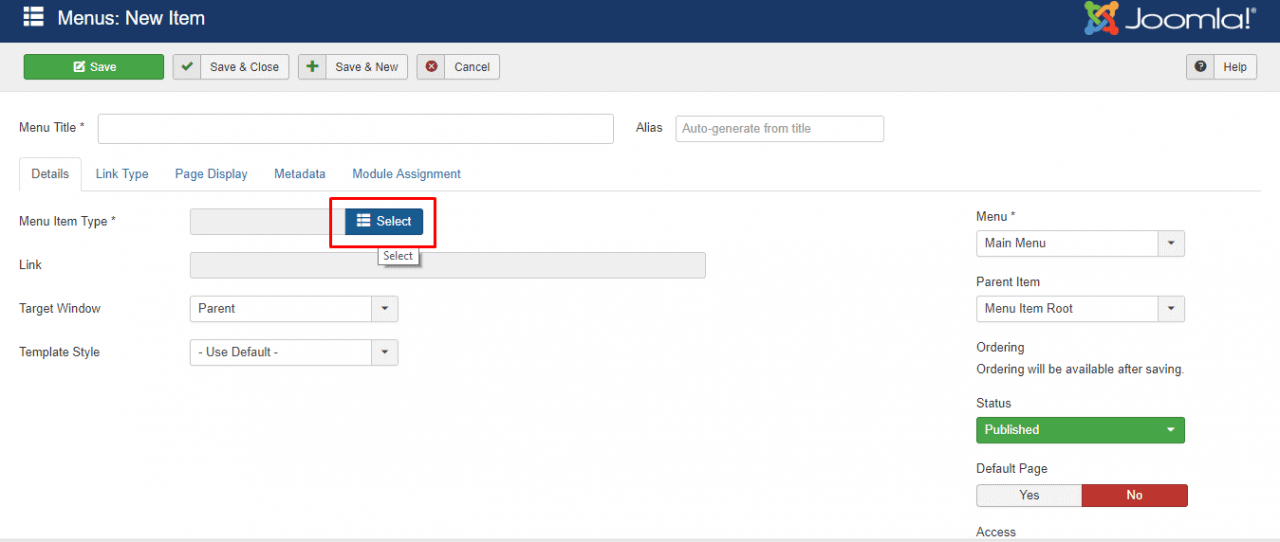
Step-2: Go to "Menu Item Type", click on "Select" button.
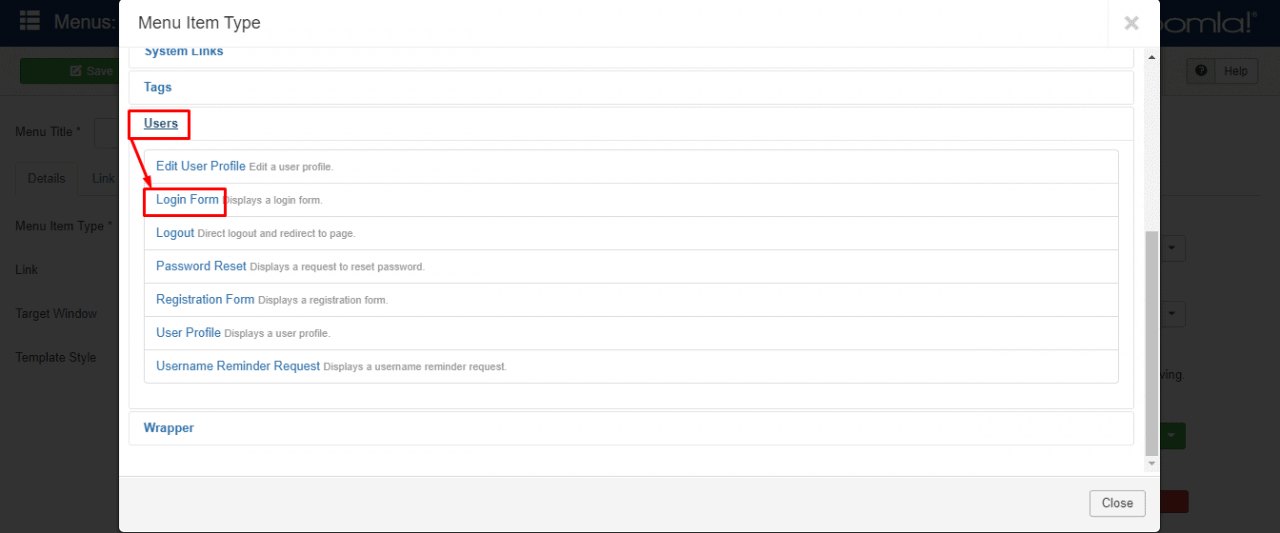
Step-3: Click on Users > Login Form.
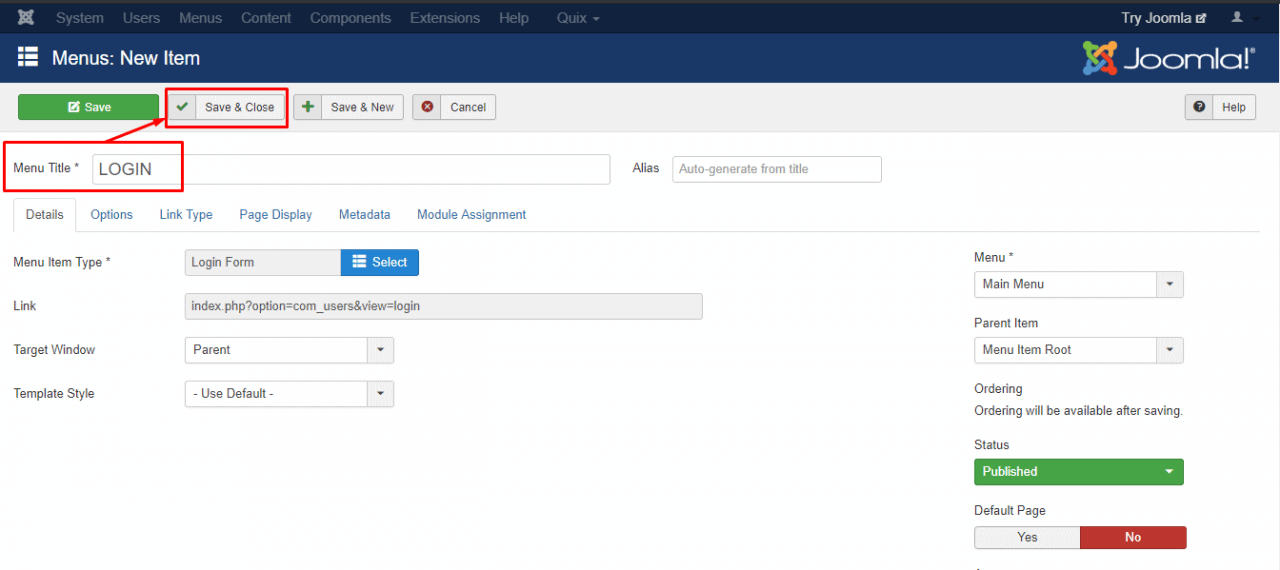
Step-4: Add "Menu Title" whatever you wish, then click on "Save & Close" button.
For more customization, click on the "option" button just above the "Menu Title" section.
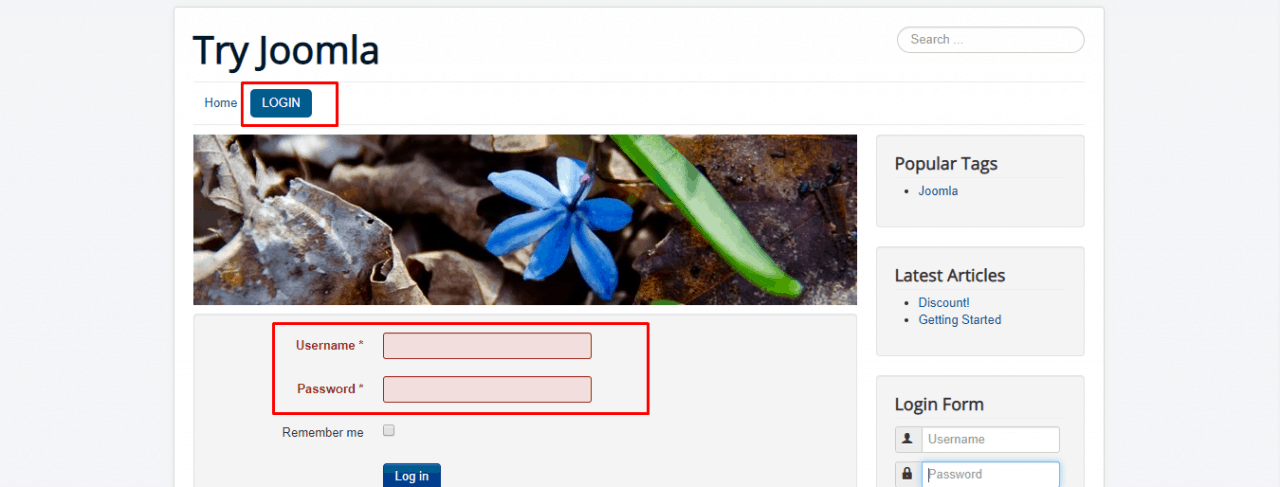
Step-5: Go to try joomla. You will see the button that you just created. Click on that button, and you will see the result.
Where is Your Joomla Login Admin Page?
Finding Joomla login admin page, sometimes make trouble both to the new users as well as the old users. You can find it in a moment if you follow the below steps.
Logging into your Joomla Administrator Dashboard is usually the first step after completing an installation.
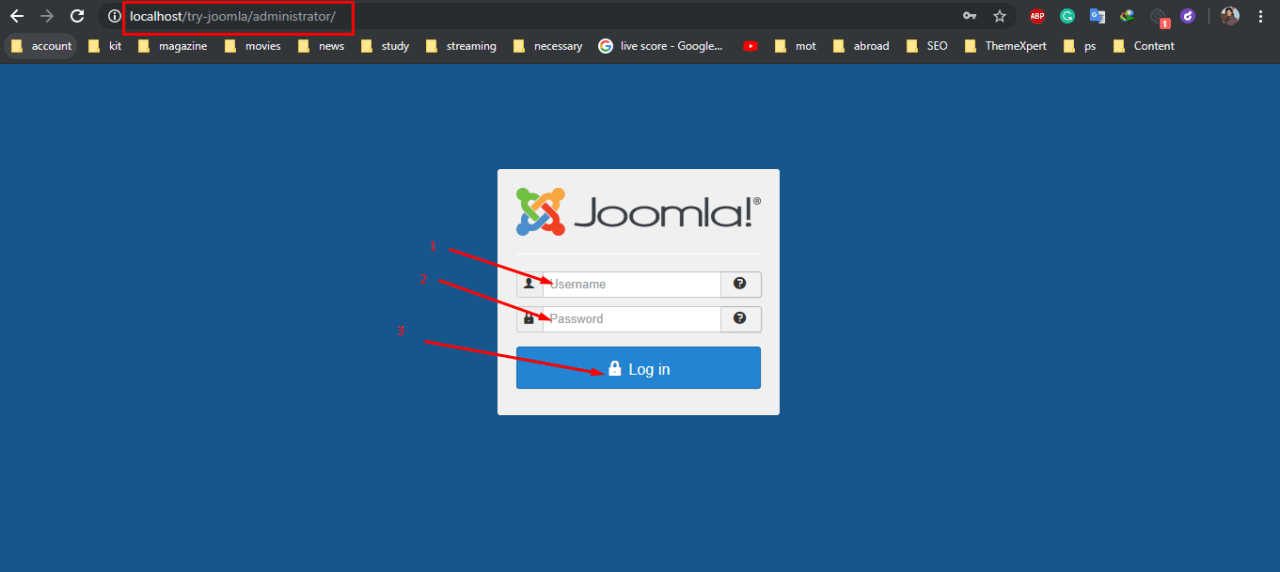
Step-1: Navigate to your Joomla website, and add /administrator to the URL.
For example, if your site is located at example.com, you would access the login page by going to: example.com/administrator
My one is: https://localhost/try-joomla/administrator
Step-2: Enter your Username, and Password in the available fields, then click the Log in button.
How to Login Joomla Back-end & Front-end at the Same Time?
Every time logging into Front-end and Back-end separately is a hassle while you are working with Joomla front-end and Back-end simultaneously. Almost everyone login to Front-end and Back-end separately.
But there is a magical feature in Joomla that can help you to disappear this hassle from logging in separately on the Back-end and Front-end. Simply follow the steps that I have narrated here.
From now on, if you log in to the Front-end, you will be automatically logged in to the Back-end, and vice-versa.
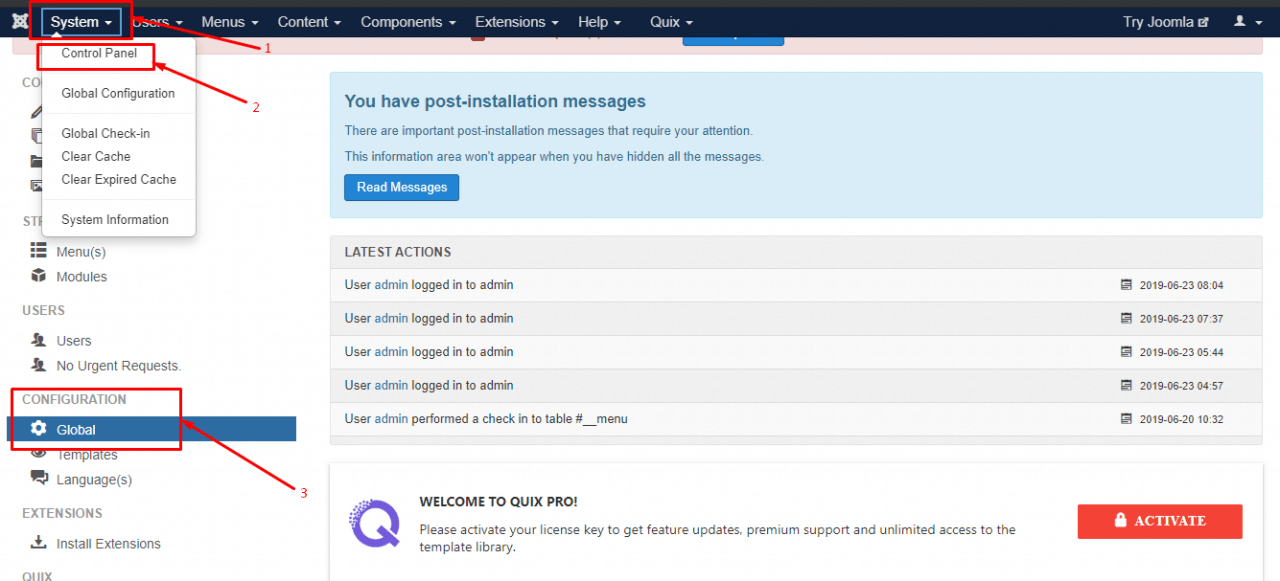
Step-1: Go to System > Control Panel. Then click the "Global" button under the CONFIGURATION section.
Step-2: Go to "Shared sessions" and make it "Yes". Then save the changes. It's done!

Who Can Login to Joomla Administrator Page or Admin Page?

In this section, I will discuss the role of different group members. You should have a clear sense about the role of each character. Otherwise, you won't be able to categorize your users in the Joomla administrator page.
Go to System> Control Panel> Global CONFIGURATION> permission as attached image shows.
In the Joomla Administration page, different groups have different access level features, and they are directly related to the editing, creation, and publishing of content as well as to access to the Administrative interface.
Each group has certain levels of access control, and once a user is made a member of that group, they automatically inherit those rights.
- Registered: Registered group allows the user to login to the Front-end interface. They can't contribute to the content, but this could allow them access to other sections, like a forum or download section if the site contains one.
- Author: It permits a user to post content. They are able to submit new content, select options to show the item on the front page and they can also select dates for publishing, but they have no access to publish any content. They can edit only their articles but only when that article has been published and is visible.
- Editor: Editor group enables a user to post and edit any content item from the Front-end. They can also edit the content that has not been published. Still, Editor users can't publish or change the publishing status of any articles, even their own article.
- Publisher: It permits a user to post, edit, and publish any content item from the Front-end.
3 Administration section groups allow access to Joomla:
- Manager: It allows the manager to create or edit any content, access to some Backend features like deleting, adding, and editing Categories, and Sections. They can also be editing the Front Page and Menus. But they have no access to the "Mechanics" of Joomla, like user management or the ability to install components or modules of Joomla.
- Administrator: It allows access to almost every administration functions. This user has all the privileges on the back end of a Manager, and they also have the access to set options on, and install/delete components, plugins, and modules. They just cannot change, edit, or install Site Templates or make any changes to the sites Global configuration options.
- Super Administrator: A Super Administration account can only be created or deleted by another Super Administration account. Each and every access to all areas is given to Super Administrators, and once these type of account are created, they cannot be as easily deleted. A Super Administration account holder admin can block the user from logging in or change the Password on another Super Administration account.
How to Create a Redirect After Joomla login?
In general sense, a Joomla login redirect is a notification or instruction to the browser, that your existing page has moved from one location to another location so that your traffic can get the updated version of your page from the new location.
To create a Joomla login redirect just follow the following steps.
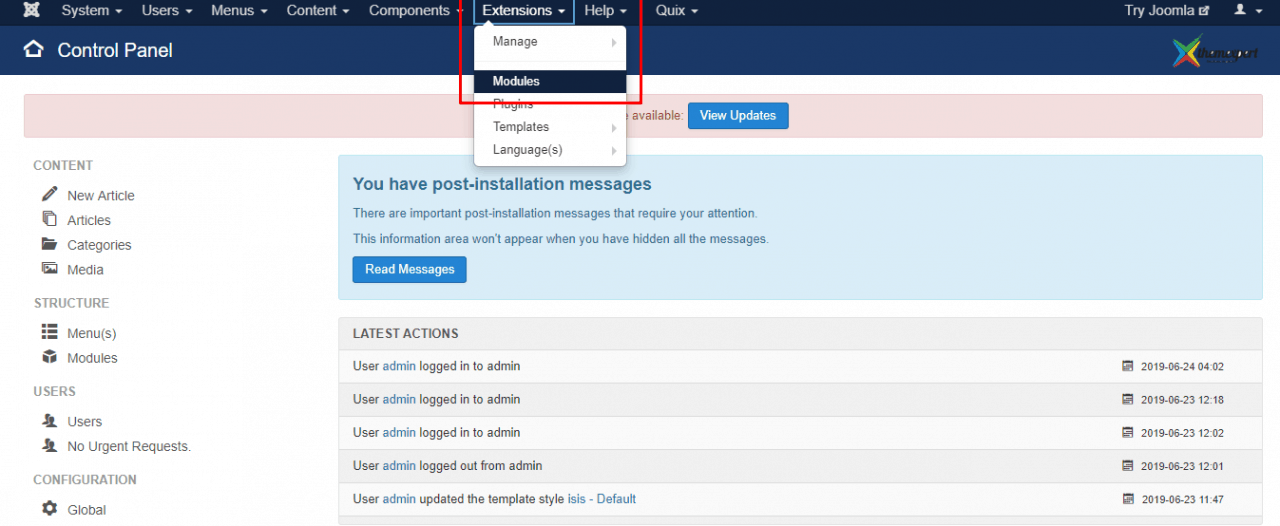
Step-1: Go to Extension > Modules.
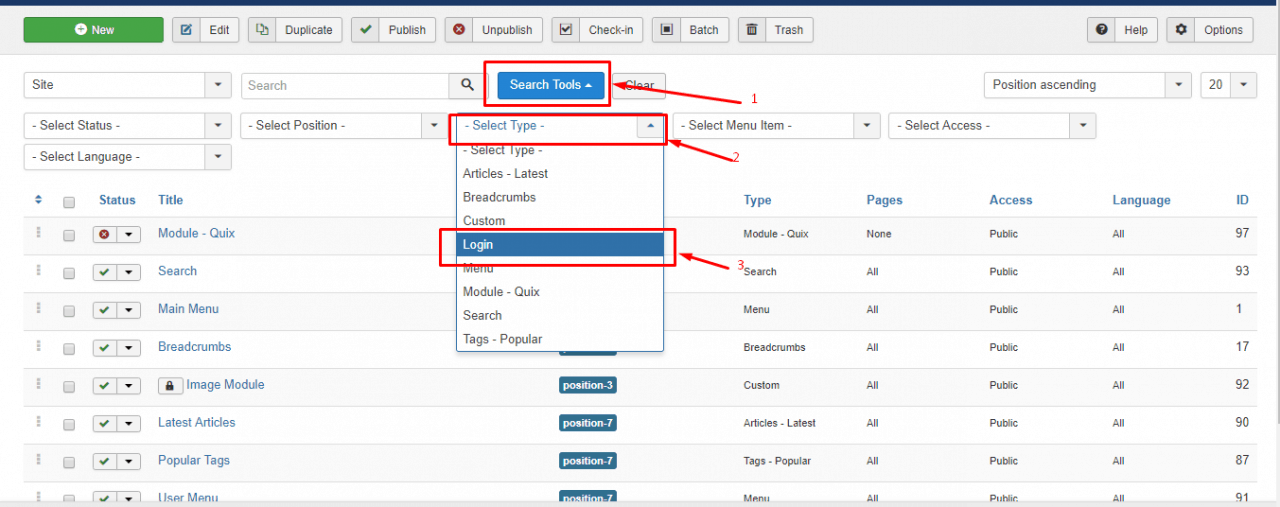
Step-2: Click on the "Search Tools", then you will see a "Select Type" drop-down list field. Select "login" from the list.
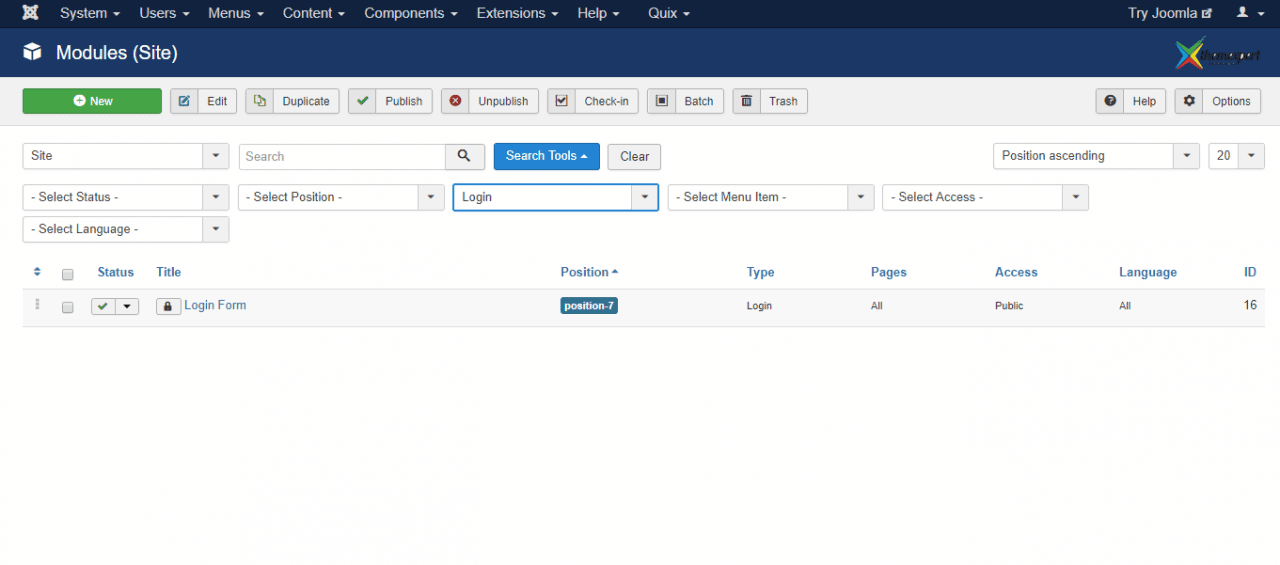
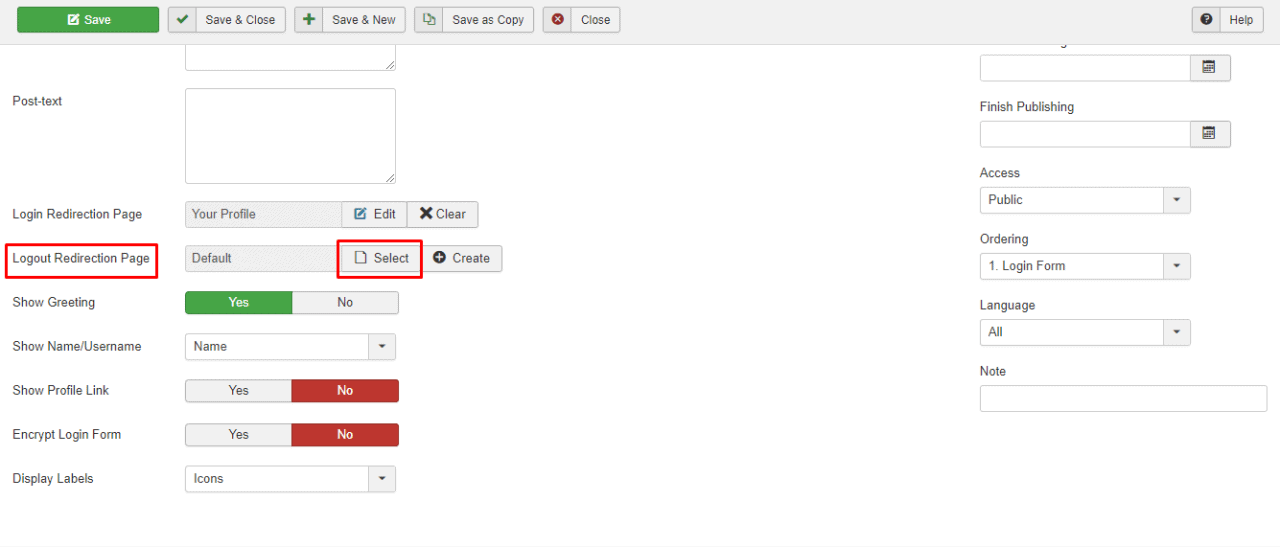
Step-3: Click on "login form". Go down and you will find a "Login Redirection Page". It will allow you to choose any published page that you want to redirect.
Remember one thing; your chosen page must be published; otherwise, it would not work.
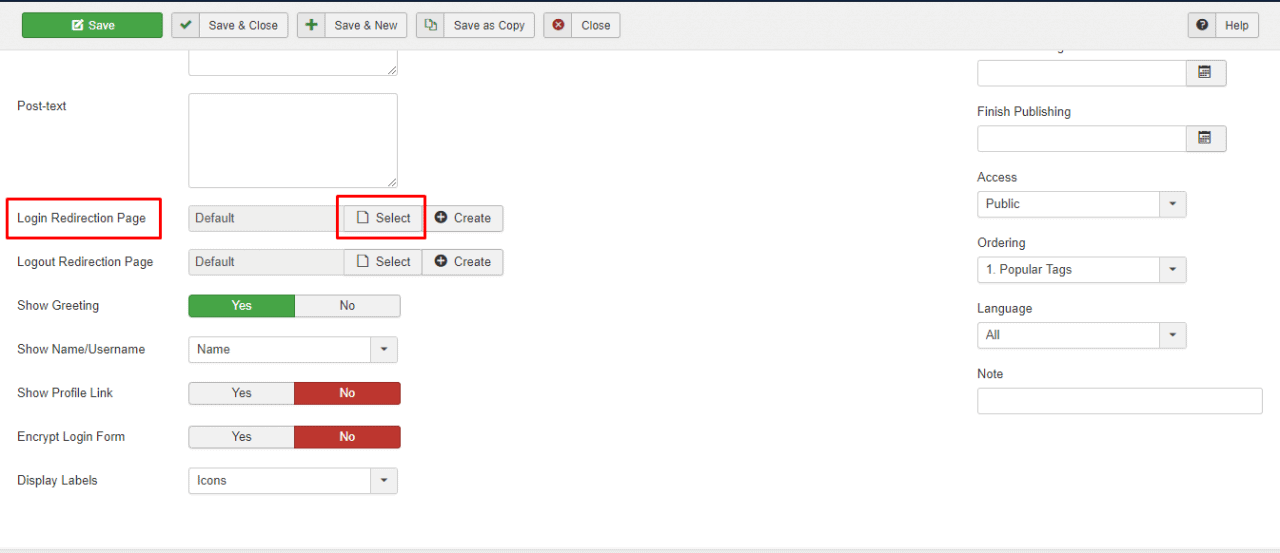
NOTE: If you want to redirect a Joomla logout page, similarly follow the above steps. You will find a "Logout Redirection Page" just below the "Login Redirection Page", and then choose whatever published page you want to redirect.
How to Recover Lost Joomla Login Username & Password?
Suppose, you have forgotten your Joomla login Username, or Password, or both. There is no need to worry as this section of this article will make you capable of recovering or resetting your Joomla login Username and Password.
To recover your Joomla login username and password, follow the below steps or watch the video.
Step-1: Open your "phpmyadmin". Find your database. Click on that.
Step-2: Click the "edit" option and find the username and password field.
Step-3: Set "Username" & "Password" as you want. Select "MD5" in the password field, it will encrypt your password so that no one can read your password. Click the "Go" button.
You have done it successfully. Go back to your login page and login there with new username and password.
How to Customize the Joomla Login Page?
Changing the Joomla admin dashboard login page is easy and simple. You can change it and add your own brand logo and image to it.
To change the logo of your admin dashboard login page, follow the steps below.
Step-1: Login to your Joomla Back-end. Go to Extension > Templates > Style.
Step-2: Switch to "Administrator" templates list.
Step-3: Open the isis-default template. Then click on the "Advanced" tab from the menu.
Step-4: Upload a Login logo and save the change.
To change the background of the admin login template, follow the steps below.
Step-1: Go to Extension > Templates > Templates.
Step-2: Switch to "Administrator" templates list.
Step-3: Open "Isis details and files".
Step-4: Upload a background image under the "images" folder.
Step-5: Create a custom.css file under the "css" folder. Paste the following code and don't forget to save your changes.
.view-login {
background: url("Your Image")
no-repeat fixed 50% 50% / cover #eff0f4 !important;
}

.login.well {
background: none repeat scroll 0 0 rgba(245, 245, 245, 0.79);
}

.view-login .well hr {
border-color: transparent;
}
How to Add Fields in Joomla Login Form?
You can add more fields in your Joomla user login form if you need more information about the user.
It's an easy procedure but impactful to decorate your Joomla login form. To implement that, follow the below steps.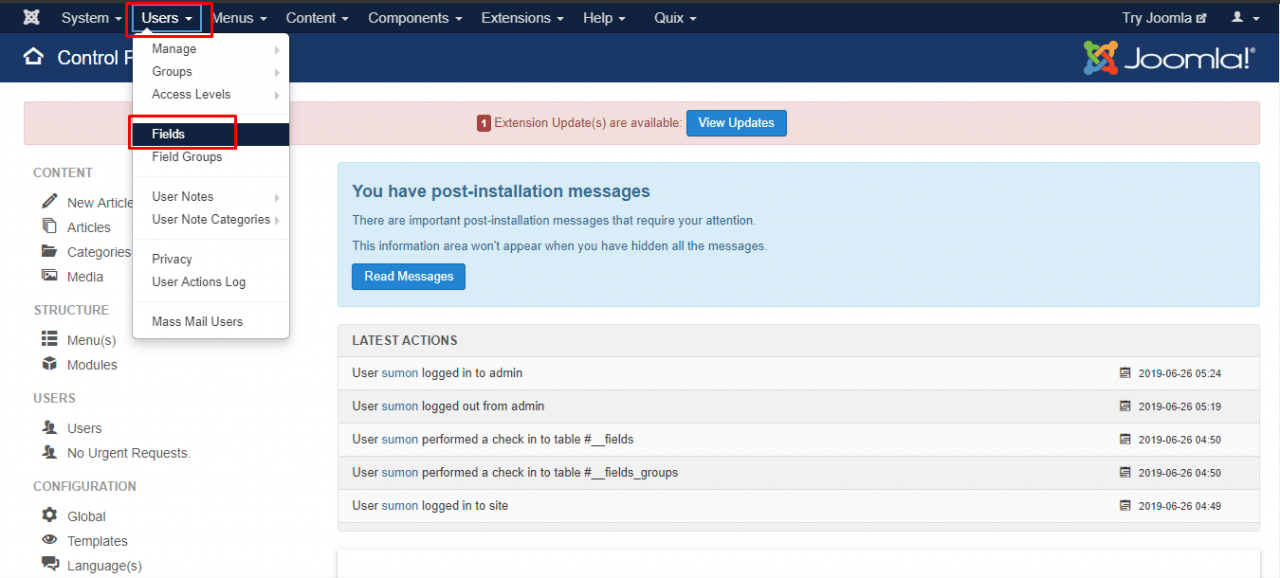
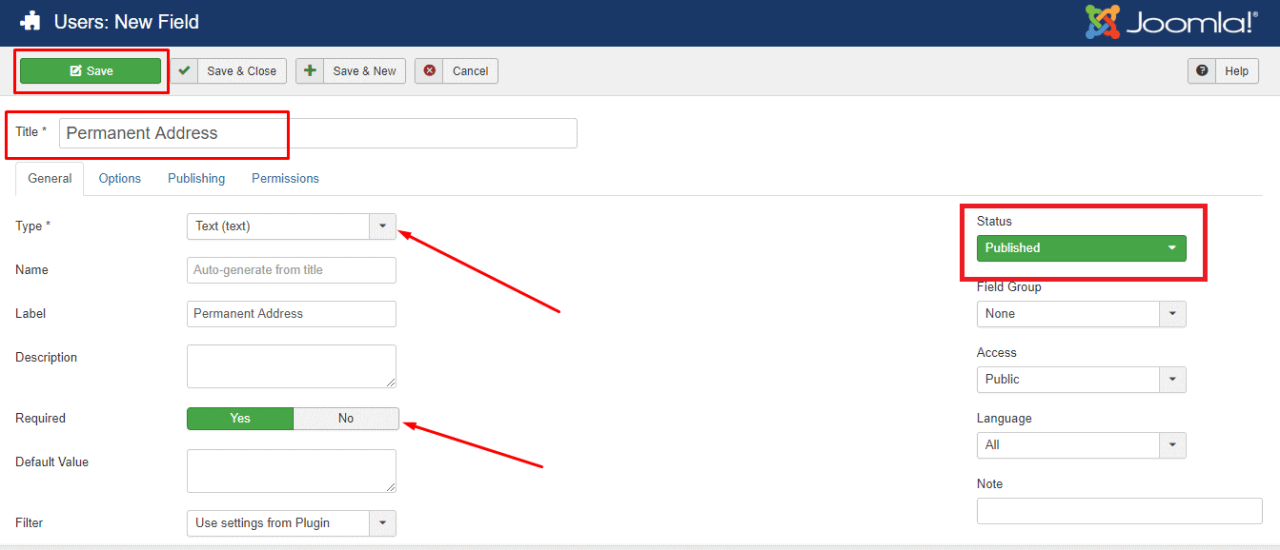
Step-2: Press the "New" button and create a field by giving the input in the "Title" field.

Step-3: Now customize it as you want and don't forget to press the "save" button after customization.
NOTE: Before pressing the "save" button please check the "status" of your "new field". It must be "published". Check the "status" condition on the right side of the page.
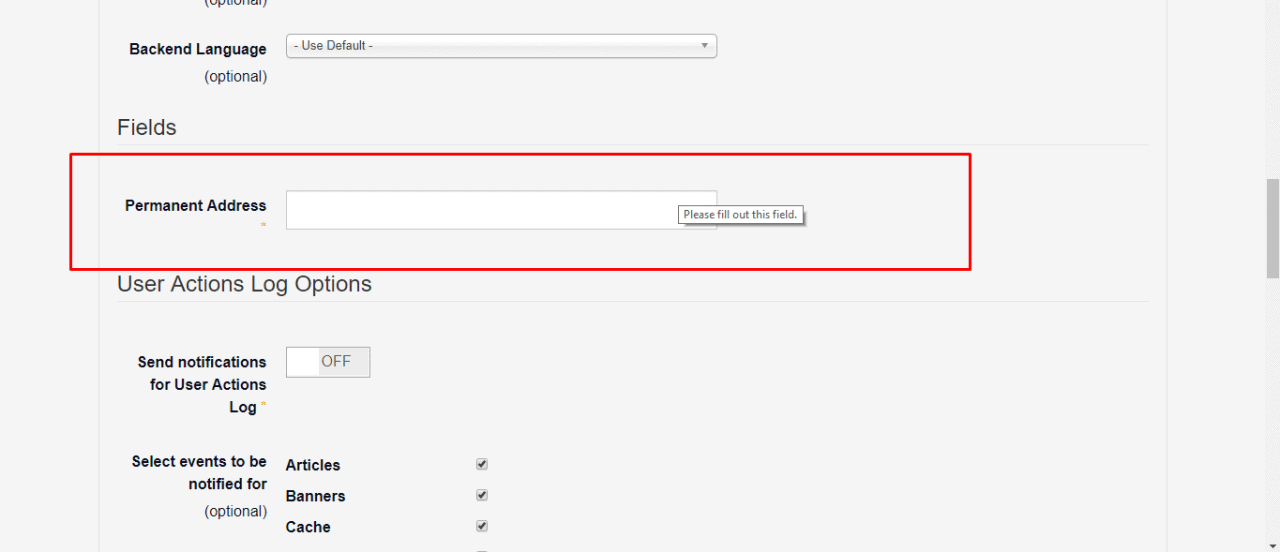
Check the screenshots for better understanding.
Now see the result.
How to Customize the Joomla Login Module?
We have an easy solution to customize the Joomla login module. It will help you to make your Joomla login module more specific to your users.
You can customize the Joomla Login Module as you want. You just need to open the settings and customize it as I show here.
Step-1: Go to Extensions > Modules
Step-2: Find "login form" and click that.
Step-3: Customize and save. You're done. Enjoy the changes.
How to Secure Joomla Login Page & Joomla Website?
Security is the first and foremost priority for a website owner. After so much hard work and dedication, one can own a website, but losing that website in a minute is pathetic.
This could happen by hackers. We faced this challenge earlier and followed some steps to overcome it successfully.
So for protecting your website from a hacker, you must follow some rules and regulations.
There are superb workable 16 strategies that could really help in this concern.
- Keep your Joomla version, extensions and plugins updated
- Use strong password
- Take regular backup
- Protect your Joomla administrator URL
- Use Joomla security extensions
- Secure Joomla login with 2-factor authentication
- Do not download Joomla templates and extensions from a warez site
- Disable FTP
- Proper file and directory protection
- Select your web host carefully
- Install SSL/HTTPS
- Rewrite htaccess file to .htaccess
- Force to use a secure password
- Enable SEO friendly URL
- Delete unused/unnecessary Joomla extensions
- Always update your PHP version
Joomla login security extension is really helpful to protect your website from hackers. For assuring protection from hackers, it is recommended to use top security extensions.
You can use the following Joomla security extension to secure your website.
-
- Check Plus
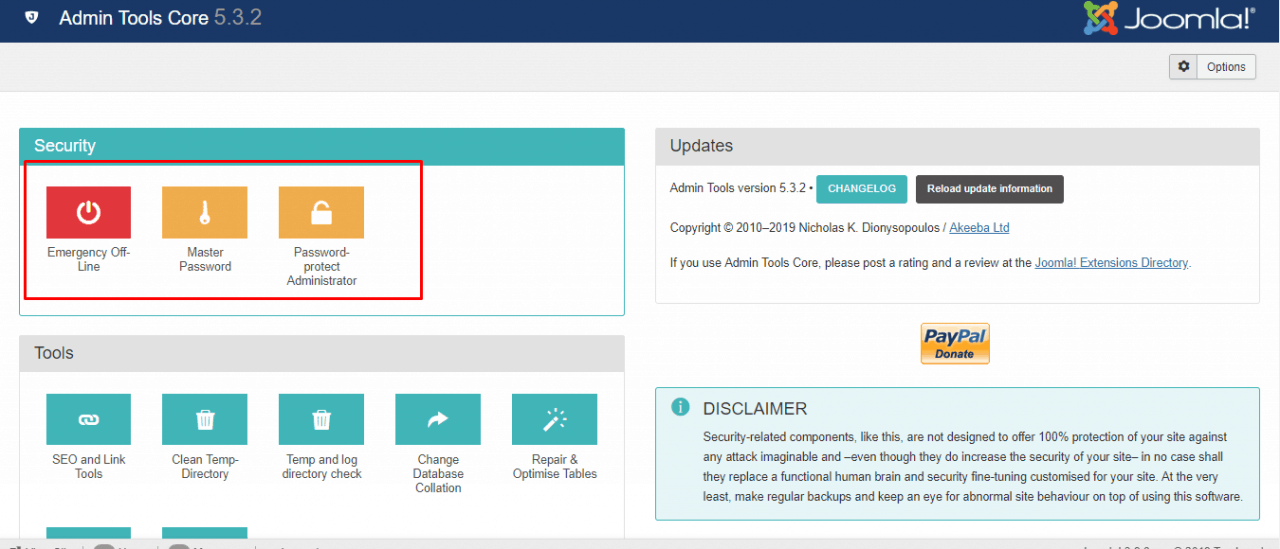
Now I'm going to demonstrate to you how you can add a Joomla security extension in your website. To secure your Joomla admin login, you can use an Admin tool in your site. To do that, follow the following steps.
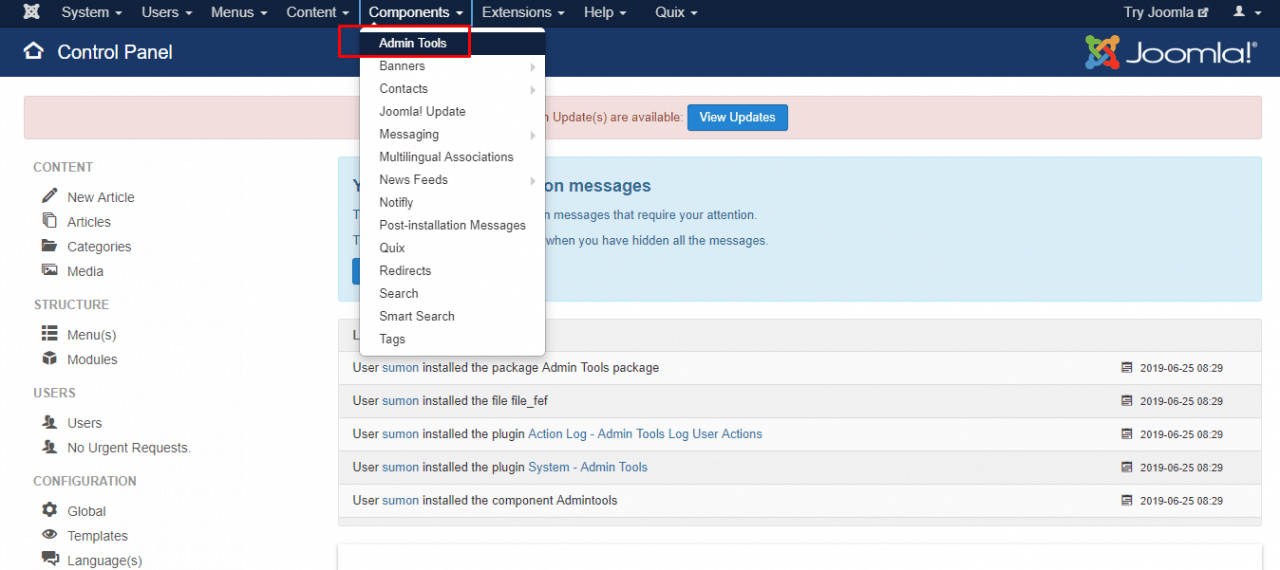
Step-1: Go to Akeeba backup and download admin tool for Joomla.
Step-2: Go to "Install Extension" and install your downloaded file.

Step-3: Go to Components > Admin Tools, and you are there. Now customize it as you need.
How to Add reCaptcha in Joomla Login?
Nowadays, reCaptcha is one of the most popular terms in the security field. For security purpose, using reCaptcha is a smart solution.
To set reCaptcha in your Joomla login page, you have to get the reCaptcha keys from Google. Don't worry; I am going to show you everything about setting reCaptcha in your Joomla login page.
So relax and follow the below steps, then you will be capable of setting up reCaptcha by yourself.
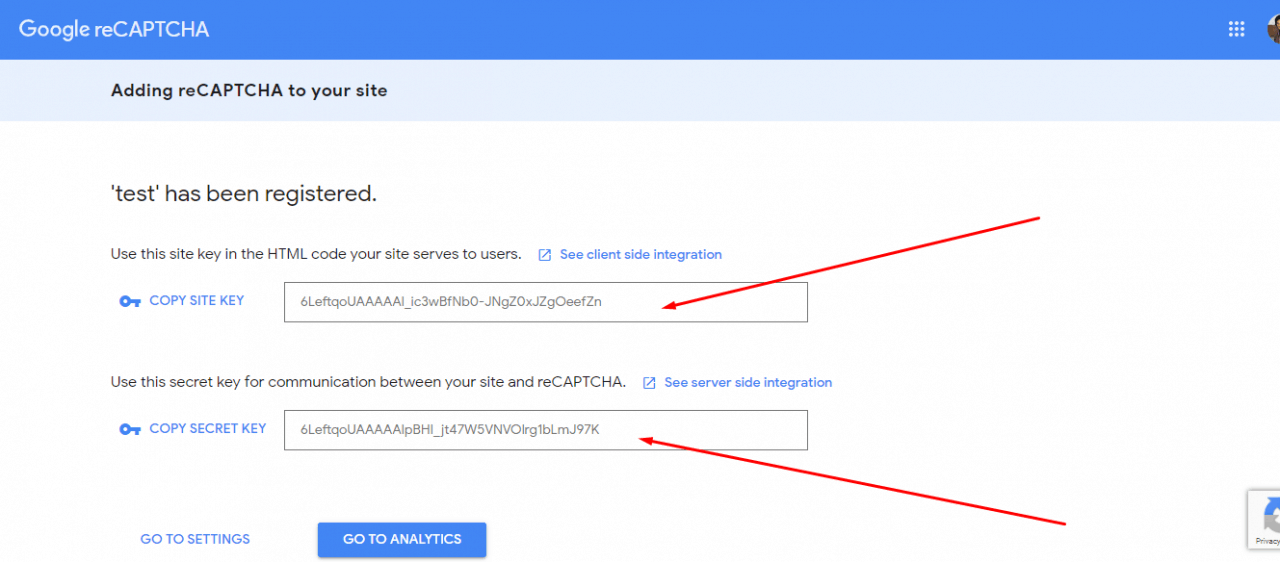
Step-1: To get the reCaptcha keys from Google, you must have a Gmail account, and you need to login on that account. Now go to this link https://www.google.com/recaptcha/admin.
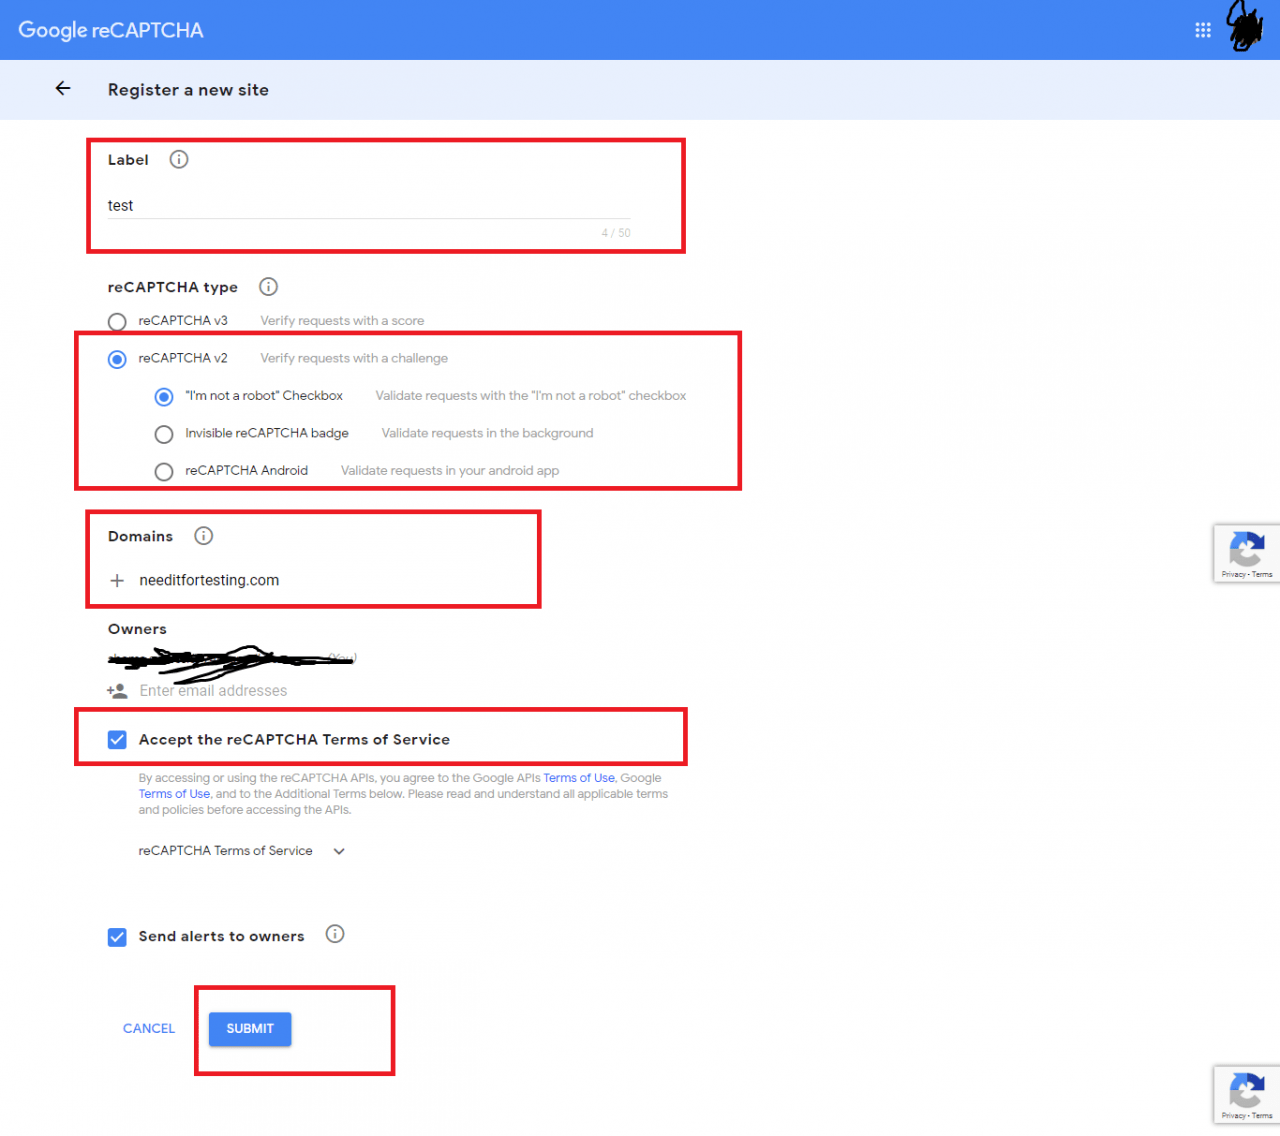
You must register your domain with the reCAPTCHA API and get the site API key & the site secret API key from this site.
You just need two pieces of information from here.
- Site Key
- Secret Key
NOTE: Without these keys, your reCaptcha won't work.
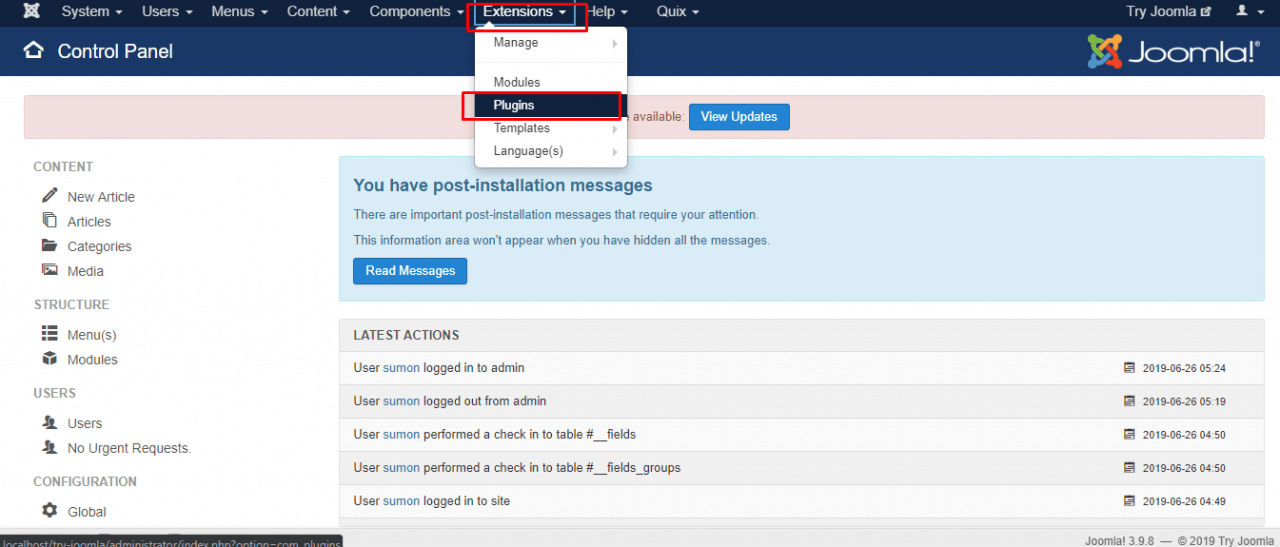
Step-2: Go to Extensions > Plugins.
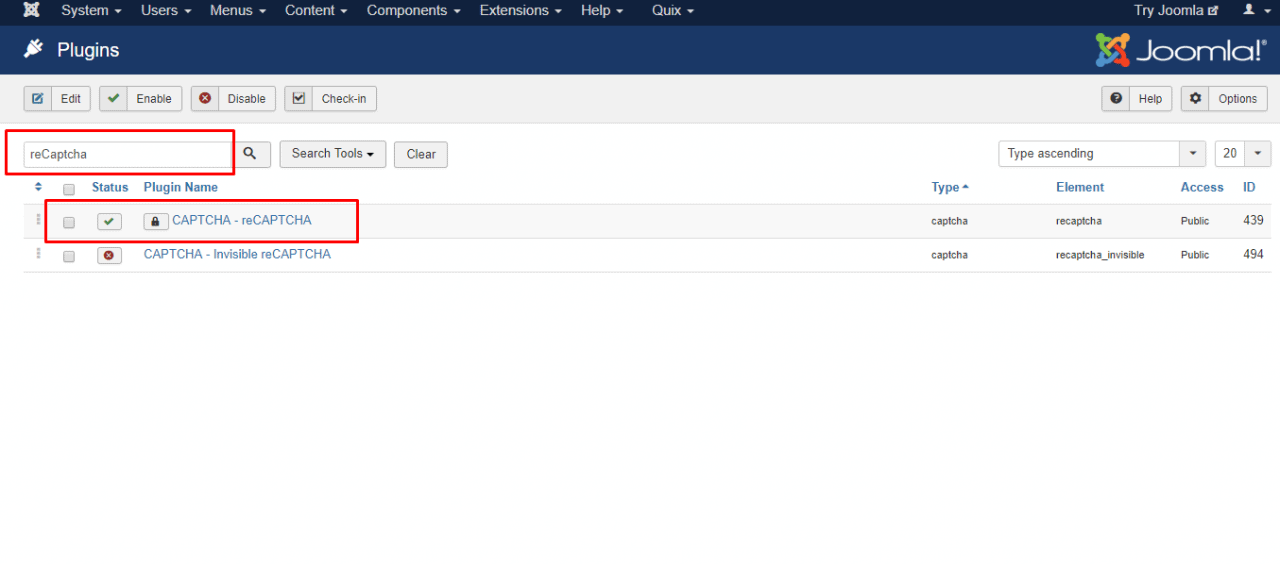
Step-3: Search and find the reCaptcha plugin.
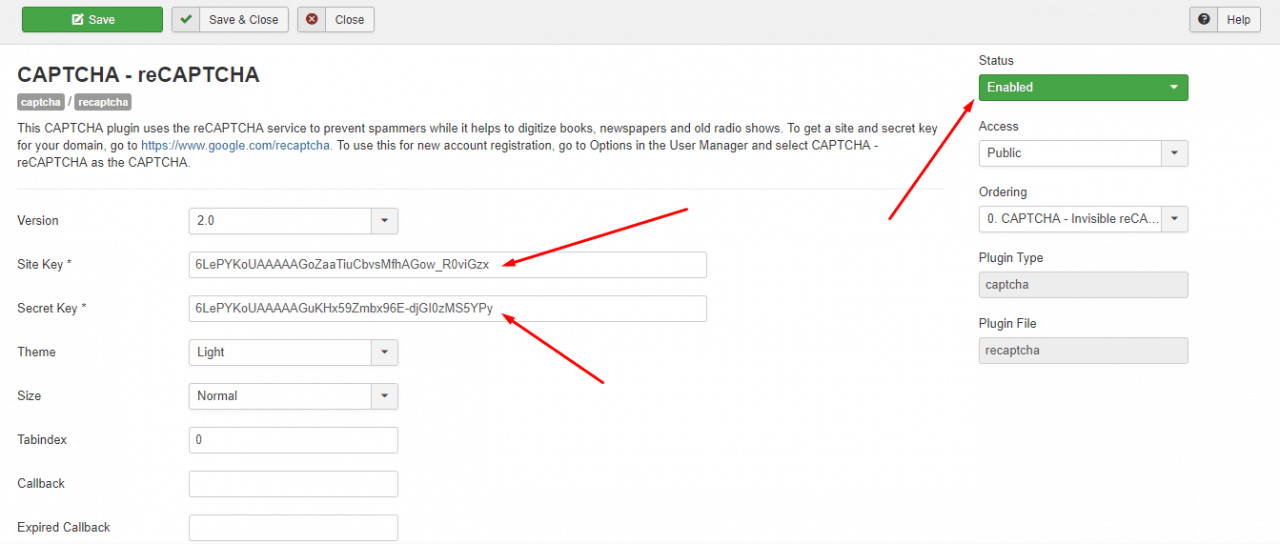
Step-4: Open reCaptcha plugin, choose version 2.0 and insert the Site Key & Secret Key. Set the plugin status as "Enabled". Don't forget to save the changes.
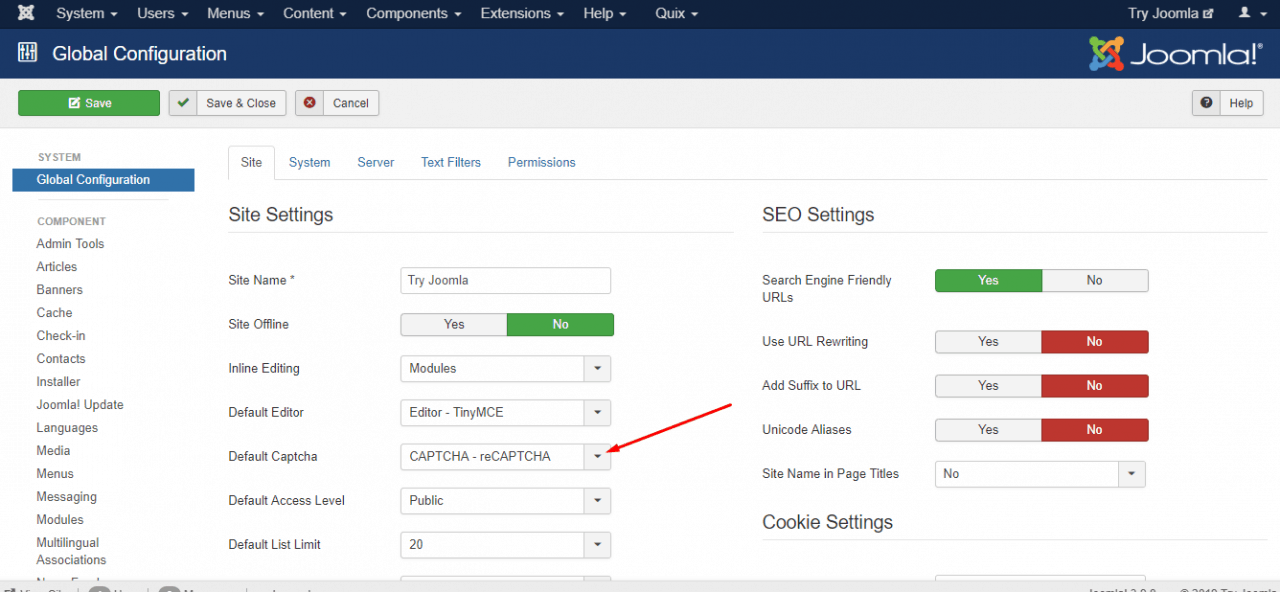
Step5: Go to System > Global Configuration > Site Settings.
Step-6: In the field named "Default Captcha" choose "Captcha-ReCaptcha" and save settings.
Now check the results.
NOTE: Sometimes in localhost, reCaptcha does not work. To make it work, you need to set up a virtual host in your localhost. Your hosted domain has to be registered in Google API.
Joomla & GDPR Compliance
GDPR stands for General Data Protection Regulation. Those who are new with the term of Joomla GDPR, you can read our previous dedicated blog post on How to Make Your Joomla! Site GDPR Friendly
GDPR has some rules. I am going to cover the gist of them in the following.
- Seek permission from users before collecting information that could identify them, which could include non-identifying data points that taken together might identify a real person — e.g., name, email, IP address, location.
- Explain to your user why you are collecting their data. Show them the reasons. E.g., we retain your email because you subscribed to us so we could send you our newsletter.
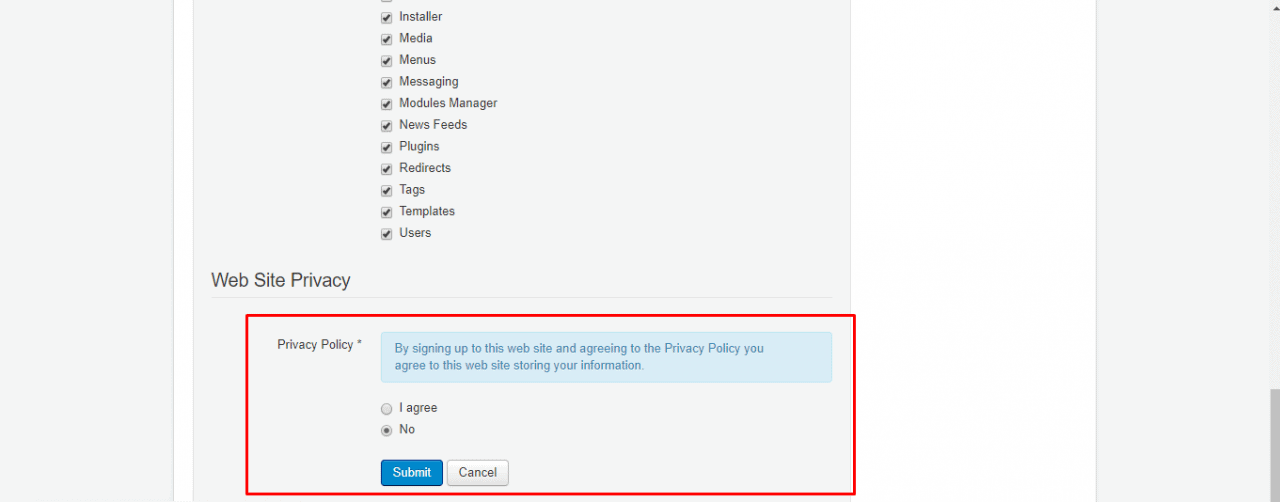
- Clearly inform your users about what information is being collected. Assure them to delete the data at a user's request.
Joomla & GDPR Compliance Strategy: Seeking User Consent
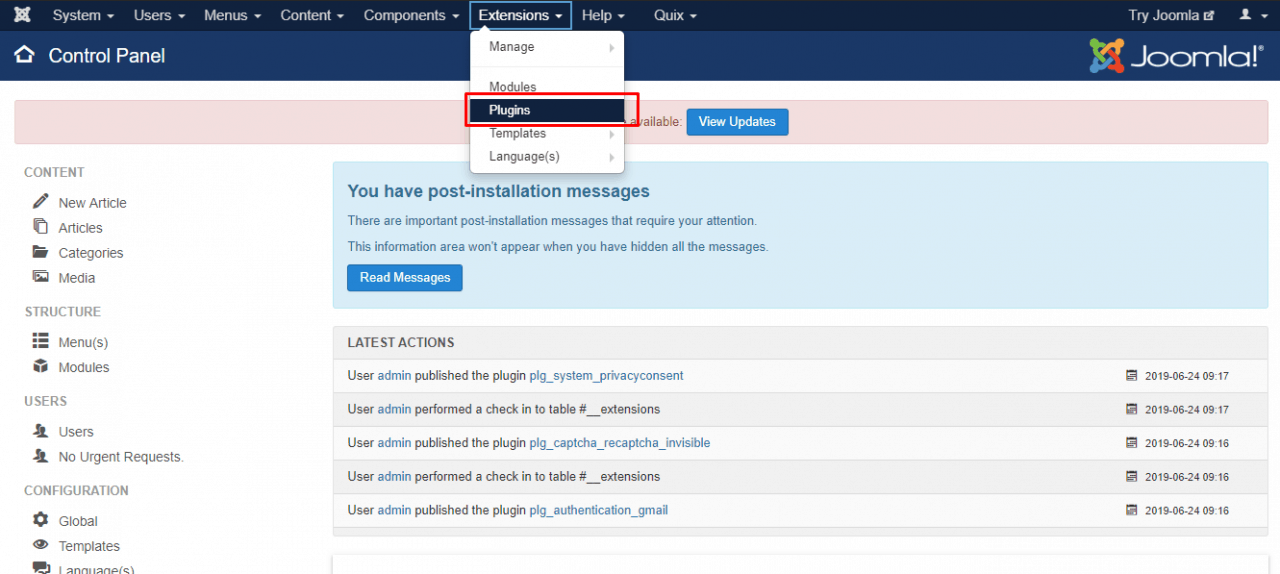
Step-1: Go to Extensions > Plugins.
Step-2: Search "system privacy consent" in the search box and enable it.
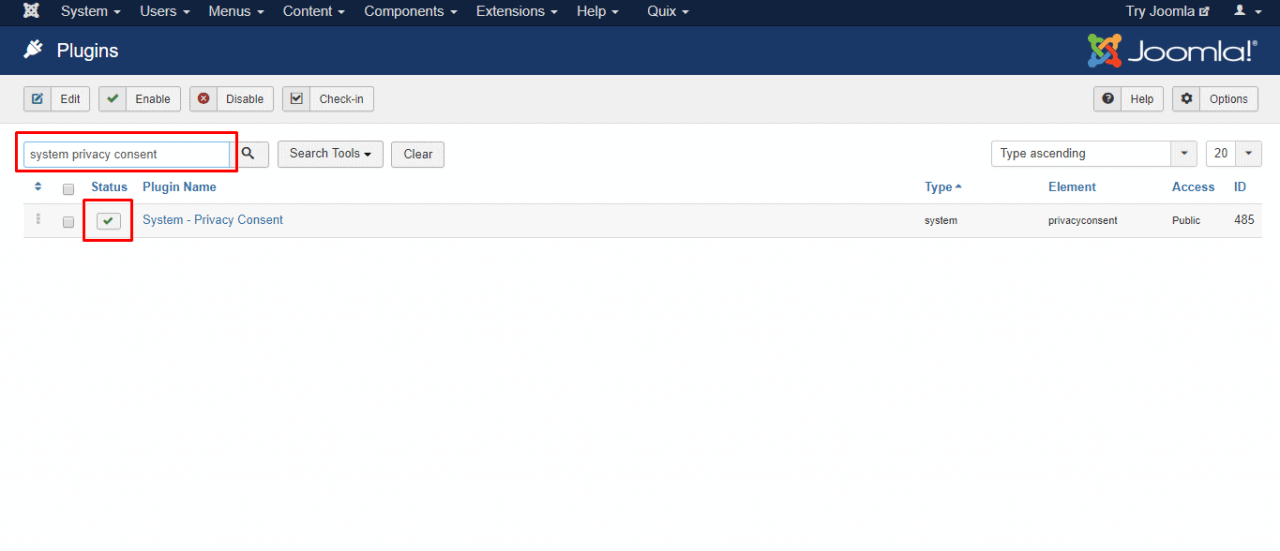
Now see the result.
Joomla Login Providers
Social login is a free Joomla extension that allows the visitor to login and register with their social accounts.
This extension supports Facebook, Google, Twitter, Instagram, LinkedIn, Yahoo, PayPal, Foursquare, OpenID, LiveJournal, Steam, Wordpress.com, StackExchange, Windows Live, Disqus, Blogger, Github.com, Skyrock.com, VKontakte, Mail.ru.
You can choose any of them or all of them on your page.
Detailed procedures are described below.
Step-1: Download your file from https://docs.oneall.com/plugins/guide/social-login-joomla/. Choose your required file from the list.
Step-2: For uploading the downloaded file, follow the below procedures.
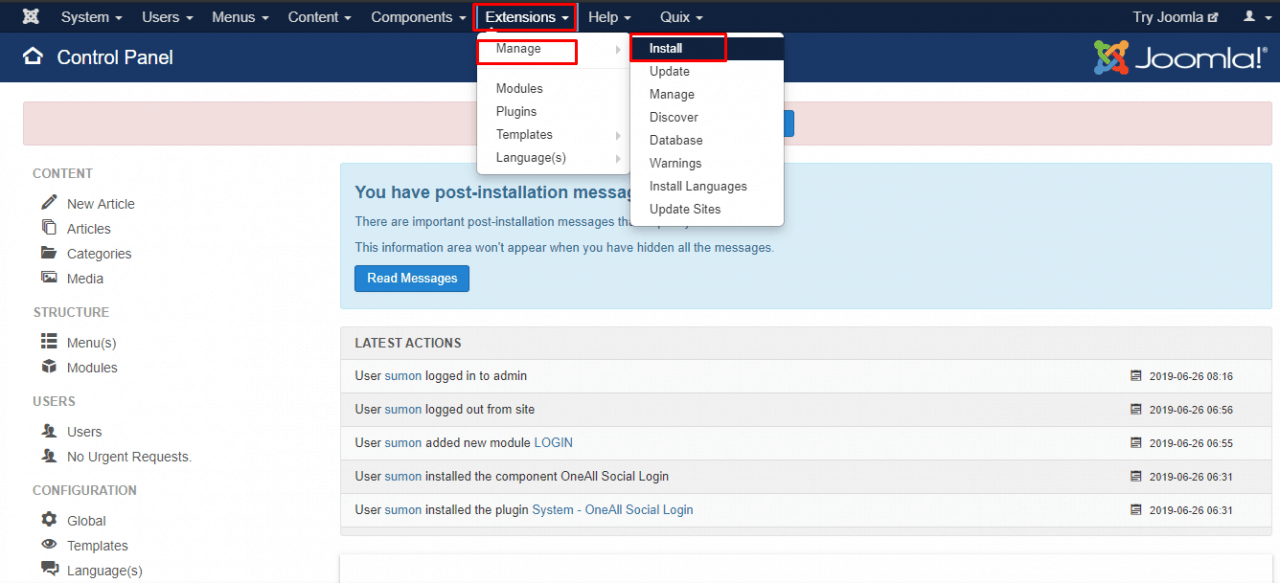
- Go to Extension > Manage > Install
- Upload the file to install. You will see a confirmation message after successful upload.

Step-3: Configuration
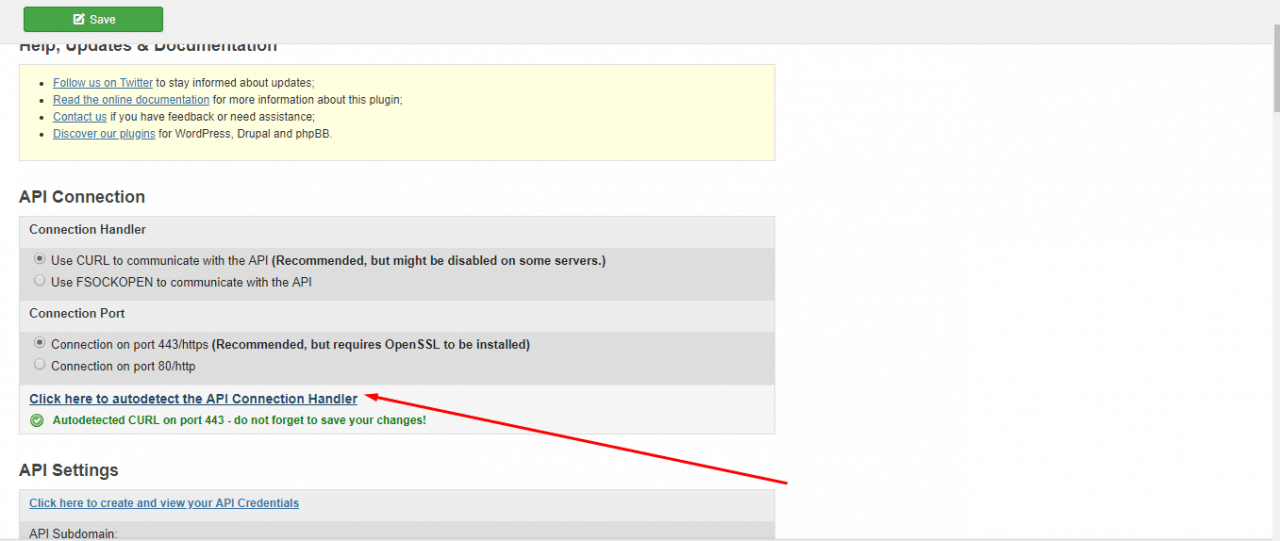
- Go to Components > One all social login
- Click on the Click here to autodetect the API Connection Handler link.
Step-4: Collecting public key and private key.
You can collect it from any of your trusted sources. I am going to demonstrate to you how you can configure the next steps. For your betterment, I have shown here a third party site to collect those keys.
- Log in https://app.oneall.com If you don't have an account in this site, sign up.
- Fill up the required fields and generate your API access.
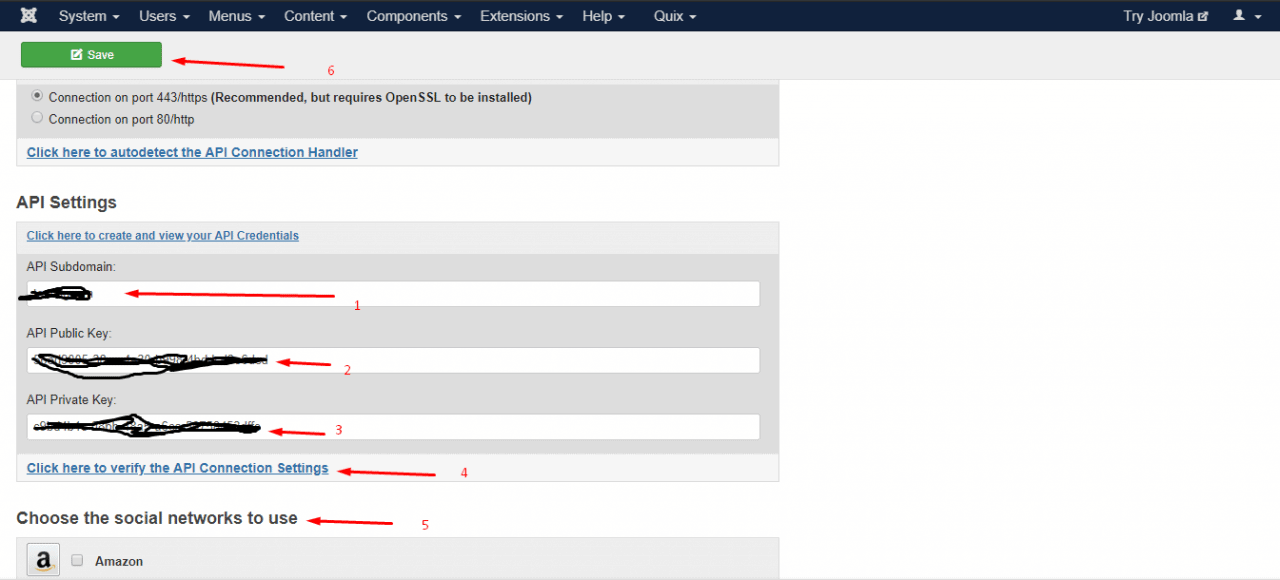
Step-5: Go again to Components-> OneAll Social Login and set your API Settings (values you'll find from API Access) type your API Subdomain, API Public Key, API Private Key and click on the Click here to verify the API Connection Settings.
Then Choose the social networks to use and finally click the Save button.
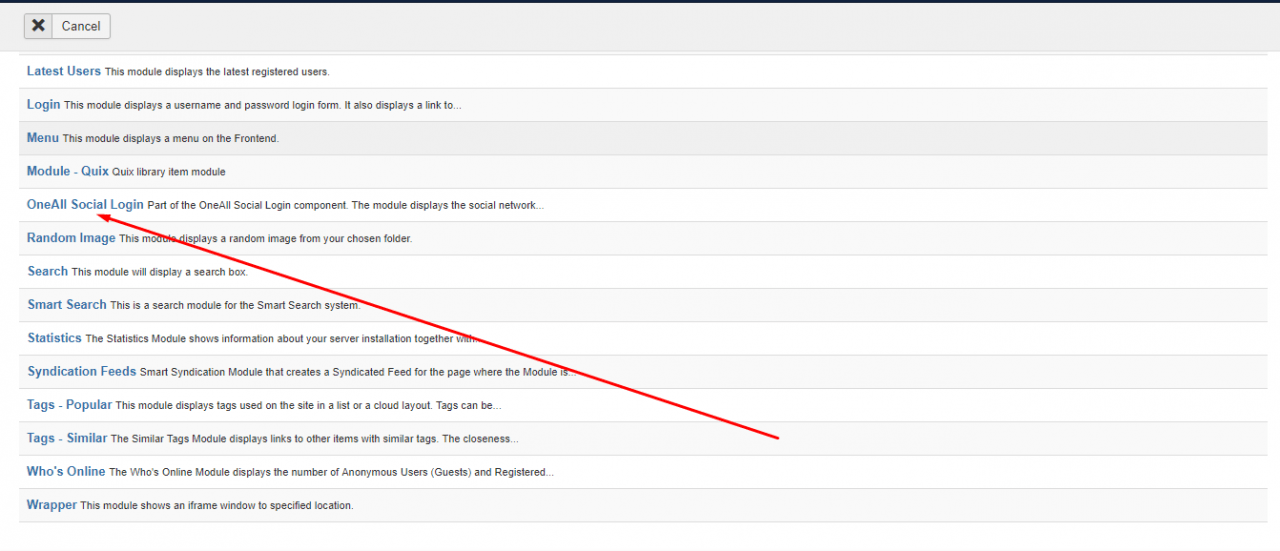
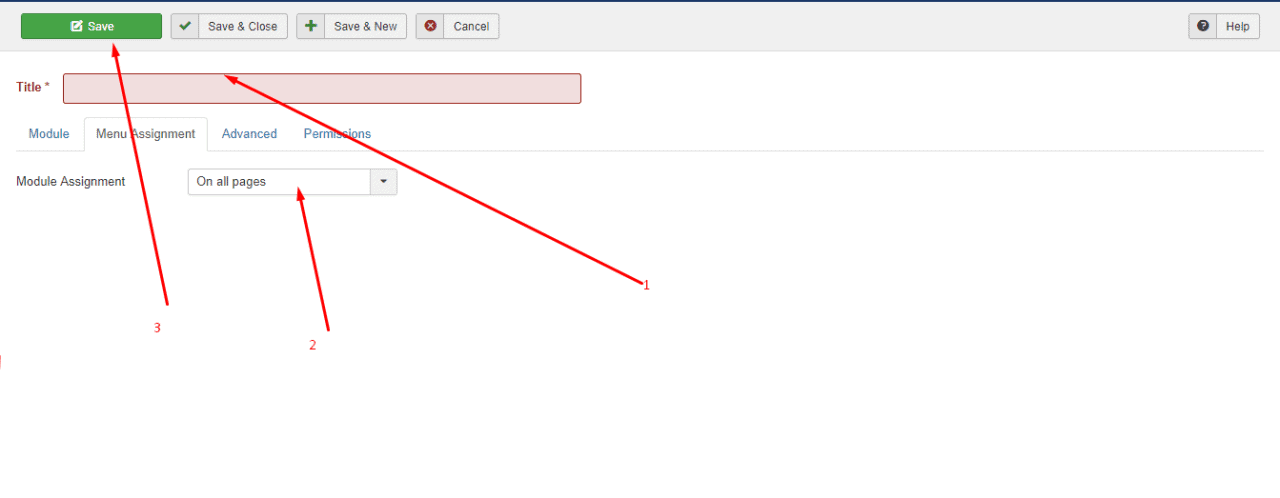
Step-6: Go to Extensions-> Modules-> New. Then choose OneAll Social Login.
Step-7: Type Title, choose the position and go to Menu Assignment Tab. Assign the module to On all page and click Save and Close.
You're done!!!
The solution of Joomla Login Problem
We often face some login issue when we try to login to Joomla page. It happens when there is something wrong in our system or database.
I have discussed here some common issue that we usually face and tried to give you the solution regarding the problem.
Change the Password of Your Administrator User
Sometimes it happens that, we input the username and password but it doesn't allow me to login. In that case, you can try the following steps.
Step-1: Open your "phpmyadmin". Find your database. Click on that.
Step-2: Click the "edit" option and find the username and password field.
Step-3: Set "Username" & "Password" as you want. Select "MD5" in the password field, it will encrypt your password so that no one can read your password. Click the "Go" button. You have done it successfully.
Go back your login page and login there with new username and password.
The Account For Your User is Blocked
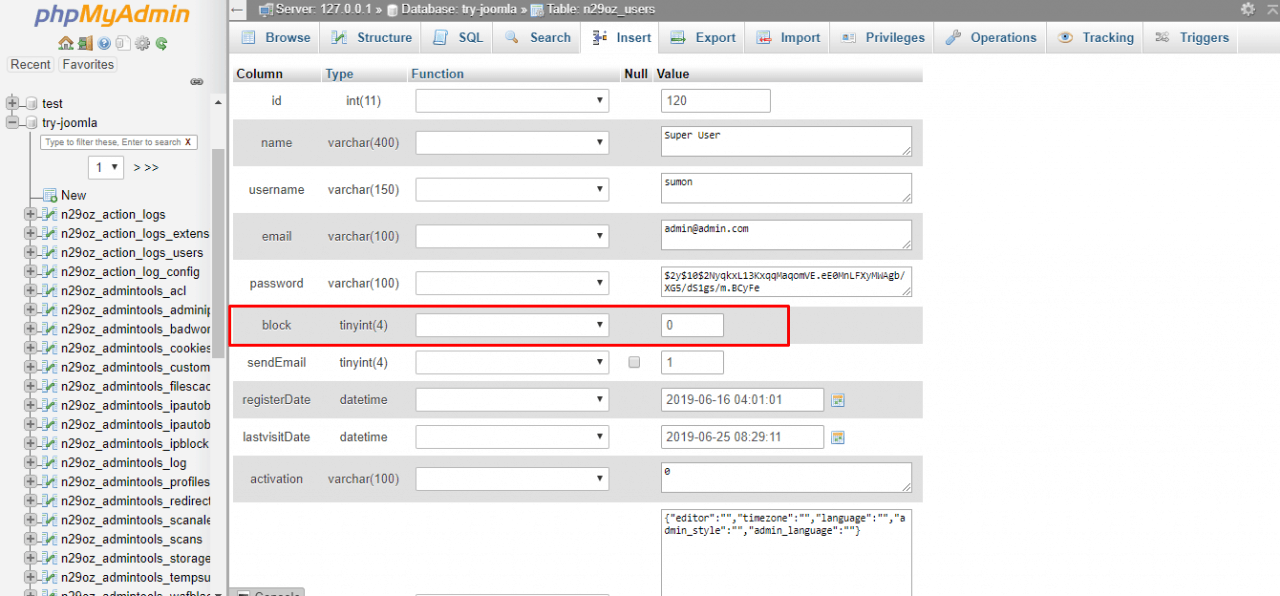
Any user can be blocked from Joomla's Back-end.
You can unblock your user via phpMyAdmin, by going to the user's table and then set the block field for the affected user to 0 (instead of 1).
Getting a JAuthentication Error Message
If you are getting the following error message:
JAuthentication::__construct: Could not load authentication libraries.
Username and password do not match.
Most probably the problem is occurred by disabled Authentication - Joomla plugin. To solve it, follow the below procedures.
Step-1: You just need to access your phpMyAdmin in cPanel and select your database.
Step-2: Select the plugin table and find the record named "Authentication- Joomla"
Step-3: Click the Edit button (pencil icon) for that entry. Find the row called "published" and change the value from 0 to 1.
Now click the "Go" button.
Access your admin area with your login details and verify if the issue persists.
Check if the Plugin User - Joomla! is Properly Enabled
We usually forget to check the status of the Plugin User Joomla. When you face login issue, we should check the status of it. If it is disabled, you must make it enable.
Here is the procedure:
Step-1: Log in to your cPanel and navigate to phpMyAdmin and select your database.
Step-2: Click on the plugins table and select the "User - Joomla!" entry.
Step-3: Make sure that the value next to the "published" field is set to 1. If it is different, you should change the value to 1.
Click on the GO button and check whether you can log in or not.
Conclusion
In this article, I have tried to cover all of the Joomla login system settings. The explanation of each and every setting will make your Joomla login page customization work easy.
Let us know your valuable feedback regarding this article below the comment box. We are always ready to hear from you.