Developing a Joomla! component generally gets you to write tons of code, right? If you want to get rid of that and want your component to be compatible with Joomla regular and major updates of Joomla. You are on the right place. Today, I will show you how to develop Gallery Component with FOF, develop by Akeeba, thought FOF comes with default Joomla! installation, but we’ll download F0F (FzeorF) files. You might think why download, F0F right? There is a funny reason, I will disclose at the end of my tutorial.
There are a couple of parts related to this component development, such back-end view and front-end view. Only back-end view involves with Item view and category view, and item view consists of single item view and multiple item view, and the same as with category view.
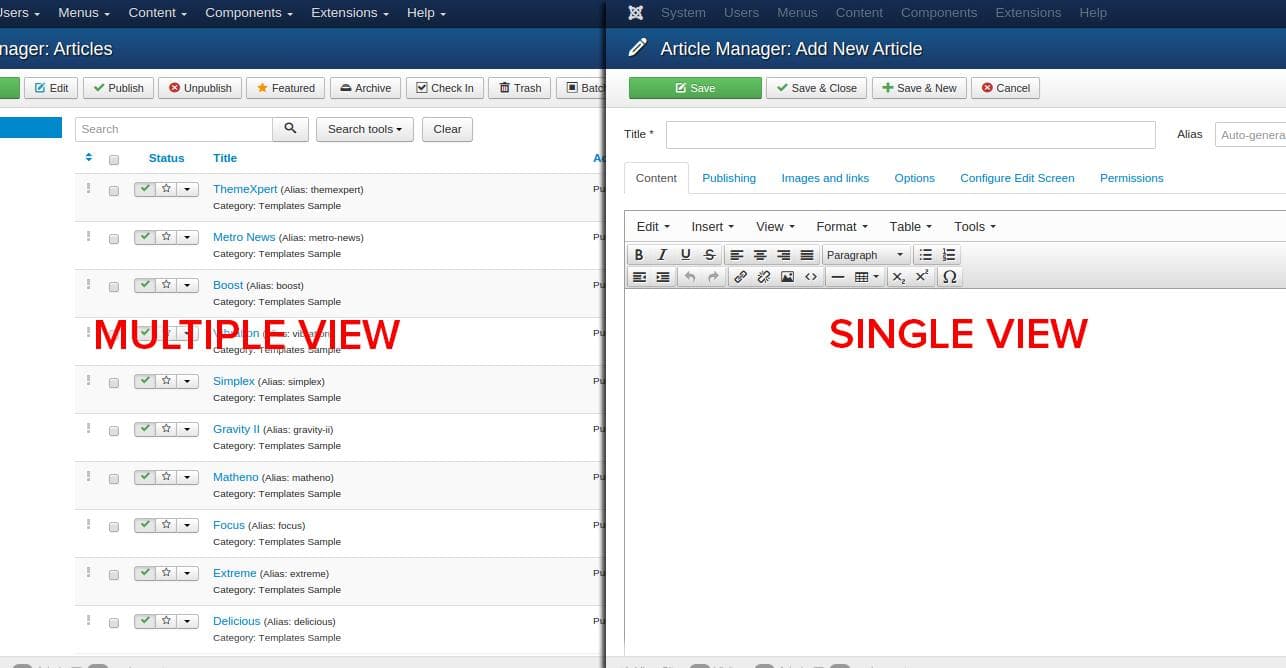
If you are confused with item view and category view. Let me make things simple. When we click on the New button from Article Manager, it opens up the single item view. In Article Manager, we can see all Articles altogether, this is called a multiple item view, Have a look at the image below.
Note: I have defined the terms such as single as well as multiple items view and category view in the last paragraph only to make steps simple in the subsequent steps. Hope it will help you a lot. Let’s get started.
Step 01
To develop a Joomla Component, download the latest version of Joomla and FOF framework. Install Joomla in your computer and FOF framework as well. I think, you might not familiar with the FOF framework installation. After downloading latest version of FOF framework from this link, unzip it. Once you unzipped the folder, you will find golf. Copy the folder, and paste it in the libraries folder from the Joomla! root directory after rename it From fof to f0f (FzeroF).
Libraries folder path: Joomla root directory/administrator/components/libraries
Step 02
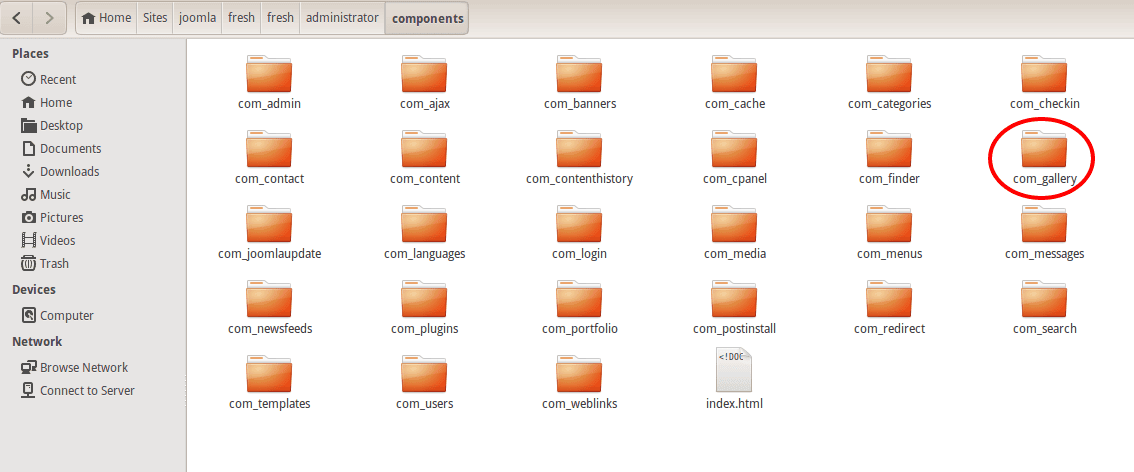
Now select your component name. You know we’re going to create Gallery Component. In this tutorial we will create only backend multiple and single item view. To create your own component, head to the Joomla and create the com_gallery folder in the component folder following this link Joomla root directory/administrator/components. You might be thinking why I use com_ prefix in com_gallery folder, let me make things clear. Whatever component you’ll create you have to add com prefix before your component name, Suppose you will create portfolio component. you have create folder com_portfolio. Have a look in the image below.
Step 03
Now we have to create five files in com_gallery folder to initialize the component development. Here are file names create your own.
- access.xml
- com_gallery.xml
- config.xml
- fof.xml
- gallery.php
com_gallery and gallery.php file name could be different depending your component name. If you create the portfolio component. The com_gallery and gallery.php name would be com_portfolio and portfolio.php.
Now open access.xml file copy the following code and paste on blank file access.xml.
Copy the following code, open gallery.php file and paste your copied code on it.
config.xml file copy and paste the following code
Copy the following code paste in fof.xml file
Now, open com_gallery.xml file copy the following code and paste on it.
Note: We are creating a gallery component. If you want to create some other component, such as portfolio component. Make sure you have replaced gallery text with portfolio on every file. You must follow the uppercase and lowercase convention while replacing your component name.
Step 04
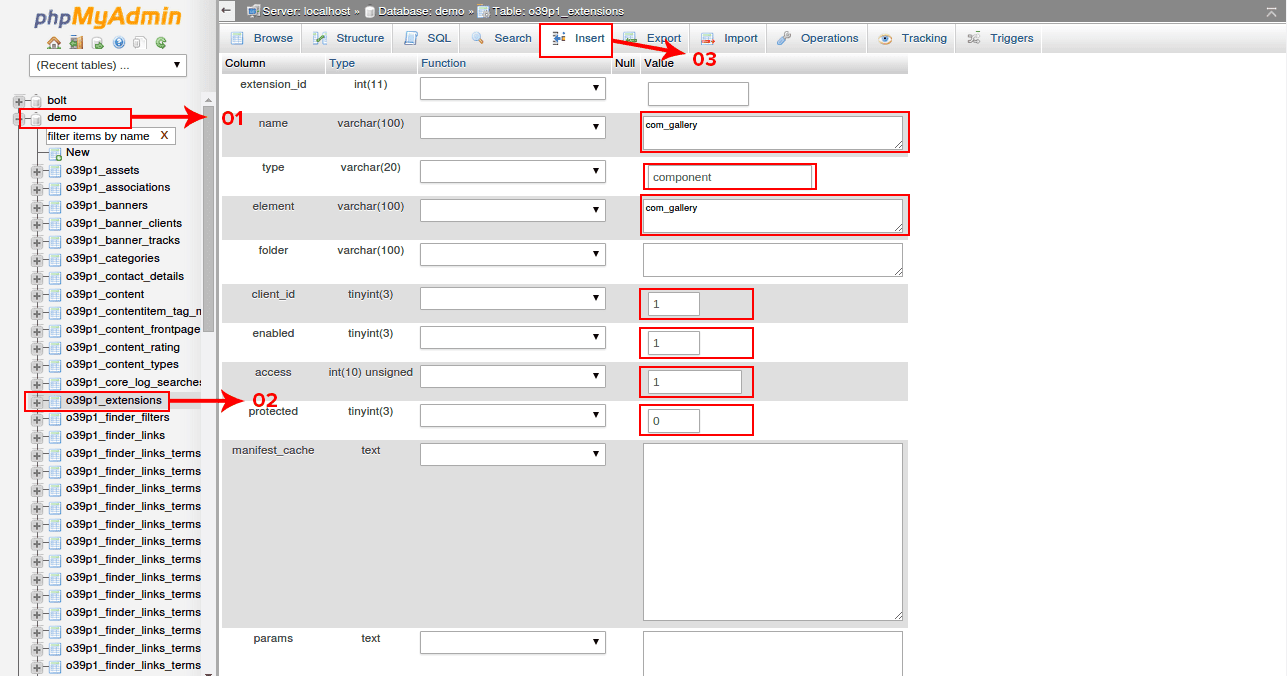
Now you have to register your component in your database extension table. Open your database where you’ve installed your Joomla files. You can see my database name is demo. click on your database. click on Extension from left table columns. You might be thinking the prefixes before extension table, right? The prefixes are added automatically while installing Joomla, even you can add your own defined prefixes to secure your database. This is not part of FOF. Click on insert button from top navigation. Now fill name and element field value with com_gallery, type field value with component, assign the clicent_id,enable, access value with 1, fill the protect value field with 0, keep everything empty for this moment, and click on go button.
Step 05
Now we access the component backend view from url. Type the URL (https://localhost/yoursitename/administrator/index.php?option=com_gallery) on your browser address bar, make sure you have logged in our Joomla backend. You will face the error something like this ( 1146 Table 'demo.o39p1_gallery_items' doesn't exist SQL=SHOW FULL COLUMNS FROM `o39p1_gallery_items`). The error is indicating us. We have a database call “demo”. The query can’t show all columns from o39p1_gallery_items table. Right now we have database called “demo” but have not table titled “o39p1_gallery_items” exist in your database. In your turn the database name and table prefix could be different. Be careful while creating your database table.
Step 06
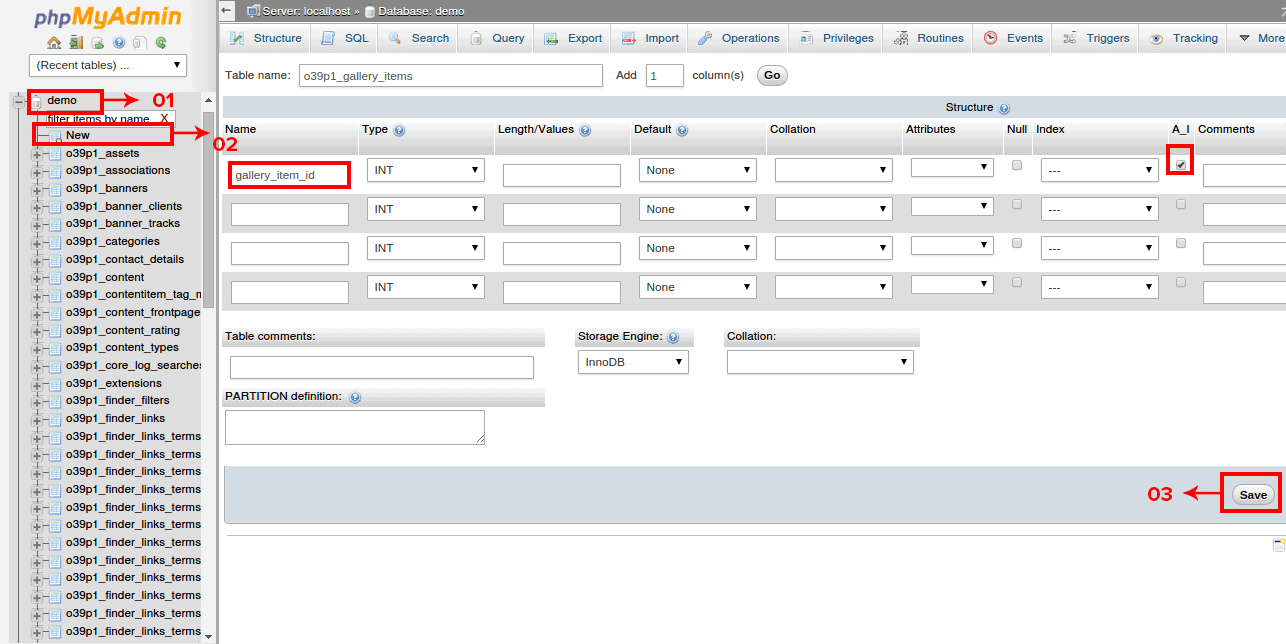
To create new database table in your database, select your database and click New under it. Now field you Table Name your table name. My table name is o39p1_gallery_items. Insert table ID name (I inserted gallery_item_id), choose type INT (integer) and select A_I (Auto Increment), keep other field empty for this time and click Save. You can see in the image below, how I filled the field.
Step 07
Now refresh the page where you 1146 error. But now it give you another 500 error. something like this ( 500 Layout admin:com_gallery/item/default not found). Don’t worry, we’ll no longer have this error after this step.
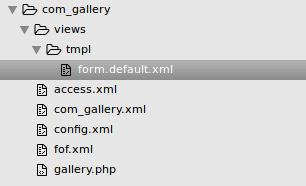
Now back to your joomla root directory in com_gallery folder where we created five files in our step 03 section . In this turn we will create backend view. To create backend view. Create a folder views under com_gallery folder. items folder under views, tmpl folder under items and create new file titled form.default.xml. Have a look on the file hierarchy.
Now copy and paste the following code in form.default.xml file
Now refresh the page where you got 500 error, Now you will get following screen.
Step 08
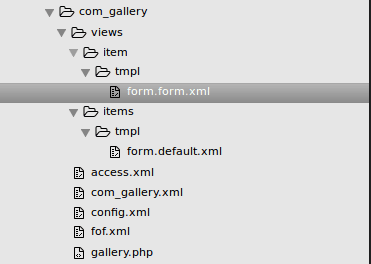
Our items multiple views is ready, Now we can term it items manager, because Its something like Joomla Article Manager. Currently there is no item is available in our items manager, because we haven’t create any items yet. To create new item click on New button from top menu. Now you will get 500 ( 500 Layout admin:com_gallery/items/default not found) error again. Because we haven’t created any files for single item view. To create single item view, back to the views folder. Create item folder under views, tmpl folder under item and create new file titled form.form.xml. Have a look on the file hierarchy.
Now copy and paste the following code in form.form.xml file
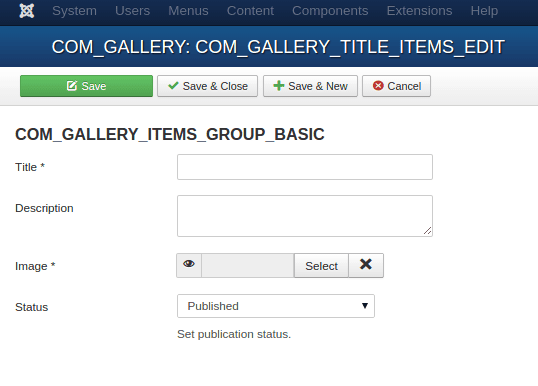
If you properly do the above steps, you can bring up the following screen.
Step 09
Our single item view is ready. Now give Title, Description, select image, and choose status publish for your new gallery item. and click Save and Close. Now you’ve created a sgine items, but no record have been created in our o39p1_gallery_items database table except gallery_item_id, because I’ve created only gallery_item_id field, not the other fields for Title, Description, Image, Status and other magic fields. You might be thinking what is magic fields, right? Magic fields have special meaning for FOF. to learn more about FOF, have a look on this link.
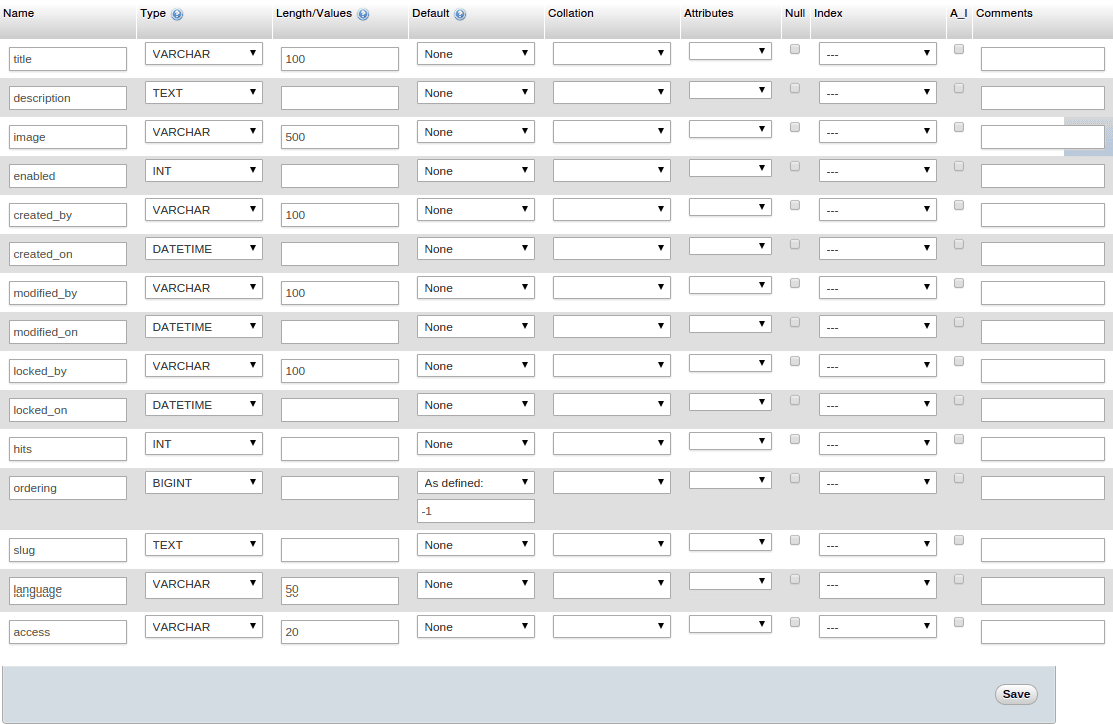
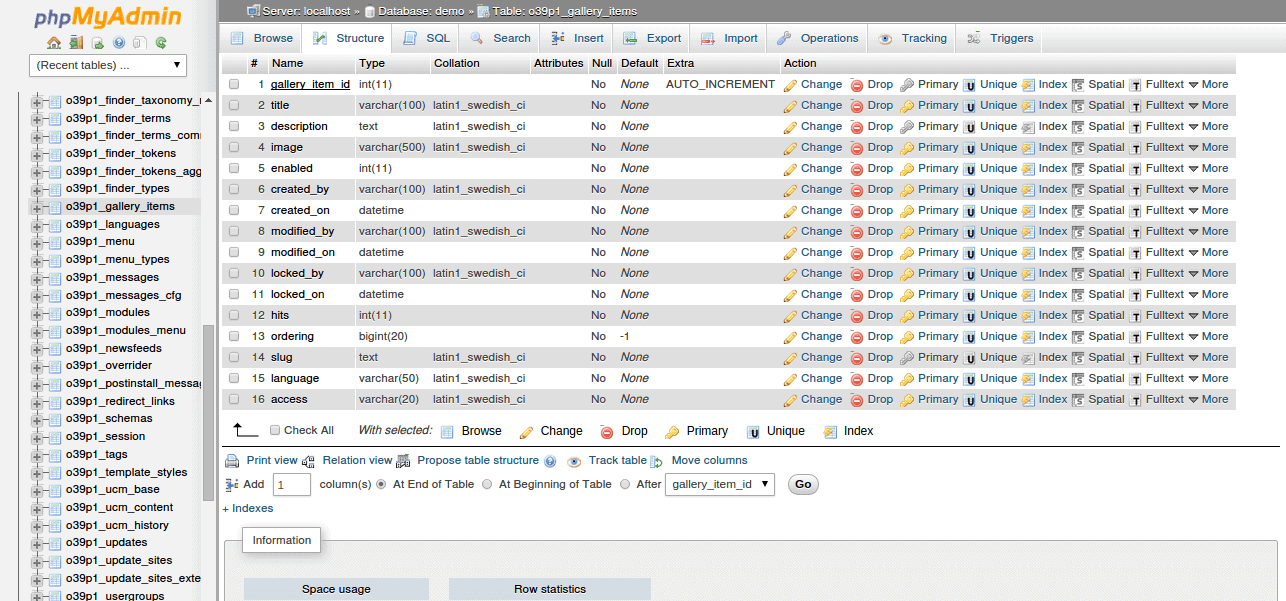
Lets get back o39p1_gallery_items table, and create all fields with their data type and values. Have a look in the image below, how I’ve created, insert the following fields in your items table, and click save button.
After clicking save button your items table will look like this.
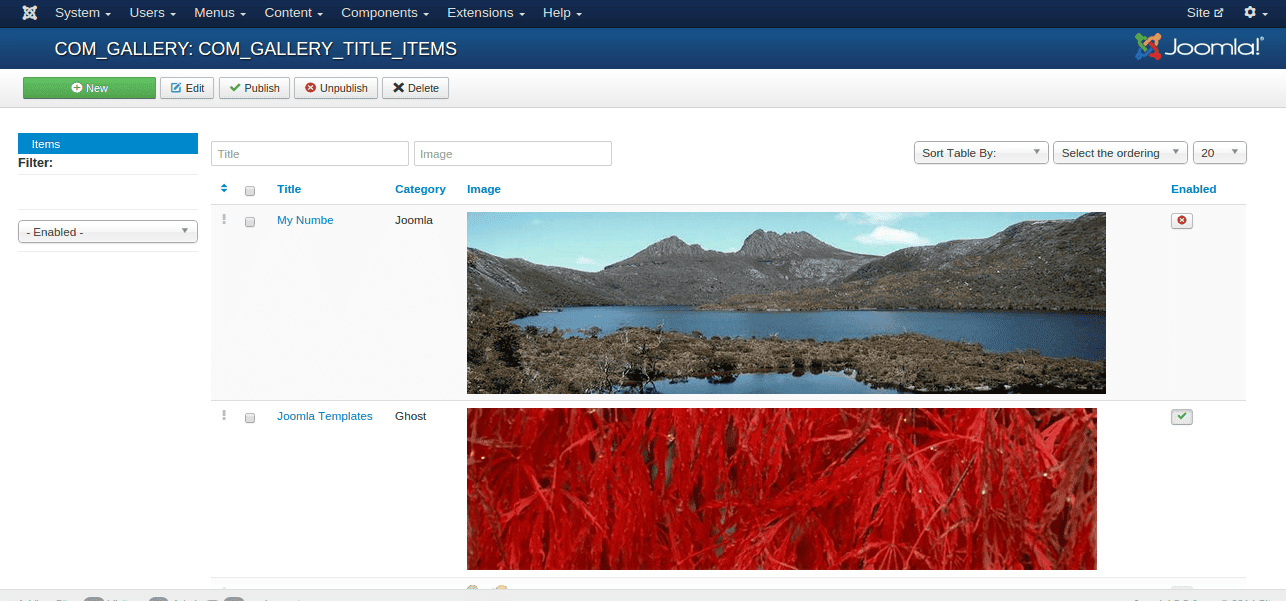
Now you can insert your item from single item view, click save and close. Now you can see your newly created item has been added in your items table. Have a look in the image , My newly created item has been added in my items table.
Conclusion
There are couple of way to develop Joomla component, I found this way the easiest and quick. If you have eagerness to develop Joomla component, or want to try new way to develop component, FOF is the great way to get your started. The tutorial is only the first part of our entire gallery component development process, in upcoming tutorials I will take you the subsequent of parts of this first tutorial. If you have any question to please let me know in comment below. If love you answer, it leads my excellence into perfection. Hurry up! I am waiting for your response.

