Joomla is a free and extendable open source CMS (Content Management System), which follows the MVC (Model-View-Controller) architecture and used to build websites and online applications.The structure of Joomla contains seven layers: Database, Joomla Framework, Components, Modules, Plugin, Templates and Web Server.We, Quix always prioritizes user requirements. While other Joomla page builders, not concern about displaying this layers into a page, we take a great action in this case. Because you may want to use or exhibit some of this layers inside a page.If you are using the Quix page builder, you can utilize this layers inside a page using the Quix element. Today, I am going to discuss on this topic.Let's dig into it!## How to load a Joomla Module inside Quix element?Before launch to the central part let me define Joomla module.Joomla Module: A Joomla module is similar to an extension which is used to render the pages in Joomla and display the new data from the component. Joomla modules are managed by the module manager from the administrator panel.Quix has an element both for the Free and PRO users named "Joomla Module" that is used to load a module inside an element. So, at the very beginning step, you have to insert this element.### Insert Joomla Module Element:Choose a section from a Quix page where you want to display a Joomla Module. Now insert the Joomla Module from the Elements List.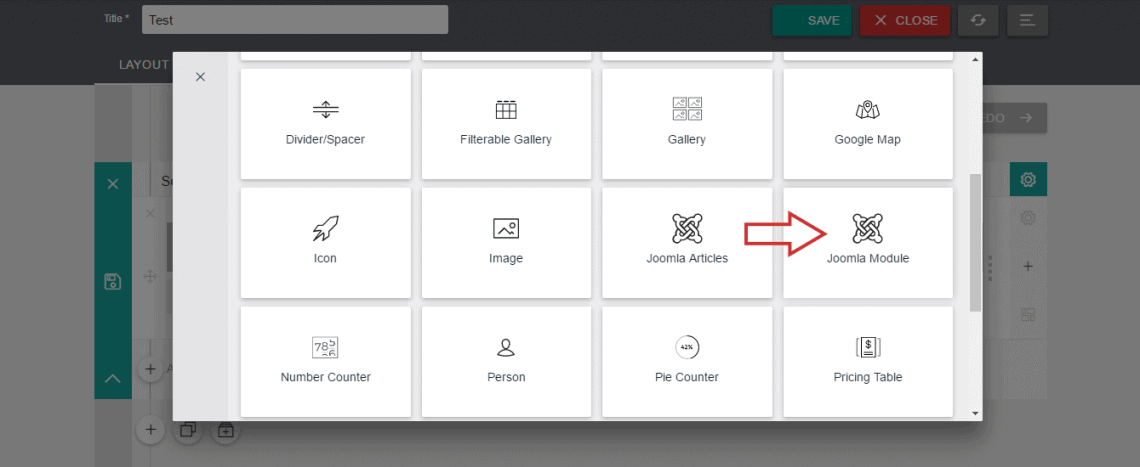 After inserting the element, you have to customize some settings. Now I'll give a brief on the settings of Joomla Module element.### Configure General Settings:You can see few following options inside general settings tab.
 Select Module: Here you will see the list of all modules in a drop-down list. Select anyone of them according to your demand. Note: You will see the modules name in the drop-down list only if you have created a module in before from the Administration Panel >> Extensions >> Modules >> New
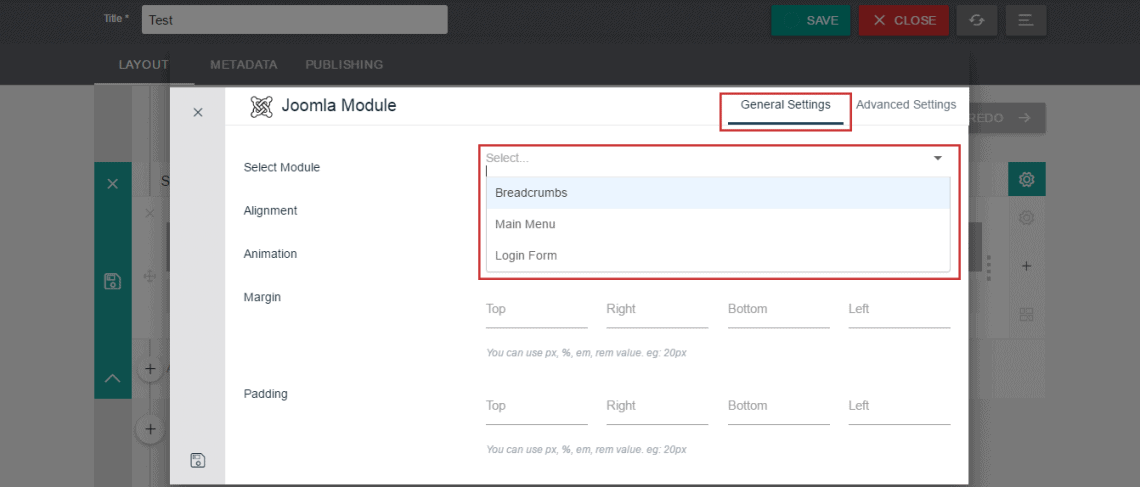 Alignment: Choose the alignment from this option. You will see four types of alignment option there. Left, Right, Center and Justify. Animation: Quix elements come with total six animations. These are: Fade In, Zoom In, Left to Right, Right to Left, Bottom to Top & Top to Bottom. Choice one among them to fetch an animated style. You can also select "No Animation" if you do not like this. Margin: When you need some space outside of the element or outside of the border around elements specify it in this field with digits.* Padding: If you need some space inside of the element or inside of the border specify it in this field with digits.### Configure Advanced Settings
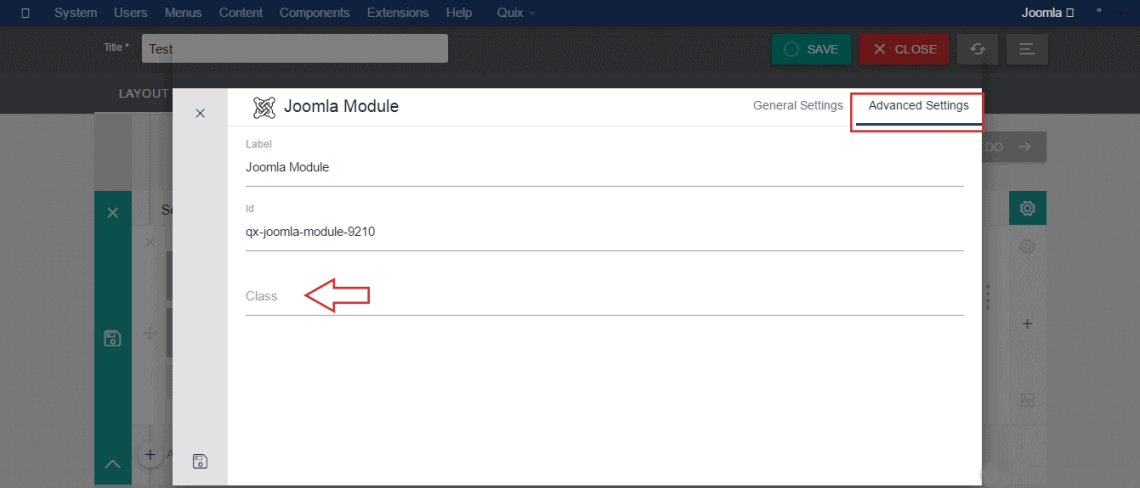 The Advanced Settings allows you to fetch some extra style when you need. Just write your own attributes in a CSS class of your templates stylesheet and insert those class names in the defined field.You can read Quix Documentation to learn from depth. Here you will find some useful direction, and that will be undoubtedly helpful for you if you are a developer.That's mainly it! Hope you find this article helpful. Let us know your experience or opinion through the comment section.
Joomla is a free and extendable open source CMS (Content Management System), which follows the MVC (Model-View-Controller) architecture and used to build websites and online applications.
The structure of Joomla contains seven layers: Database, Joomla Framework, Components, Modules, Plugin, Templates and Web Server.
We, Quix always prioritizes user requirements. While other Joomla page builders, not concern about displaying this layers into a page, we take a great action in this case. Because you may want to use or exhibit some of this layers inside a page.
If you are using the Quix page builder, you can utilize this layers inside a page using the Quix element. Today, I am going to discuss on this topic.
Let's dig into it!
How to load a Joomla Module inside Quix element?
Before launch to the central part let me define Joomla module.
Joomla Module: A Joomla module is similar to an extension which is used to render the pages in Joomla and display the new data from the component. Joomla modules are managed by the module manager from the administrator panel.
Quix has an element both for the Free and PRO users named "Joomla Module" that is used to load a module inside an element. So, at the very beginning step, you have to insert this element.
Insert Joomla Module Element:
Choose a section from a Quix page where you want to display a Joomla Module. Now insert the Joomla Module from the Elements List.
After inserting the element, you have to customize some settings. Now I'll give a brief on the settings of Joomla Module element.
Configure General Settings:
You can see few following options inside general settings tab.
- Select Module: Here you will see the list of all modules in a drop-down list. Select anyone of them according to your demand. Note: You will see the modules name in the drop-down list only if you have created a module in before from the Administration Panel >> Extensions >> Modules >> New
- Alignment: Choose the alignment from this option. You will see four types of alignment option there. Left, Right, Center and Justify.
- Animation: Quix elements come with total six animations. These are: Fade In, Zoom In, Left to Right, Right to Left, Bottom to Top & Top to Bottom. Choice one among them to fetch an animated style. You can also select "No Animation" if you do not like this.
- Margin: When you need some space outside of the element or outside of the border around elements specify it in this field with digits.
- Padding: If you need some space inside of the element or inside of the border specify it in this field with digits.
Configure Advanced Settings
The Advanced Settings allows you to fetch some extra style when you need. Just write your own attributes in a CSS class of your templates stylesheet and insert those class names in the defined field.
You can read Quix Documentation to learn from depth. Here you will find some useful direction, and that will be undoubtedly helpful for you if you are a developer.
That's mainly it! Hope you find this article helpful. Let us know your experience or opinion through the comment section.