“Coming together is a beginning. Keeping together is progress. Working together is the success.” - Henry FordHenry Ford is a great American industrialist, and the founder of the Ford Motor Company, who have defined the importance of teamwork in the above line.Teams are formed when individuals have a common tendency, preference, liking, and attitude and work together for a common goal. Work will be funnier when you are working as a part of a team.A team plays a significant role in organizations as well as our personal lives. It also enhances the confidentiality of an organization to the outer world.Why not you introduce your amicable team members to the world?But, How?Never fear, because Quix is here!Today, I am going to describe Quix Team Element and show how you use this effectively to build a fantastic team section for your website. Let's start!## How to create a stunning Team section using Quix?The person element of Quix will help you to go this way. But you should mind one thing that is - one element can demonstrate one team member.Therefore, you have to setup the number of person element with the number of the team member.Let's assume that; I want to build a team section of eight team members. In this situation, I have to follow the following steps.
Step 1: Create a section Step 2: Take two rows in the section Step 3: Take four columns in every row Step 4: And at the final step, take a person element in every column.
Therefore, I can get total eight person-element for eight team members.After inserting an element in a column, you have to customize some settings which will ensure the stunning outlook of the element.Now I'll give a brief on the settings of Quix person element which will help you to know the depth and work smartly.### Configure General Settings:You can see few following options inside general settings tab.
Name: Insert here the full name of the team member. Position: The designation goes in this field. Image: Upload an image by hitting the right button and then insert it. Description: You can say some words about yourself or the members in this area. Social Links: Quix lets you add social links of every member. You may notice the buttons including plus (+) and minus (-) sign at the right site. Press plus (+) sign to add a new social field or press (-) to remove one. And just add the URL of the social profile to the left field, Quix will do the rest of the things.### Configure Styles SettingsYou can see few following options inside styles settings tab.
Image Style: Image style defines the shape of each profile picture of team members. Here, you will get three built-in shapes to represent. These are: Square, Rounded, and Circle. Text Alignment: You can define the text alignment to left, right or center from this option. Animation: Quix will give you six animation style in total. These are: Fade In, Zoom In, Left to Right, Right to Left, Bottom to Top & Top to Bottom. Choice one among them to fetch an animated style in the person element. Icon Color: The Icon color defines the color of the social icons. Icon Hover Color: You may want to change the color of social icons when the mouse hovers over it. It so, then define the hover color in here. Header Font: This setting determines the font of team members name. Header Text Color: Here delimit the color of header text means the color of name text. Position Text Color: Position defines the designation. Specify the text color of this from this field. Body Font: Here you can define the font of description text. Description Text Color: You can use this field to specify the color of description text. Background Color: Use this option to change the whole background color of the element. Background Image: Instead of use a background color, you can use a background image. Just upload an image using the right button and then upload it. Margin: When you need some space outside of the element specify it in this field with digits. * Padding: If you need some space inside of the element specify it in this area with digits.### Configure Advanced SettingsQuix lets you the opportunity to fetch some extra style in the elements using Advanced settings. Just write your own attributes in a CSS class of your templates stylesheet and insert those class name.
You may read Quix Documentation to learn from depth.### Example
The above image is an example of Quix team element. You will get this powerful and stunning element with our best one page Joomla template - Marvel.Live Demo## Summing UpHope this short tutorial will help you to start with Quix team section. Let us know your question if any and also share your experience of using Quix - Joomla page builder.
“Coming together is a beginning. Keeping together is progress. Working together is the success.” - Henry Ford
Henry Ford is a great American industrialist, and the founder of the Ford Motor Company, who have defined the importance of teamwork in the above line.
Teams are formed when individuals have a common tendency, preference, liking, and attitude and work together for a common goal. Work will be funnier when you are working as a part of a team.
A team plays a significant role in organizations as well as our personal lives. It also enhances the confidentiality of an organization to the outer world.
Why not you introduce your amicable team members to the world?
But, How?
Never fear, because Quix is here!
Today, I am going to describe Quix Team Element and show how you use this effectively to build a fantastic team section for your website. Let's start!
How to create a stunning Team section using Quix?
The person element of Quix will help you to go this way. But you should mind one thing that is - one element can demonstrate one team member.
Therefore, you have to setup the number of person element with the number of the team member.
Let's assume that; I want to build a team section of eight team members. In this situation, I have to follow the following steps.
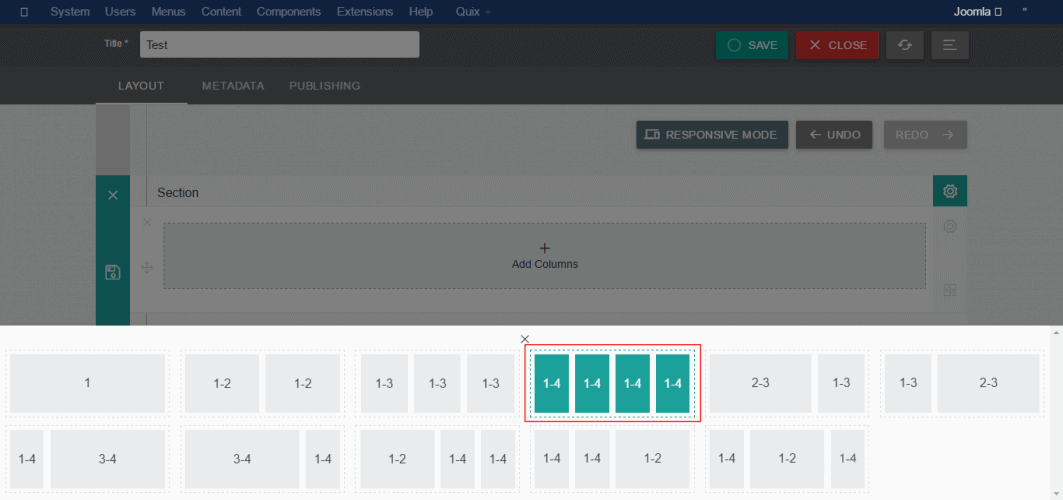
- Step 1: Create a section
- Step 2: Take two rows in the section
- Step 3: Take four columns in every row
- Step 4: And at the final step, take a person element in every column.
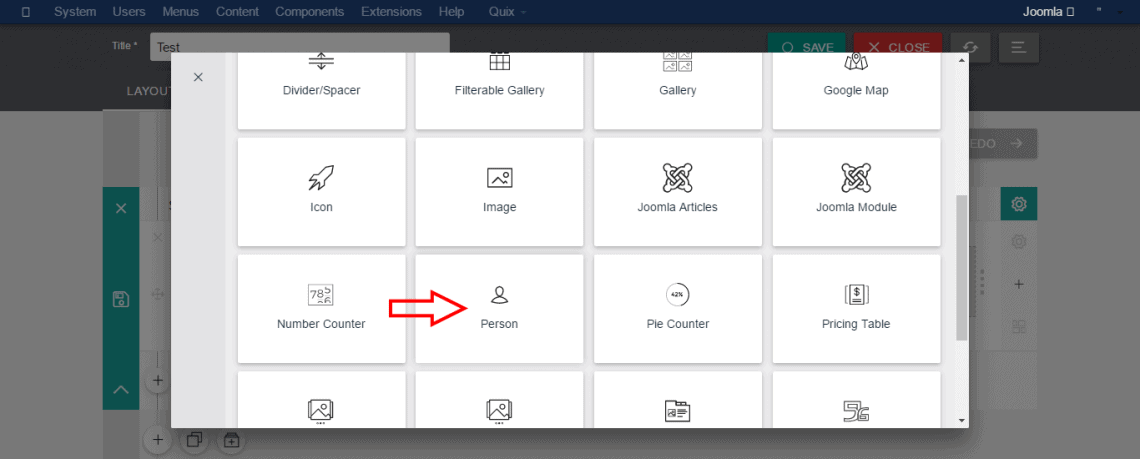
Therefore, I can get total eight person-element for eight team members.
After inserting an element in a column, you have to customize some settings which will ensure the stunning outlook of the element.
Now I'll give a brief on the settings of Quix person element which will help you to know the depth and work smartly.
Configure General Settings:
You can see few following options inside general settings tab.
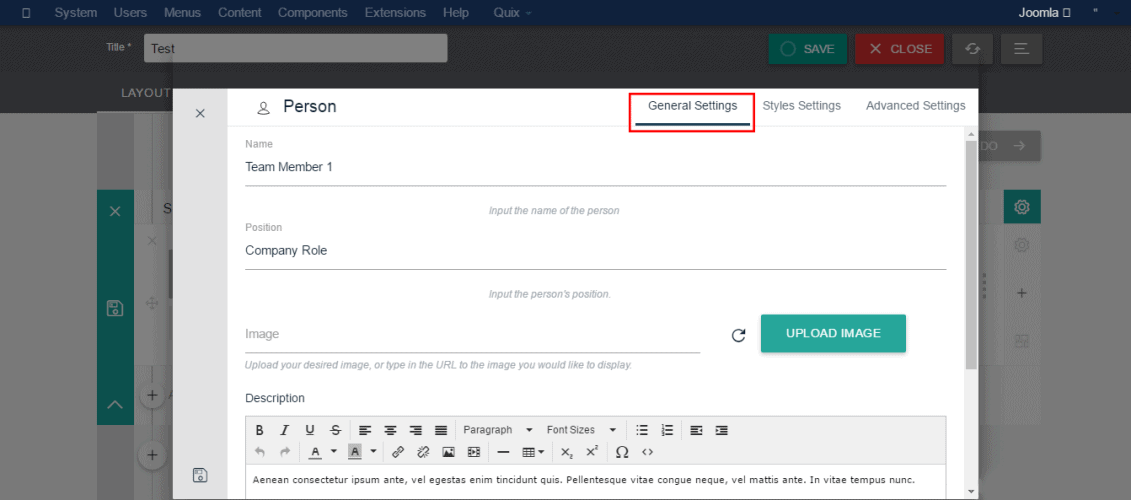
- Name: Insert here the full name of the team member.
- Position: The designation goes in this field.
- Image: Upload an image by hitting the right button and then insert it.
- Description: You can say some words about yourself or the members in this area.
- Social Links: Quix lets you add social links of every member. You may notice the buttons including plus (+) and minus (-) sign at the right site. Press plus (+) sign to add a new social field or press (-) to remove one. And just add the URL of the social profile to the left field, Quix will do the rest of the things.
Configure Styles Settings
You can see few following options inside styles settings tab.
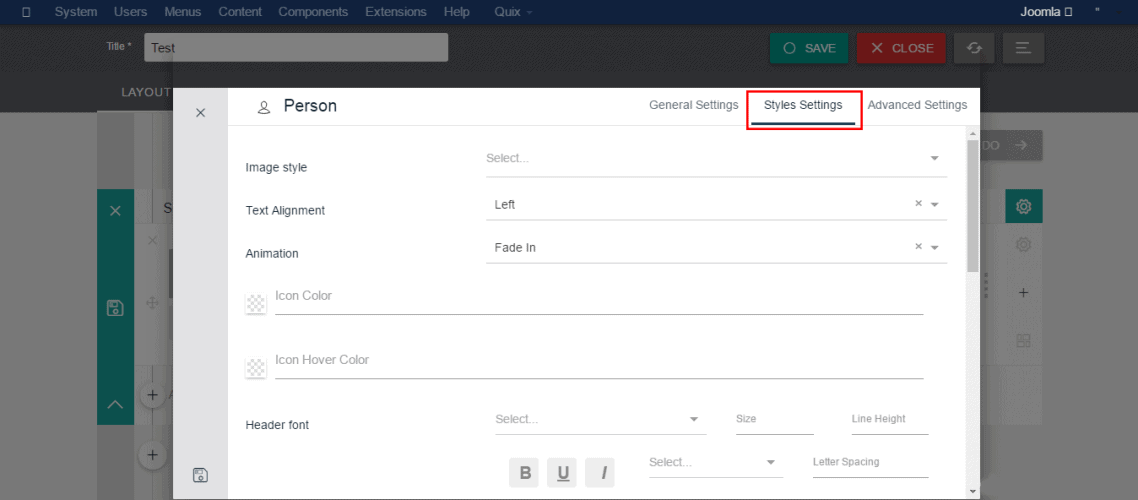
- Image Style: Image style defines the shape of each profile picture of team members. Here, you will get three built-in shapes to represent. These are: Square, Rounded, and Circle.
- Text Alignment: You can define the text alignment to left, right or center from this option.
- Animation: Quix will give you six animation style in total. These are: Fade In, Zoom In, Left to Right, Right to Left, Bottom to Top & Top to Bottom. Choice one among them to fetch an animated style in the person element.
- Icon Color: The Icon color defines the color of the social icons.
- Icon Hover Color: You may want to change the color of social icons when the mouse hovers over it. It so, then define the hover color in here.
- Header Font: This setting determines the font of team members name.
- Header Text Color: Here delimit the color of header text means the color of name text.
- Position Text Color: Position defines the designation. Specify the text color of this from this field.
- Body Font: Here you can define the font of description text.
- Description Text Color: You can use this field to specify the color of description text.
- Background Color: Use this option to change the whole background color of the element.
- Background Image: Instead of use a background color, you can use a background image. Just upload an image using the right button and then upload it.
- Margin: When you need some space outside of the element specify it in this field with digits.
- Padding: If you need some space inside of the element specify it in this area with digits.
Configure Advanced Settings
Quix lets you the opportunity to fetch some extra style in the elements using Advanced settings. Just write your own attributes in a CSS class of your templates stylesheet and insert those class name.
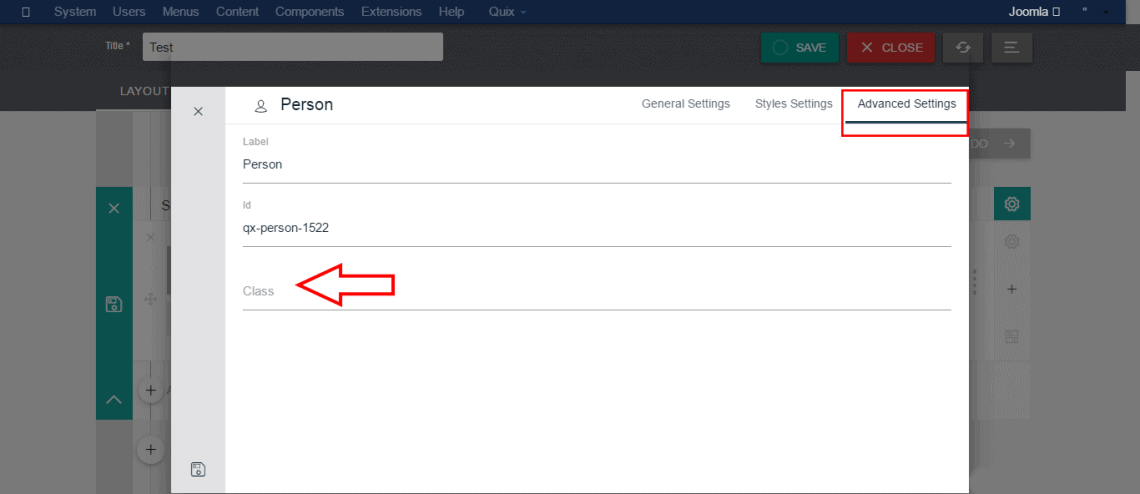
You may read Quix Documentation to learn from depth.
Example
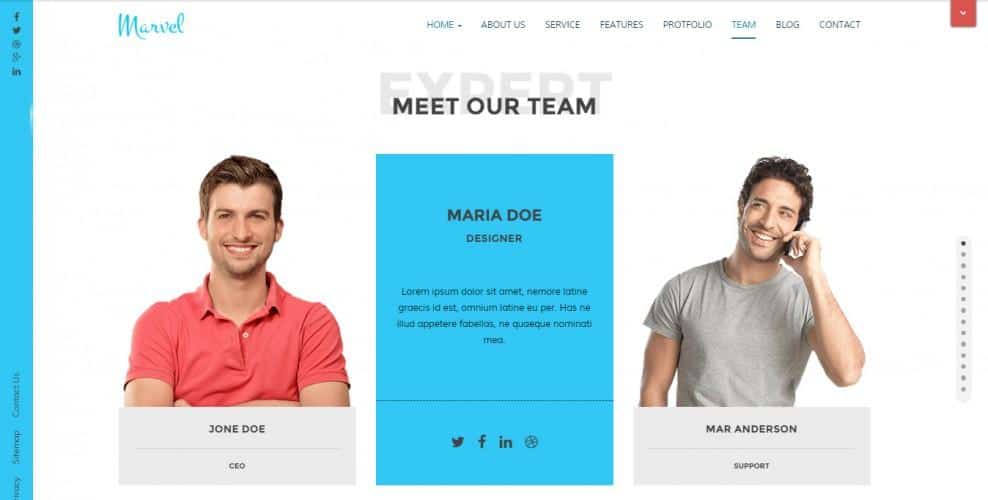
The above image is an example of Quix team element. You will get this powerful and stunning element with our best one page Joomla template - Marvel.
Summing Up
Hope this short tutorial will help you to start with Quix team section. Let us know your question if any and also share your experience of using Quix - Joomla page builder.

