

A couple of weeks ago we were developing a Joomla! contact form extension called Xpert Contact. We are glad developers developed the extension professionally well with reCAPTCHA support. To study the best practice to provide CAPTCHA support, we searched for the resource in the web but unfortunately we found nothing interesting.So, we decided write the tutorial on our own. In this tutorial First I’ll show you how to enable the new "No CAPTCHA Joomla reCAPTCHA" in Joomla default contact forms and subsequently show the details way to provide support of this API in the Joomla extensions.##Add the New Google ReCaptcha to Joomla Contact FormsAdding No CAPTCHA reCAPTCHA API in your Joomla websites doesn’t require elusive and tedious steps to walk through. It combines a set of instruction to follow. Let’s dig in.###Step #1 Collection the public and secret keysTo enable Joomla reCAPTCHA in your Joomla website, you have to collect public and secret keys from Google reCaptcha site. When you are on the Google reCaptcha official site, select the Get reCAPTCHA button from the top right corner. Provide site details including Label, Domains and Owners email address to register your website for Google reCAPTCHA. and click register button.
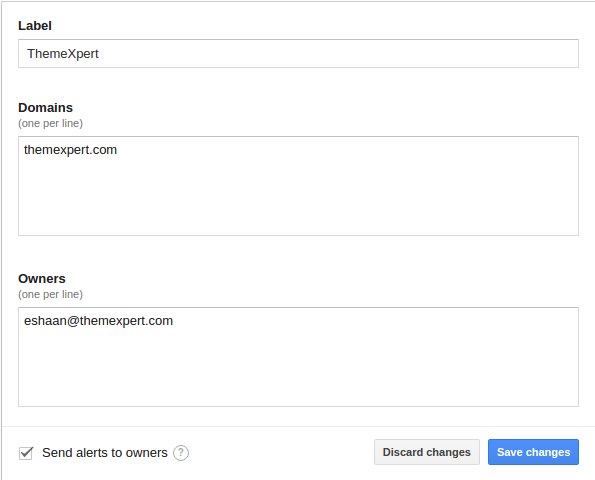 Now your site domain is registered, you have site and private keys are available to proceed for Captcha integration in your Joomla website.###Step #2 Enable Joomla reCaptcha pluginLog into your Joomla backend and head to the Plugins from Extensions menu. Search for Captcha - ReCaptcha. The Captcha plugin comes up being in disabled status.
 Now click to edit Captcha - ReCaptcha plugin, select version 2.0 from version dropdown, add site as well as private keys in the specific fields, change Theme if you want; default it will set the theme Dark, change status disabled to enabled, and click save and close.
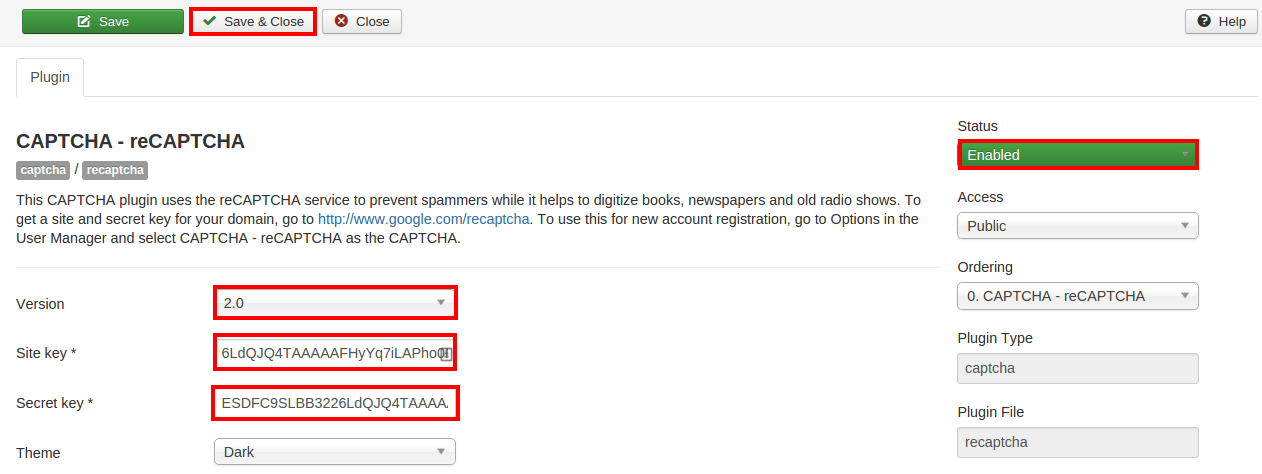 ###Step #3 Enable ReCaptcha globallyWe’ve successfully enabled Joomla reCaptcha plugin. Now we need to enable it globally. Head to System > Global configuration. select Captcha - ReCaptcha from Default captcha dropdown.
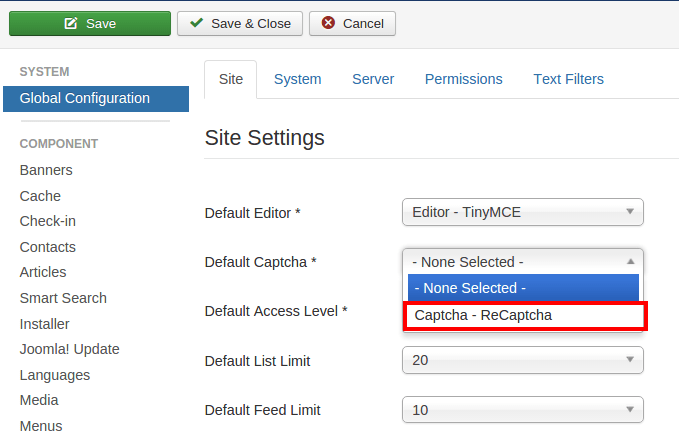 Now head to the contact or register form page of your Joomla website, you’ll noticed Captcha would be successful integrated.
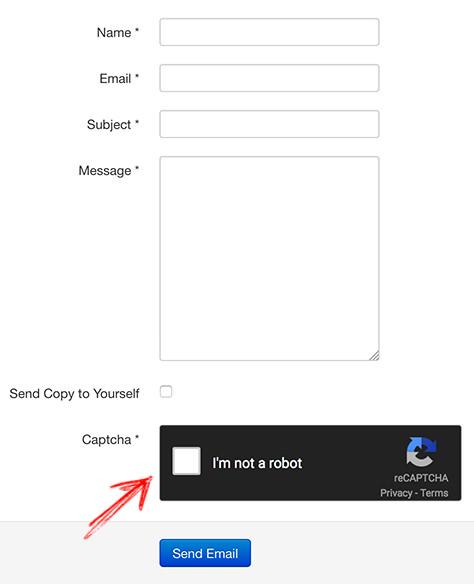 ##Add support of Google ReCaptcha to Joomla Contact Forms pluginsWhen you are developing contact form plugin for Joomla, it’s essential to enable reCaptcha to protect from abusive bots. If you don’t have experience to developed reCaptcha enabled contact form plugins, don’t worry I am here to flip you through the entire steps.Great news is we have XpertContact module created which supports Captcha. For the quick demonstration I’ll explain how we provide support for Captcha in the contact form module. Before heading further I recommend you to download the module first.
/> $form = JForm::getInstance('customForm','path/to/form/form.xml',array('control' => 'jform'));$fieldSets = $form->getFieldsets();foreach ($fieldSets as $name => $fieldSet) : foreach ($form->getFieldset($name) as $field): echo $field->getControlGroup(); endforeach;endforeach; $data = $this->input->get('jform', array(), 'array');$form = JForm::getInstance('customForm','path/to/form/form.xml');$result = $form->validate($data);// Check for validation errors.if ($return === false){ // codes goes here $return = ''; // Get the validation messages from the form. foreach ($form->getErrors() as $message) { $return .= $message->getMessage(); } //now you can return error msg return $return;}// validation successful, do your job hereGet to the Xpert Contact root directory, you will notice we’ve performed the validation in helper.php file.
A couple of weeks ago we were developing a Joomla! contact form extension called Xpert Contact. We are glad developers developed the extension professionally well with reCAPTCHA support. To study the best practice to provide CAPTCHA support, we searched for the resource in the web but unfortunately we found nothing interesting.
So, we decided write the tutorial on our own. In this tutorial First I’ll show you how to enable the new "No CAPTCHA Joomla reCAPTCHA" in Joomla default contact forms and subsequently show the details way to provide support of this API in the Joomla extensions.
Add the New Google ReCaptcha to Joomla Contact Forms
Adding No CAPTCHA reCAPTCHA API in your Joomla websites doesn’t require elusive and tedious steps to walk through. It combines a set of instruction to follow. Let’s dig in.
Step #1 Collection the public and secret keys
To enable Joomla reCAPTCHA in your Joomla website, you have to collect public and secret keys from Google reCaptcha site. When you are on the Google reCaptcha official site, select the Get reCAPTCHA button from the top right corner.
Provide site details including Label, Domains and Owners email address to register your website for Google reCAPTCHA. and click register button.
Now your site domain is registered, you have site and private keys are available to proceed for Captcha integration in your Joomla website.
Step #2 Enable Joomla reCaptcha plugin
Log into your Joomla backend and head to the Plugins from Extensions menu. Search for Captcha - ReCaptcha. The Captcha plugin comes up being in disabled status.
Now click to edit Captcha - ReCaptcha plugin, select version 2.0 from version dropdown, add site as well as private keys in the specific fields, change Theme if you want; default it will set the theme Dark, change status disabled to enabled, and click save and close.
Step #3 Enable ReCaptcha globally
We’ve successfully enabled Joomla reCaptcha plugin. Now we need to enable it globally. Head to System > Global configuration. select Captcha - ReCaptcha from Default captcha dropdown.
Now head to the contact or register form page of your Joomla website, you’ll noticed Captcha would be successful integrated.
Add support of Google ReCaptcha to Joomla Contact Forms plugins
When you are developing contact form plugin for Joomla, it’s essential to enable reCaptcha to protect from abusive bots. If you don’t have experience to developed reCaptcha enabled contact form plugins, don’t worry I am here to flip you through the entire steps.
Great news is we have XpertContact module created which supports Captcha. For the quick demonstration I’ll explain how we provide support for Captcha in the contact form module. Before heading further I recommend you to download the module first.
I assume you’ve downloaded the module, and unzip it. Now all the files comes up. Let’s dive in.
Step #1 Create XML form adding a field for Captcha
To provide support of Captcha, we have to add a extra field in XML contact form where the Captcha pops out in the frontend. Add the following code in your XML contact or register form.
/>
If you’ve download Xpert Contact copy opened, head to the form folder, you’ll find two xml files. The first is form.xml and another is form_captcha.xml. open form_captcha.xml, you can notice the previous code included in this file.
Note: you can add the previous code in form.xml file without create a new file form_captcha.xml.
Step #2 Load XML form using JForm
Having successfully created Captcha field in XML form, you’ve to load the XML form via JForm adding following code.
$form = JForm::getInstance('customForm','path/to/form/form.xml',array('control' => 'jform'));In Xpert Contact we load this code in mod_xpertcontact.php. In this file we load the XML using JForm, checked whether plugins Captcha is enabled or not and then we load form.
Step #3 Load form for the frontend view
Now we’ve instructed the system to load XML form but haven’t fetched contact to frontend display. To fetch contact form in the frontend, add the following code in the view file.
$fieldSets = $form->getFieldsets();
foreach ($fieldSets as $name => $fieldSet) :
  foreach ($form->getFieldset($name) as $field):
    echo $field->getControlGroup();
  endforeach;
endforeach;
In XpertContact open default.php file from tmpl folder. Here you’ll find how we show fetch form data for frontend view from 22 to 33 lines.
Step #4 Validate the form while form submission
A full-fledged form is now perfectly showing in the frontend. Now It’s time to validate the form. To add the ability to prevent spam and malicious bots, add the following code in your helper.php file. It’ll validate the form allowing the human from submission and keeping the malicious bots apart.
$data   = $this->input->get('jform', array(), 'array');
$form   = JForm::getInstance('customForm','path/to/form/form.xml');
$result = $form->validate($data);
// Check for validation errors.
if ($return === false)
{
  // codes goes here
  $return = '';
  // Get the validation messages from the form.
  foreach ($form->getErrors() as $message)
  {
    $return .= $message->getMessage();
  }

  //now you can return error msg
  return $return;
}
// validation successful, do your job here
Get to the Xpert Contact root directory, you will notice we’ve performed the validation in helper.php file.
Note: If Joomla website fails to load jFrom perfectly. Make sure you’ve Included the following code to enable the JForm.
jimport( 'joomla.form.form' );
Summary
The process I've described above help you a lot. If you face any confusing to follow this article feel free to post comment. I am here to answer you :)