Mebel
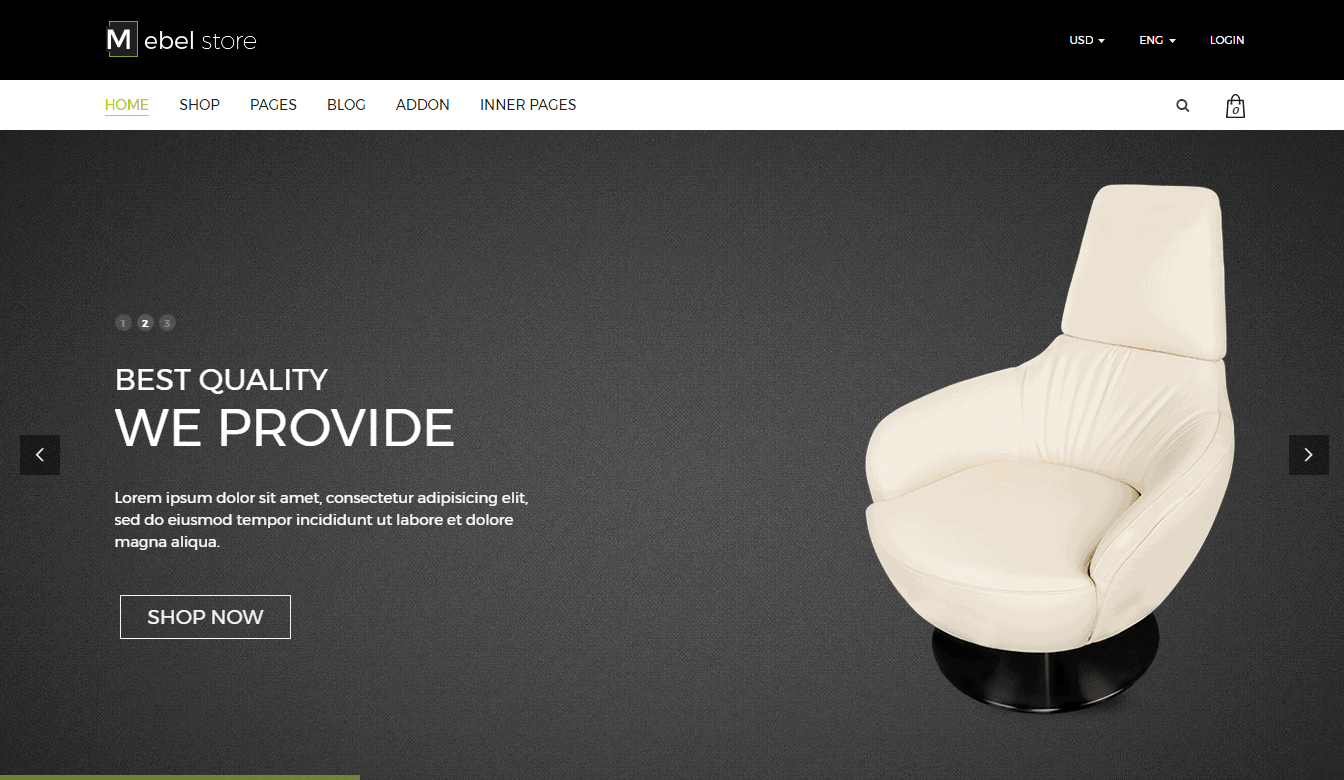
Mebel is a multipurpose WordPress theme with four stunning Homepage variations along with a bunch of necessary elements as well. The drag and drop page builder makes it easier to manage all tasks from one place. If you have a furniture business related website or similar E-commerce website, this theme can make your works simplier.
Key Features
- Fully Responsive
- Multi Homepage Variations
- Multi-Purpose usability
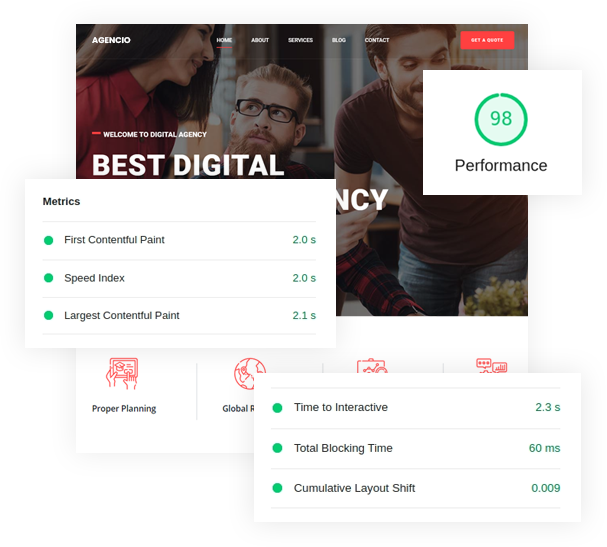
- Hi-Speed Performance
- Visual Composer Integration
- Powerful Admin Panel
- Wishlist Integration
- All Necessary Widgets
- Quick View Integration
- SEO Friendly
- Advance Header Options
- Unlimited Header Color
- Supported by Real People
- eCommerce Ready
- Drag and Drop Page Builder
- Unlimited Customizability
- Font Awesome Icon Integration
- 600+ Google fonts
- Translation Ready
- Dynamic Navigation Menu
- Custom Layout
- Quick Social Sharing
- Multiple Social Commenting
- Revolution Slider
- Built on Bootstrap 3
- 20+ Shortcodes
- Demo Content
- Google Street View
- Enrich Documentation
- Parallax Background
Requirements
In order to run Mebel smoothly on your server, you need to fulfill this requirement listed below:
- Wordpress: 3.9+
Download
Head over to Mebel download page on www.themeforest.net then download the MabelPackage.zip file. In this .zip file, you have everything you need.
Installation
Installing WordPress
To install this theme, you must have a working version of WordPress already installed on your server. If you need help installing WordPress, go through the link and follow the instructions: Installing WordPress
Installing Theme
There are a couple of simple steps to install the Mebel theme on your server. Its quite straightforward.
If you are starting from the scratch, we recommend you to follow the installation guide below to install with the pre-built existing demo data. This is the simplest way to get started.
On the other hand, if you already have an existing WordPress site and want to apply Mebel theme, in that case, you just need to install the following package:
- mebel.zip
You can find this package inside the downloaded .zip file of Mebel theme. So, before getting started with the installing process, Extract the .zip file and you'll find the desire mebel.zip in the Theme folder after the extraction.
- Log in to the WordPress Administration Panels.
- Now, go to
Appearance> Themes> Add New> Upload Themethen click on the Choose File button then select the mebel.zip file and hit upload. - After installation being done, roll over to
Appearance> Themes. - Find just uploaded theme on the Theme Thumbnail area.
- Click the Activate button below to the theme's thumbnail, to set it as default.
Do not forget to Activate the theme as default after installation process successfully been done.
To know more, visit WordPress Codex
Active Required Plugins
There are four plugins, required for Mebel theme to work properly. Those are listed below:
- Mebel Core: theme core functionality (CPTs and shortcodes).
- Visual Composer: combine pages with flexible grid and shortcodes.
- WooCommerce: For selling Products
- Slider Revolution: For amazing sliders.
- Contact Form 7 (optional). We recommend this for the contact form.
To activate those required plugins, simply go to Plugins
- Select all those four required plugins.
You can use the search module to find the desired plugins. The search box can be found on the right-top side of the module.
- Select Activate from the drop-down menu just above the list of plugins.
- Click to the Apply button next to the drop-down box and you are done.
To know more about the installation process of plugins, visit here: WordPress Codex
If there is any problem with automatical plugin installation, install them manually. You can find plugin bundle in your theme's /lib/plugins subdirectory. WooCommerce and Contact Form 7 can be found in WordPress plugins repository, install them through Plugins Screen
Import Demo Data
- Log in to the WordPress Administration Panels.
- Go to `Tools> Import.'
- Select the WordPress from the list. It can be found at the bottom of the list of plugins, normally.
- Install the WordPress Importer plugin, if you haven't installed it yet.
- After being installed, click on Run Importer to open the module.
It allows you to select the demo data file from your local drive and upload into your server.
- Now, click on Choose File. Once you click on it, it prompts up a screen, allowing you to select the demo data file from your local drive.
- Choose the mebel-content-demo.xml file and click Upload file and import
Demo data files can be found in Demo folder after you extract the theme package and the path should be
/Demo/mebel-demo-data.xml.
- On the second screen, set up an author and don't forget to check the Download and import file attachments. After making sure it is checked in, click on Submit button.
You can also import widget setting via this widget Importer Plugin
Widget setting file can be found in Demo folder after you extract the theme package and the path should be
/Demo/widget_data.jason.
Theme Settings
You can differently customize theme according to your need using Easy Customization feature.
- Click on Mebel at left-bottom corner of the module screen to open up Theme Setting panel.
General

- Breadcrumb : Allows you the control over enabling or disabling breadcrumb for your site.
- Header Image : Allows you to set a default header background image.
- Single Blog Post : Allows you to set the header image for a single blog post.
- Shop Page : Allows you to set a header image for shop page.
- 404 Page : Allows you to set a header image for 404 page.
- Archive : Allows you to set a header image for archive page.
- Search Page : Allows you to set a header image for the search page.
Header

- Select Header : Select the section are from the right side preview, and its customization settings will appear right below this.
- Select Site Logo : Upload your site logo with this option.
- Hotline Number : Put the hotline number here.
- Support Email : Put the support email address here.
- Sticky Header : Allows you to enable or disable sticky header.
Color

- Header 1 Custom Color : To enable this option you can use your preferred custom color for header 1.
- Header 2 Custom Color : To enable this option you can use your preferred custom color for header 2.
- Header 3 Custom Color : To enable this option you can use your preferred custom color for header 3.
- Header 4 Custom Color : To enable this option you can use your preferred custom color for header 4.
- Header 5 Custom Color : To enable this option you can use your preferred custom color for header 5. Header 5 Menu Color
- Rightside Color : Choose the right side menu color.
- Main Menu Color : Choose the main menu color.
This above two options only can be found when you enable the Header 5 Custom Color
- Top menu Background : Choose a background color for the top menu.
- Top Menu Color : Choose texts color for the top menu.
- Main Menu Background : Choose a background color for the main menu.
- Main Menu Color : Choose texts color for the main menu.
- Logo Section Background : Choose a background color for the logo section.
This above five options can only be found when you enable the Header Custom Color (1-4) options
Logo

- Header 1 Logo : Upload a logo for the header 1.
- Header 2 Logo : Upload a logo for the header 2.
- Header 3 Logo : Upload a logo for the header 3.
- Header 4 Logo : Upload a logo for the header 4.
- Header 5 Logo : Upload a logo for the header 5.
Social

- Social Icons : This option allows you to set social icons with your profile link to the particular social site.
- Facebook : Put your Facebook profile link here.
- Twitter : Put your Twitter profile link here.
- Google+ : Put your Google+ profile link here.
- Pinterest : Put your Pinterest profile link here.
- Vimeo : Put your Vimeo profile link here.
- LinkedIn : Put your LinkedIn profile link here.
Sidebar

- Default Sidebar Position : Define the default sidebar position.
- Default Shop Sidebar Position : Define the default position of shop sidebar.
Shop

- Default Shop product count per page : Define how many products you want to show on a page.
- Default Shop Column : Define the default number of column for the shop.
Typography

- Enable custom typography : Allows you to enable custom typography setting. To enable this option, you can set your preferred custom font and font style as well.
Footer

- Select Footer : Allows you to choose footer style from the preview next to this option.
- Copyright : Input your copyright text here.
Backup

- Import and Backup : This button allows you to import a backup theme. Just to paste the backed up string on the empty text box and then click this button.
- Import and Download Backup : With this button, you can make a backup of your current theme.
How To's
Setup Homepage
- Go to
Settings > Reading - Select A Static page on Front page displays option.
- Choose Home v1 from the Front-page drop-down menu.

- Select Blog from the Post page drop-down menu.(optional)
- Use the left-bottom Save Changes button to save the settings.
Creating Dropdown Menu
- Go to
Appearance> Menus - Select the main menu and drag the submenu items right below the main menu.
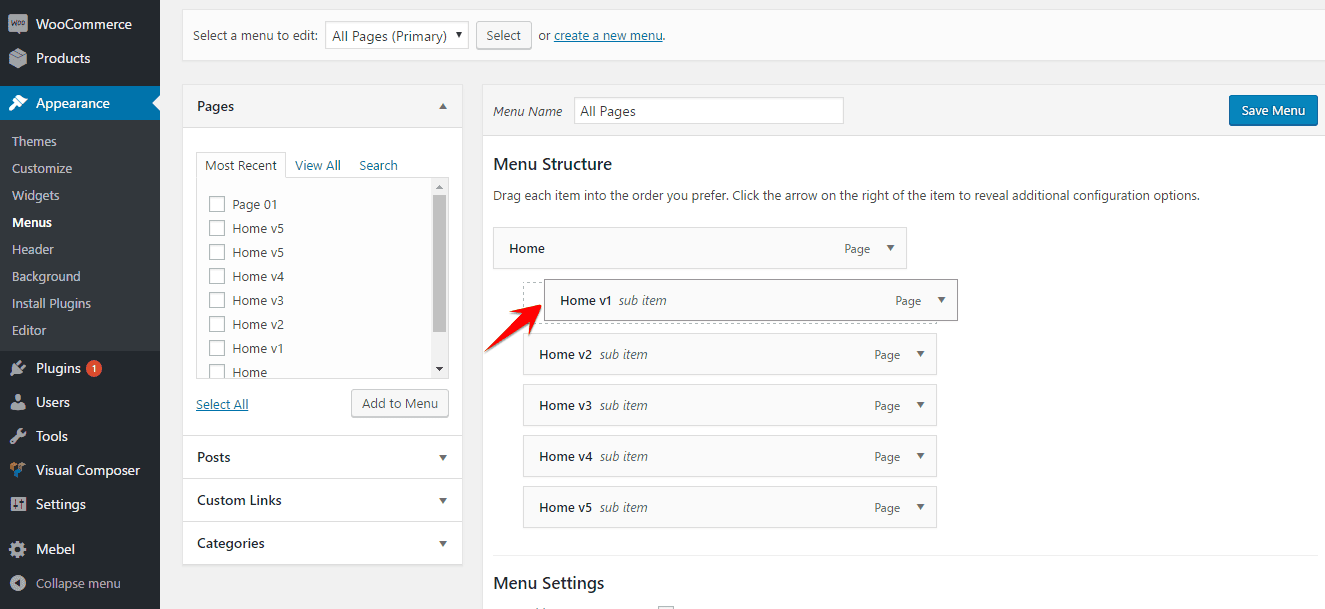
- Click on Save Menu on the right-bottom side of the module and you are done.
Elements & Shortcodes
You can add an element on a page in two different ways. Either you can use just the simple shortcode on the content area of that page, or you can add element manually. You will have plenty of default elements to add or you can add our developed elements those are only for Mebel theme from the Mebel tab.

Visual Composer
Visual Composer is the best Drag and Drop visual editor for building pages, posts, etc. on a WordPress site. If you are not familiar with Visual Composer, we recommend you to take a look at the following videos:
-
Getting Started with Visual Composer Getting Started With Visual Composer - YouTube
-
Cloning Elements How to Clone Elements with Visual Composer for WordPress - YouTube
-
Rows & Columns How to Add Row and Column with Visual Composer for WordPress - YouTube
- Create & Re-use Templates How to Use Templates in Visual Composer How to save separate Row or Section as a Template
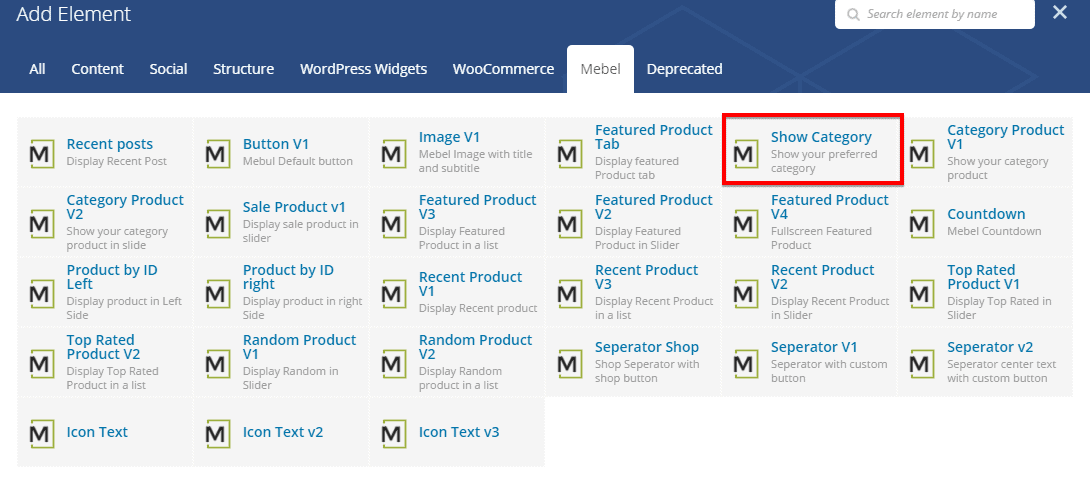
Our developed elements those are only for Mebel theme can be found in Mebel tab under Visual Composer.
Recent Posts
Shortcode : recent-posts
Manual Process :
To add Recent Posts element on a page, first-
- Go to
Pages - Click on Edit With Visual Composer
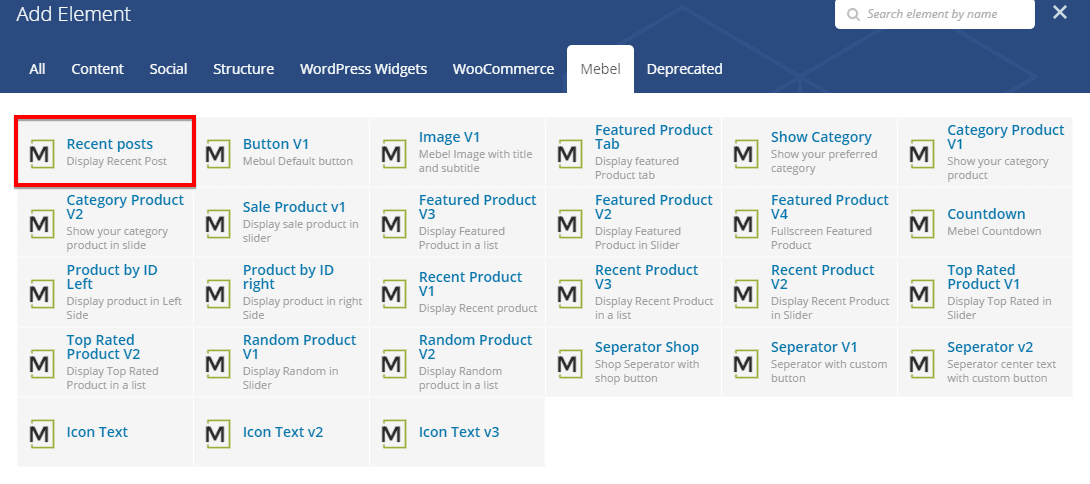
- Click on Add Elements
- From Mebel tab, click on the element named Recent Posts
- Configure the settings module according to your preferences and then
- Click on Save Changes to save the settings.
Recent Posts Settings
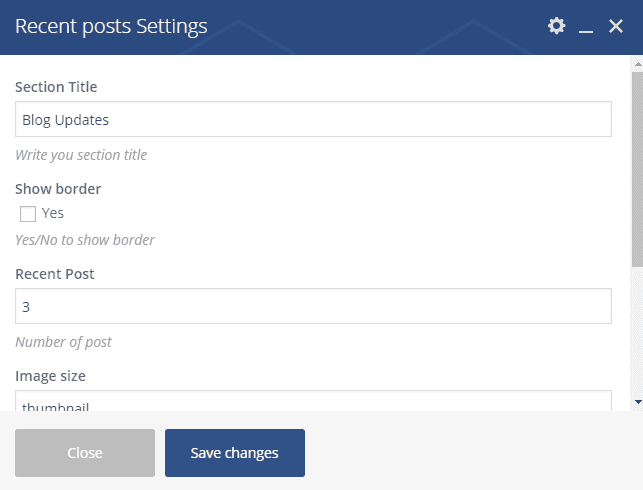
- Section Title : Write the section title here.
- Show Border : Allows you to enable or disable border.
- Recent Posts : Number of recent posts you want to show.
- Image Size : Define image size.
- Show Category Y/N : Enable or disable showing category.
- Show Excerpt Y/N : Enable or disable showing the excerpt.
Button V1
Shortcode : button-v1
Manual Process :
To add Button V1 element on a page, first-
- Go to
Pages - Click on Edit With Visual Composer
- Click on Add Elements
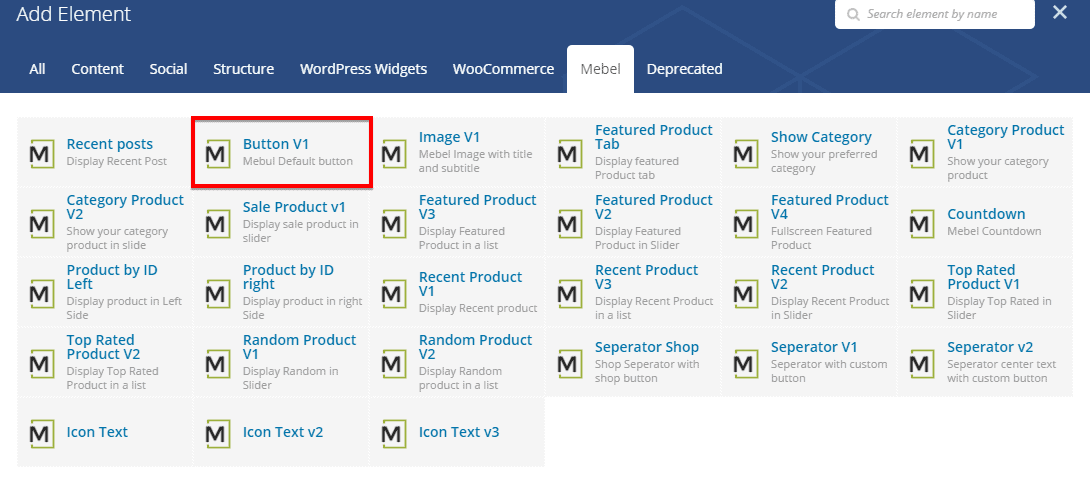
- From Mebel tab, click on the element named Button V1
- Configure the settings module according to your preferences and then
- Click on Save Changes to save the settings.
Button V1 Settings
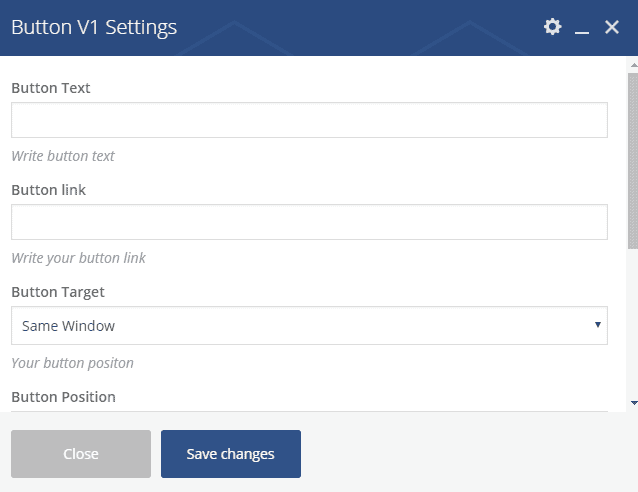
- Button Text : Put the button text here.
- Button Link : Define the link where you want to redirect the users when they click on it.
- Button Target : Define that when user click on it, whether you want to open in a new window or not.
- Button Position : Define button position.
- Full Screen or Not Full Screen : Allows you to select button style from the drop-down menu.
- Font Weight : Define font weight for the button text.
Image V1
Shortcode : mebel-image-v1
Manual Process :
To add Image V1 element on a page, first-
- Go to
Pages - Click on Edit With Visual Composer
- Click on Add Elements
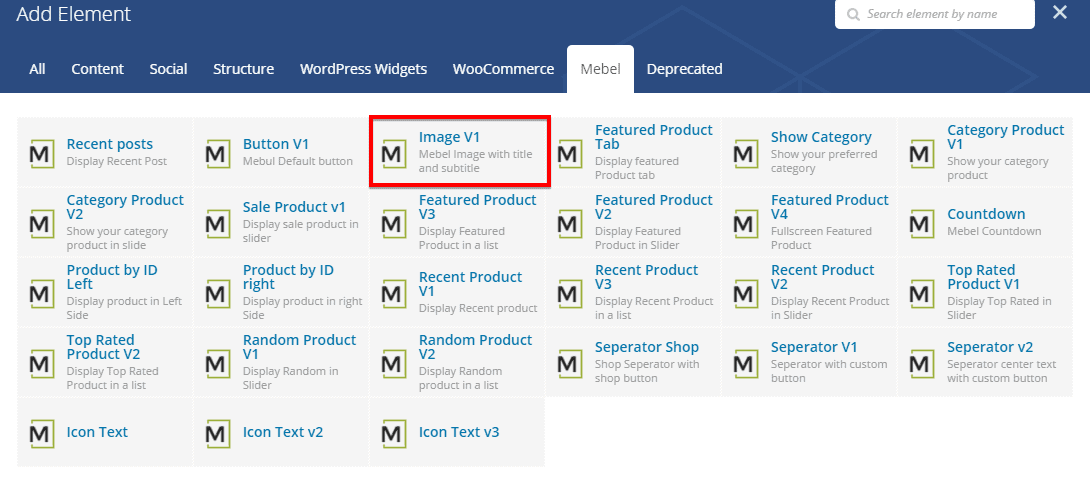
- From Mebel tab, click on the element named Image V1
- Configure the settings module according to your preferences and then
- Click on Save Changes to save the settings.
Button V1 Settings
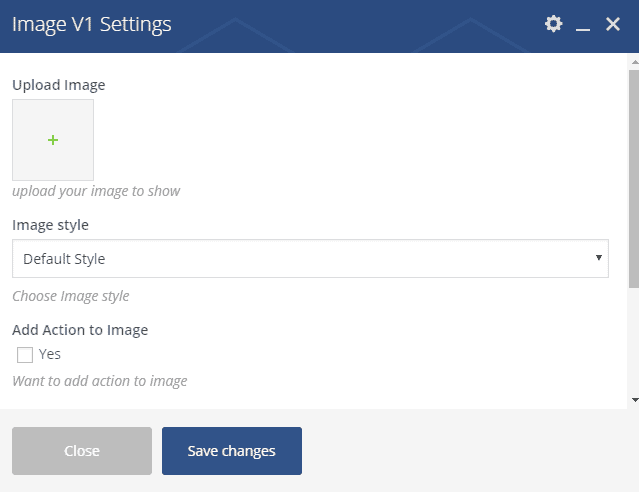
- Upload Image : Allows you to upload an image.
- Image Style : Select the image style.
- Add Action To Image : Allows you to add an action to the image.
- Show Button : Allows to enable or disable showing button.
- Show Section Title : Allows to enable or disable showing section title.
Featured Product Tab
Shortcode : mebel-image-v1
Manual Process :
To add Featured Product Tab element on a page, first-
- Go to
Pages - Click on Edit With Visual Composer
- Click on Add Elements
- From Mebel tab, click on the element named Featured Product Tab
- Configure the settings module according to your preferences and then
- Click on Save Changes to save the settings.
Featured Product Tab Settings
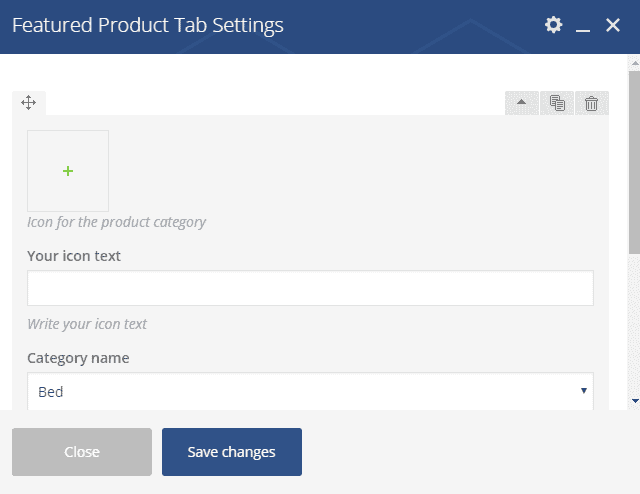
- Icon : Select an icon for the product category.
- Your Icon Text : Put the icon text you want to show.
- Category Name : Select the category name from the drop-down.
- Thumbnail Size : Write a thumbnail size. You can either choose thumbnail, full or large size for the category.
Show Category
Shortcode : show-category
Manual Process :
To add Show Category element on a page, first-
- Go to
Pages - Click on Edit With Visual Composer
- Click on Add Elements
- From Mebel tab, click on the element named Show Category
- Configure the settings module according to your preferences and then
- Click on Save Changes to save the settings.
Show Category Settings
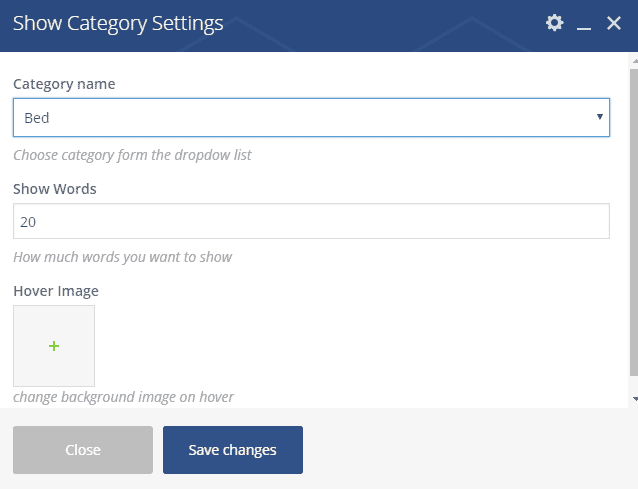
- Category Name : Select the category from the drop-down menu.
- Show Words : Define the number of words you want to show.
- Hover Image : Upload hover image.
Category Product v1
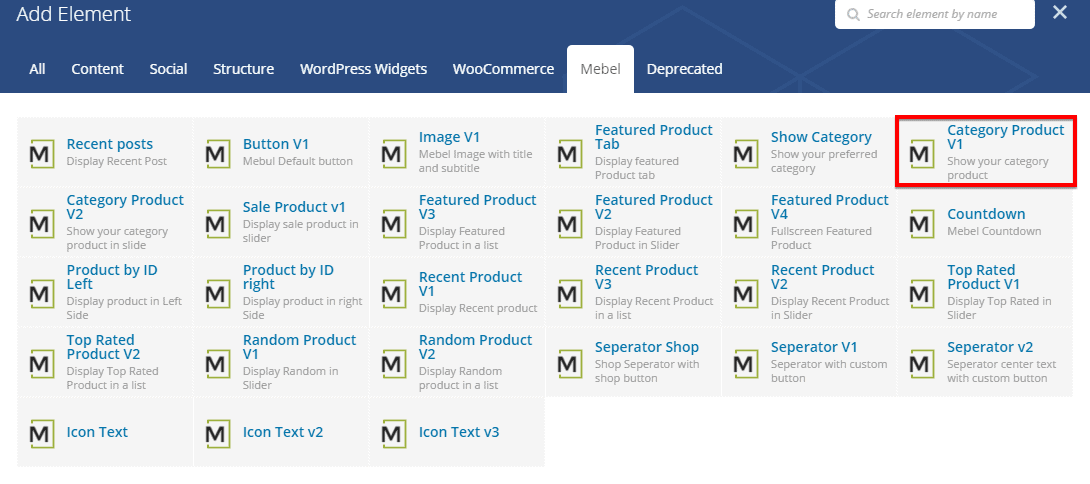
Shortcode : category-product-v1
Manual Process :
To add Category Product v1 element on a page, first-
- Go to
Pages - Click on Edit With Visual Composer
- Click on Add Elements
- From Mebel tab, click on the element named Category Product v1
- Configure the settings module according to your preferences and then
- Click on Save Changes to save the settings.
Category Product v1 Settings
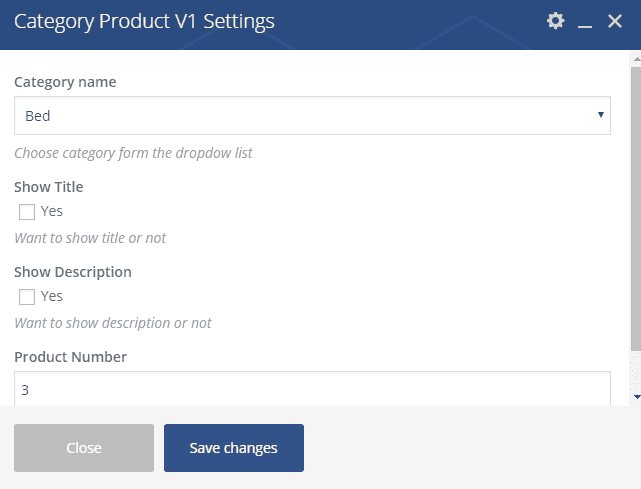
- Category Name : Select the category from the drop-down menu.
- Show Title : Enable or disable showing title.
- Show Description : Enable or disable showing description.
- Product Number : Number of product you want to show.
Category Product v2
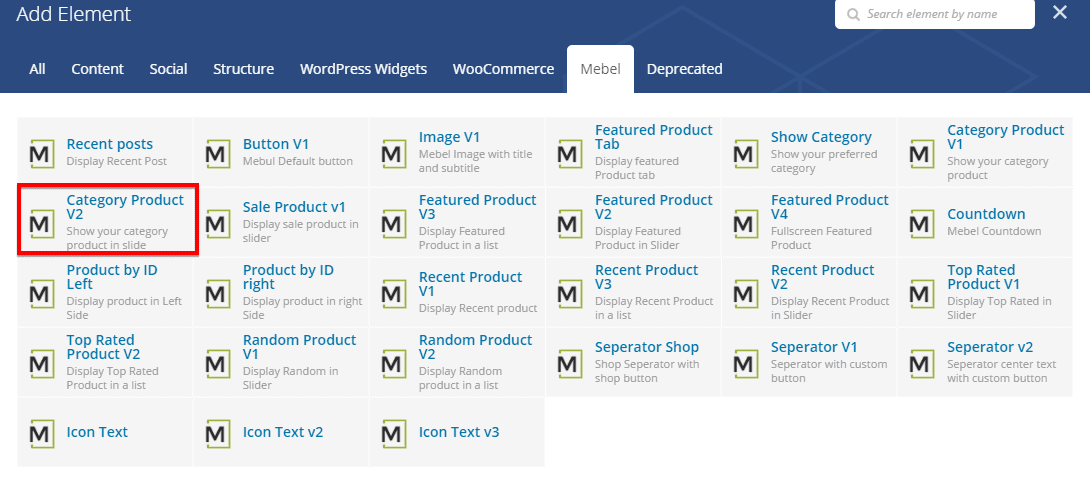
Shortcode : category-product-v2
Manual Process :
To add Category Product v2 element on a page, first-
- Go to
Pages - Click on Edit With Visual Composer
- Click on Add Elements
- From Mebel tab, click on the element named Category Product v2
- Configure the settings module according to your preferences and then
- Click on Save Changes to save the settings.
Category Product v2 Settings
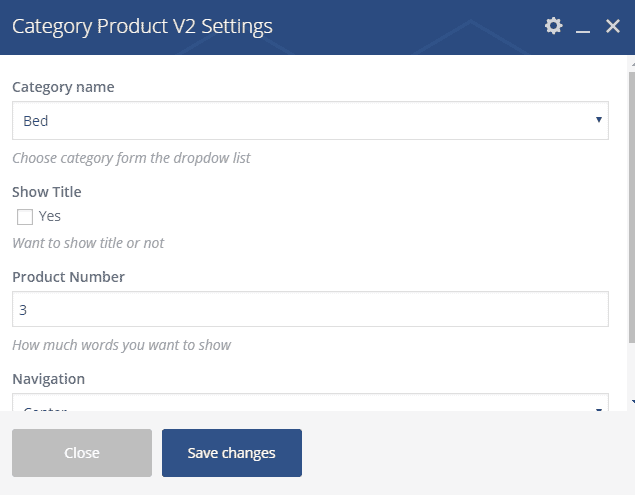
- Category Name : Select the category from the drop-down menu.
- Show Title : Enable or disable showing title.
- Product Number : Number of product you want to show.
- Navigation : Define the position of the element to be placed.
Sale Product v1
Shortcode : sale-product-v1
Manual Process :
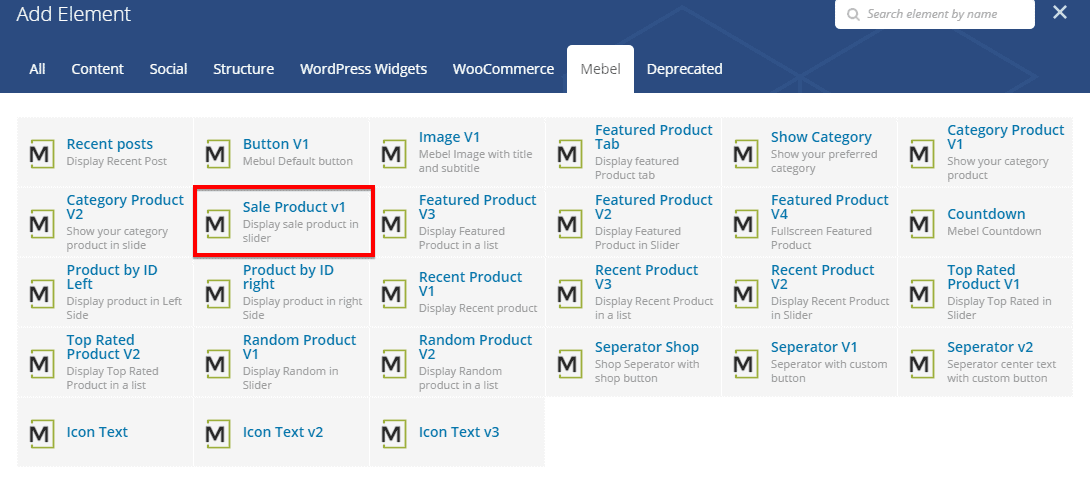
To add Sale Product v1 element on a page, first-
- Go to
Pages - Click on Edit With Visual Composer
- Click on Add Elements
- From Mebel tab, click on the element named Sale Product v1
- Configure the settings module according to your preferences and then
- Click on Save Changes to save the settings.
Sale Product v1 Settings
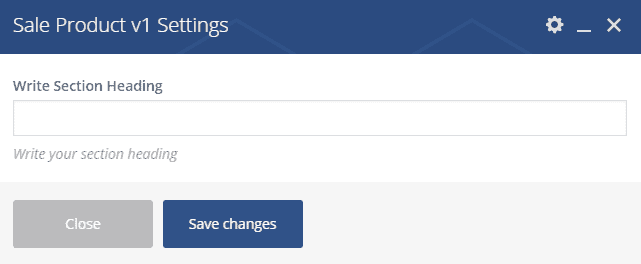
- Write Section Heading : Write the section heading here.
Featured Product v3
Shortcode : featured-product-list
Manual Process :
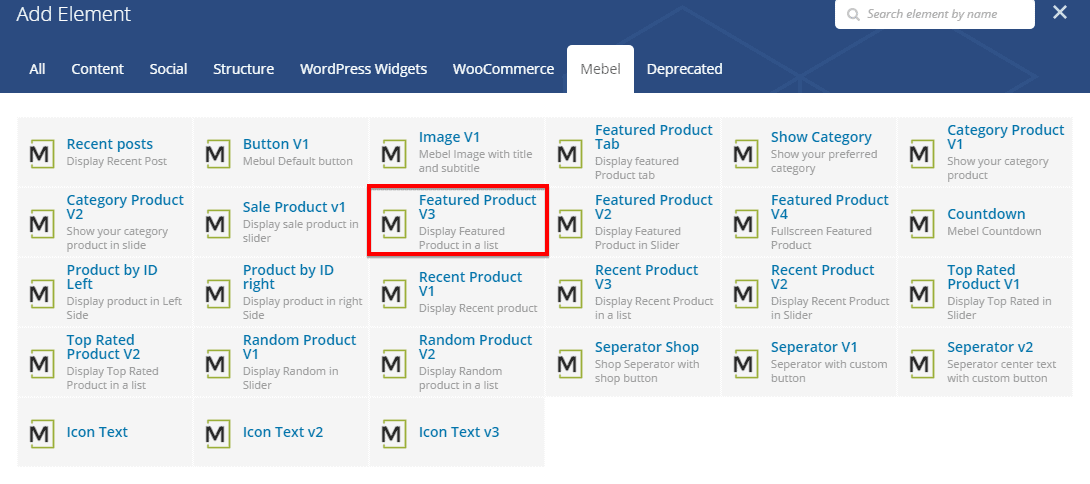
To add Featured Product v3 element on a page, first-
- Go to
Pages - Click on Edit With Visual Composer
- Click on Add Elements
- From Mebel tab, click on the element named Featured Product v3
- Configure the settings module according to your preferences and then
- Click on Save Changes to save the settings.
Featured Product v3 Settings
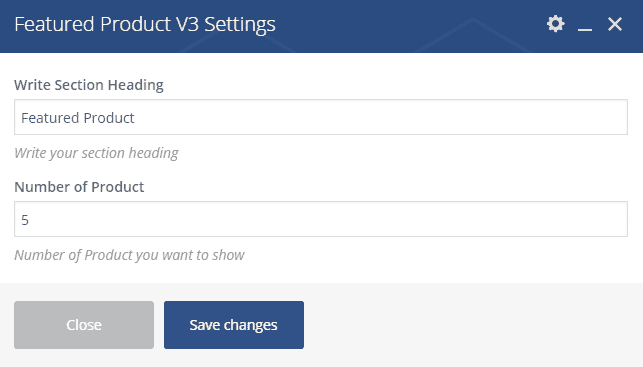
- Write Section Heading : Write the section heading here.
- Number of Product : Number of product you want to show.
Featured Product v2
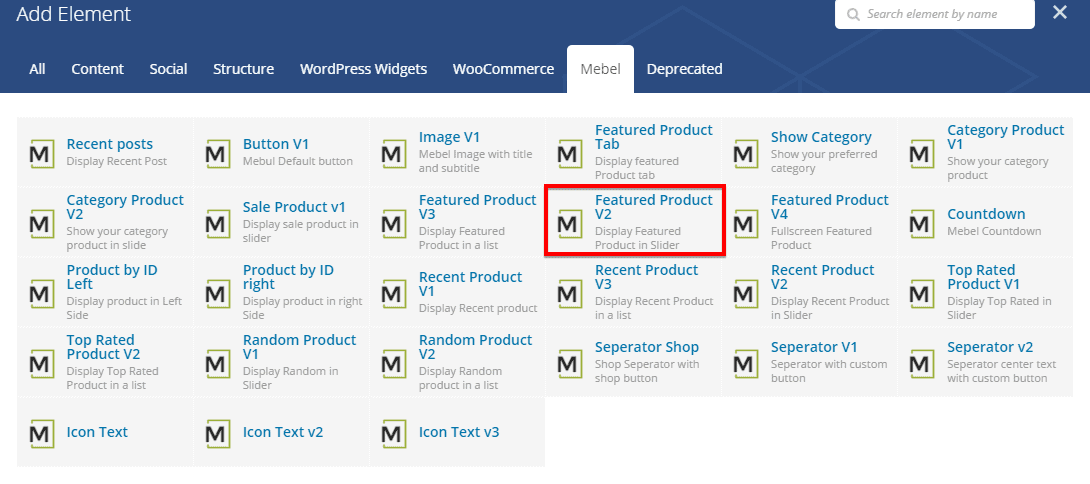
Shortcode : featured-product-v2
Manual Process :
To add Featured Product v2 element on a page, first-
- Go to
Pages - Click on Edit With Visual Composer
- Click on Add Elements
- From Mebel tab, click on the element named Featured Product v2
- Configure the settings module according to your preferences and then
- Click on Save Changes to save the settings.
Featured Product v2 Settings
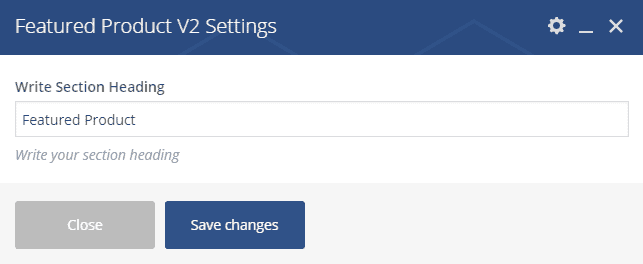
- Write Section Heading : Write the section heading here.
Featured Product v4
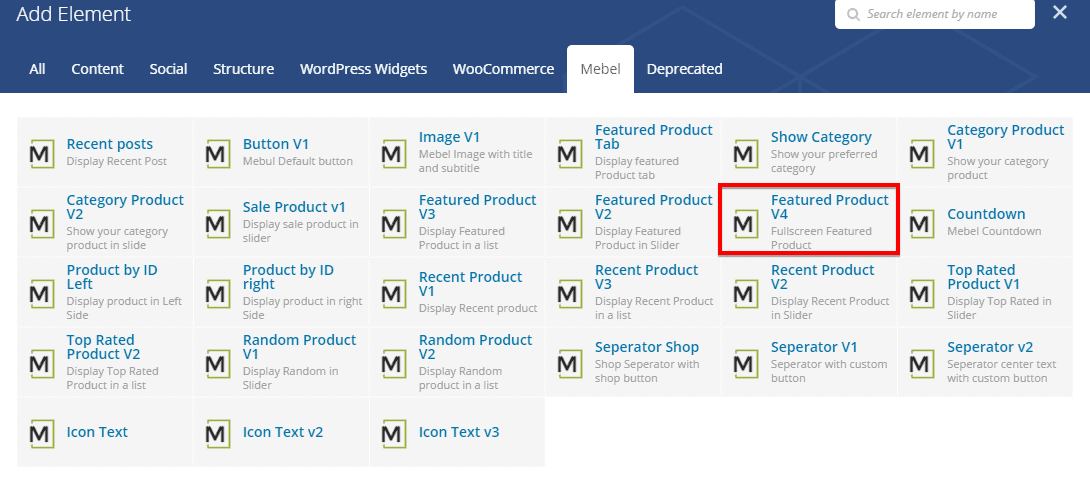
Shortcode : fullscreen-featured-product
Manual Process :
To add Featured Product v4 element on a page, first-
- Go to
Pages - Click on Edit With Visual Composer
- Click on Add Elements
- From Mebel tab, click on the element named Featured Product v4
- Configure the settings module according to your preferences and then
- Click on Save Changes to save the settings.
Featured Product v4 Settings
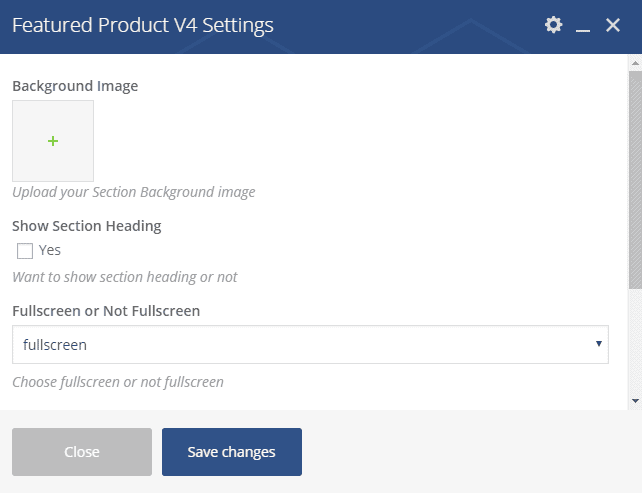
- Background Image : Set a background image by clicking on the + icon.
- Show Section Heading : Enable or disable showing section heading.
- Fullscreen or Not Fullscreen : Enable or disable fullscreen mode.
- Use Parallax : Enable or diable parallax effect.
- Show Product Info : Enable or diable showing product info.
Countdown
Shortcode : product_countdown
Manual Process :
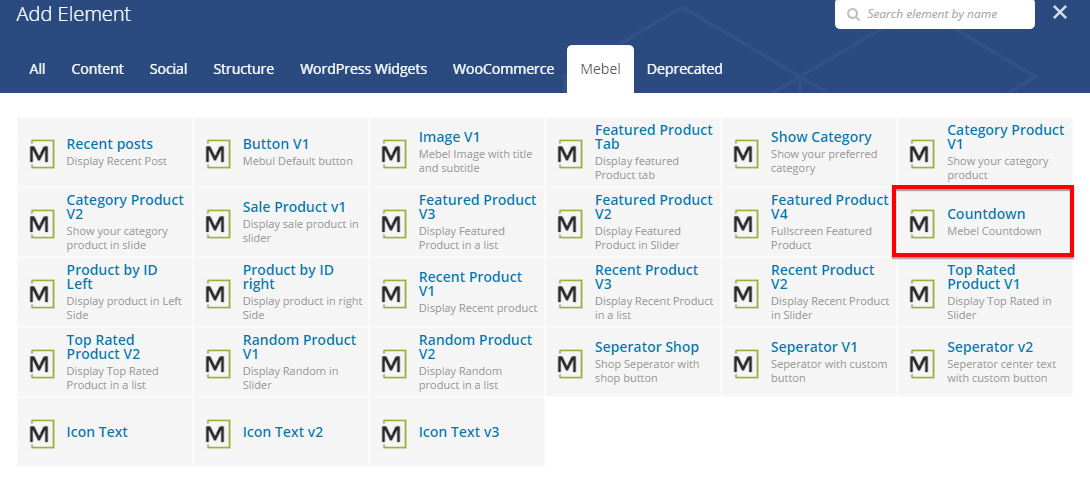
To add Countdown element on a page, first-
- Go to
Pages - Click on Edit With Visual Composer
- Click on Add Elements
- From Mebel tab, click on the element named Countdown
- Configure the settings module according to your preferences and then
- Click on Save Changes to save the settings.
Countdown Settings
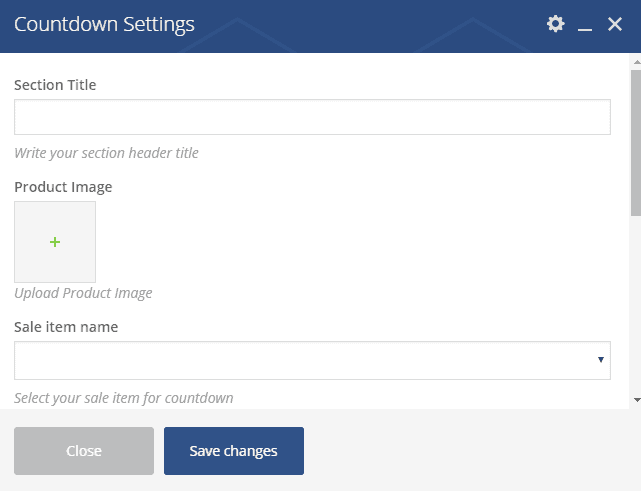
- Section Title : Write the section title here.
- Product Image : Upload a product image by clicking on the + icon.
- Sale Item Name : Select item from the drop-down.
- Short Description : Write a short description about the selected product.
- Year : Set the countdown year.
- Month : Select month from the drop-down menu.
- Day : Select a day from the drop-down menu.
Product By ID Left
Shortcode : product-id-left
Manual Process :
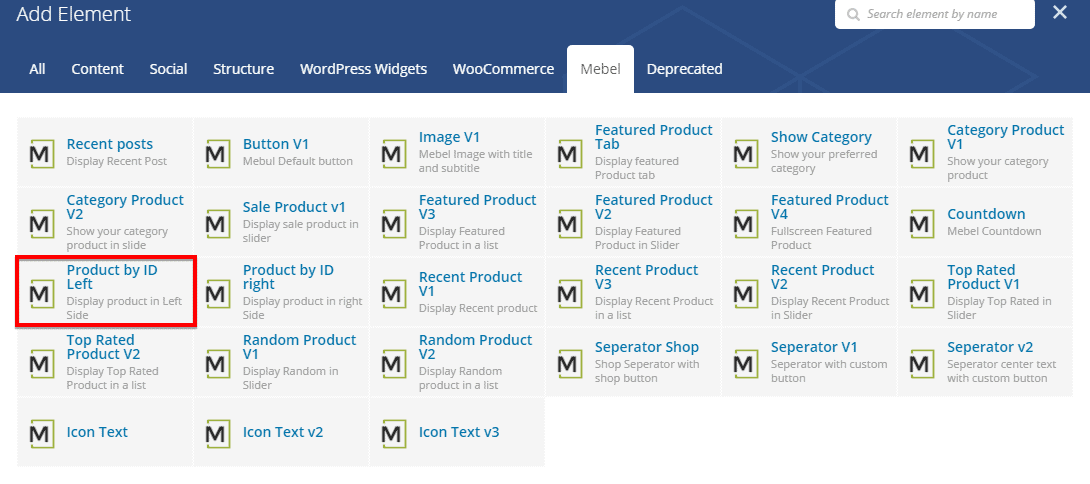
To add Product By ID Left element on a page, first-
- Go to
Pages - Click on Edit With Visual Composer
- Click on Add Elements
- From Mebel tab, click on the element named Product By ID Left
- Configure the settings module according to your preferences and then
- Click on Save Changes to save the settings.
Product By ID Left Settings
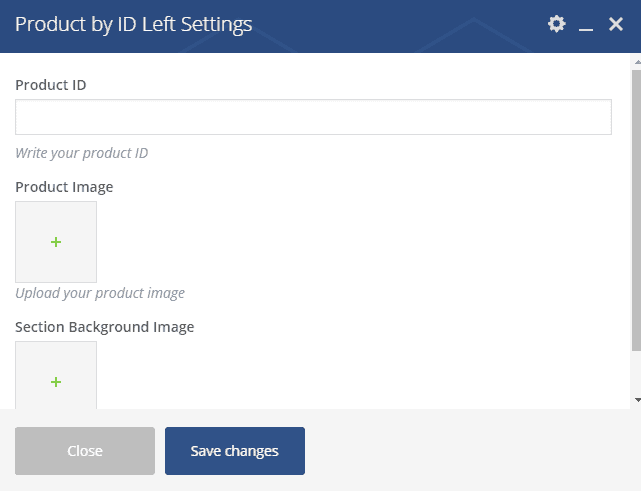
- Product ID : Write product ID here.
- Product Image : Upload the product image by clicking on the + icon.
- Background Image : Set a background image by clicking on the + icon.
Product By ID Right
Shortcode : product-id-right
Manual Process :
To add Product By ID Right element on a page, first-
- Go to
Pages - Click on Edit With Visual Composer
- Click on Add Elements
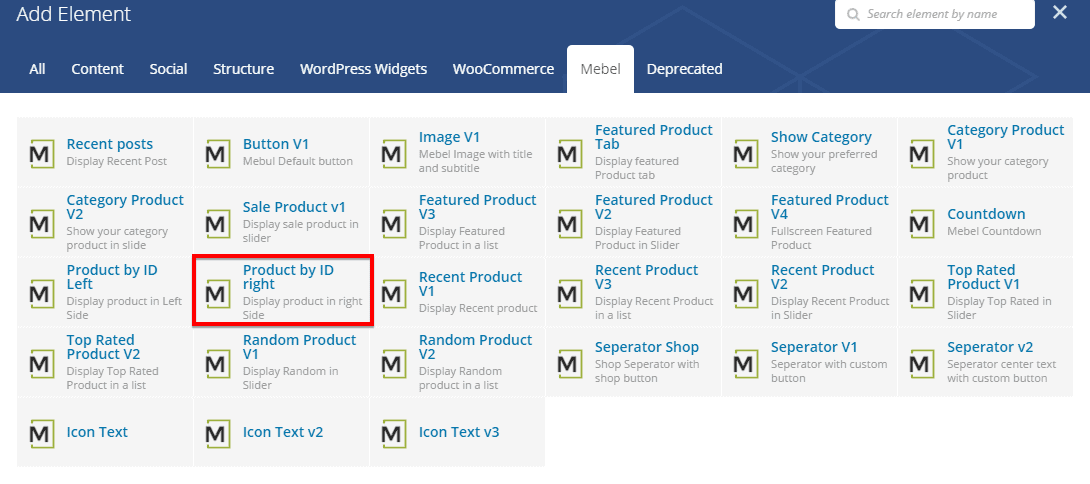
- From Mebel tab, click on the element named Product By ID Right
- Configure the settings module according to your preferences and then
- Click on Save Changes to save the settings.
Product By ID Right Settings
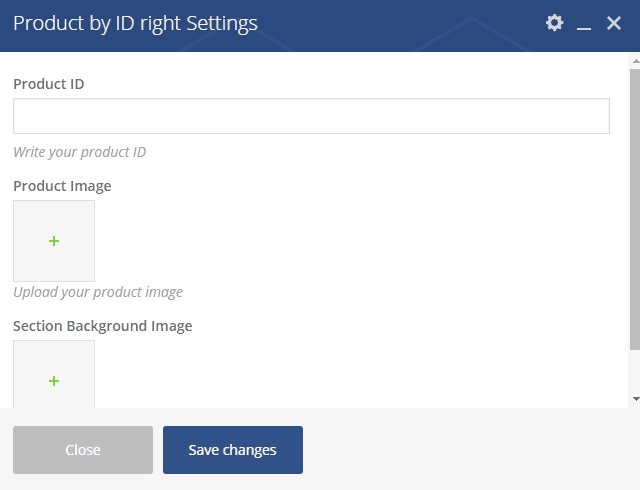
- Product ID : Write product ID here.
- Product Image : Upload the product image by clicking on the + icon.
- Background Image : Set a background image by clicking on the + icon.
Recent Product V1
Shortcode : recent-product
Manual Process :
To add Recent Product V1 element on a page, first-
- Go to
Pages - Click on Edit With Visual Composer
- Click on Add Elements
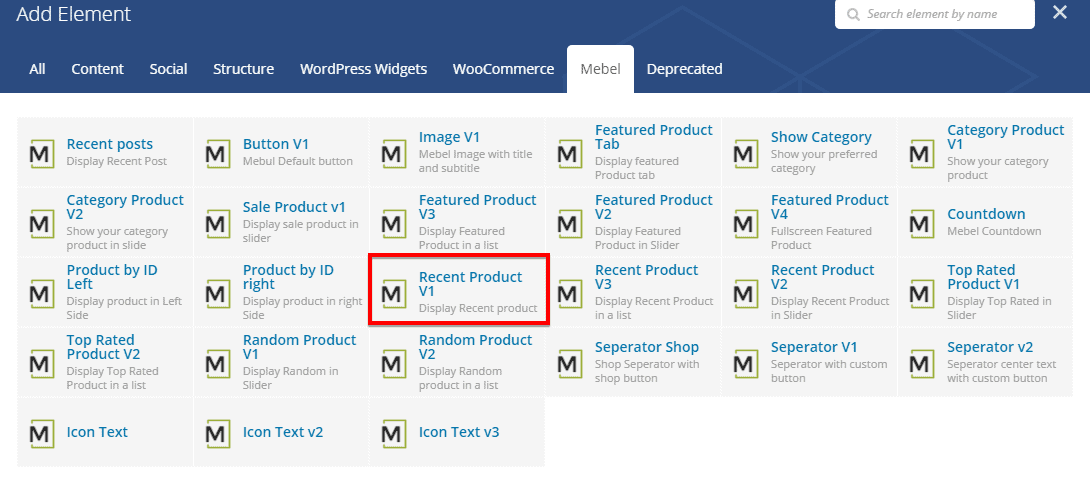
- From Mebel tab, click on the element named Recent Product V1
- Configure the settings module according to your preferences and then
- Click on Save Changes to save the settings.
Recent Product V1 Settings
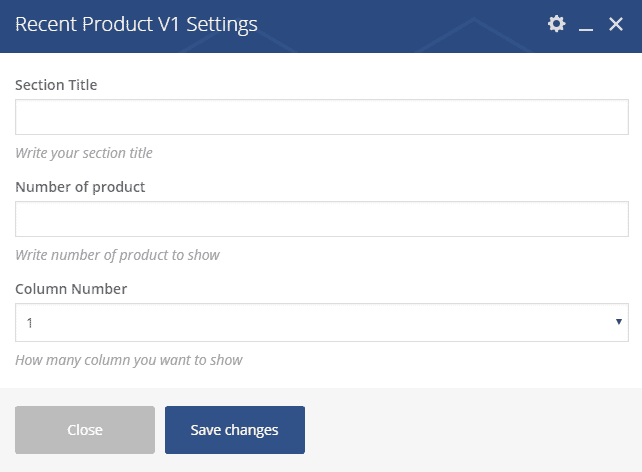
- Section Title : Write the section title here.
- Number of Product : Define the number of products you want to show.
- Column Number : Define the number of columns to show the products.
Recent Product V3
Shortcode : recent-product-list
Manual Process :
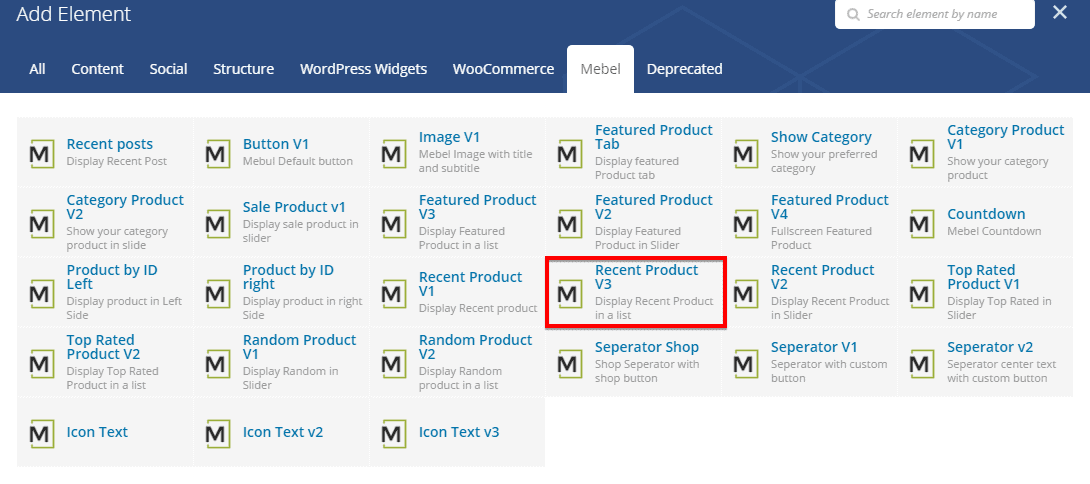
To add Recent Product V3 element on a page, first-
- Go to
Pages - Click on Edit With Visual Composer
- Click on Add Elements
- From Mebel tab, click on the element named Recent Product V3
- Configure the settings module according to your preferences and then
- Click on Save Changes to save the settings.
Recent Product V3 Settings
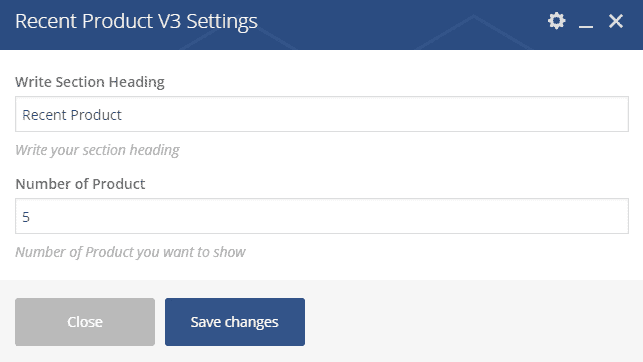
- Section Title : Write the section title here.
- Number of Product : Define the number of products you want to show.
Recent Product V2
Shortcode : recent-product-v2
Manual Process :
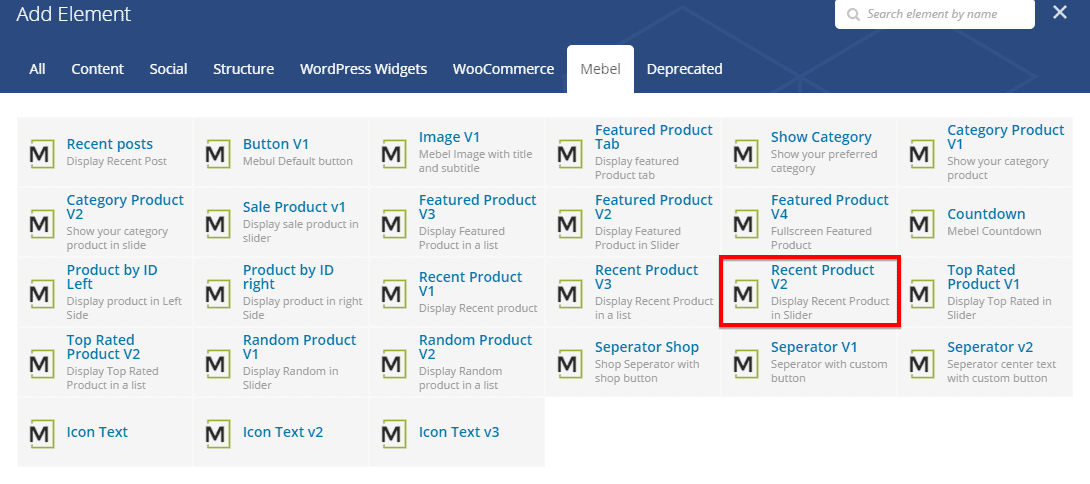
To add Recent Product V2 element on a page, first-
- Go to
Pages - Click on Edit With Visual Composer
- Click on Add Elements
- From Mebel tab, click on the element named Recent Product V2
- Configure the settings module according to your preferences and then
- Click on Save Changes to save the settings.
Recent Product V2 Settings
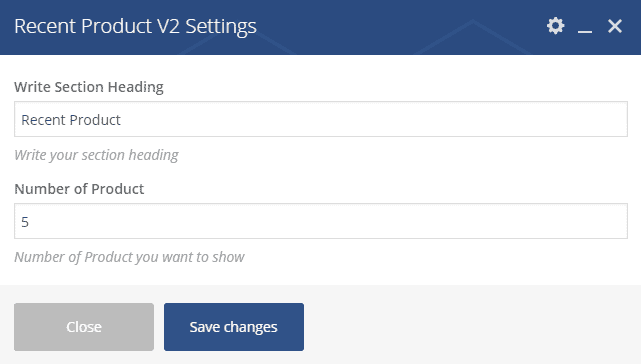
- Section Title : Write the section title here.
- Number of Product : Define the number of products you want to show.
Top Rated Product V1
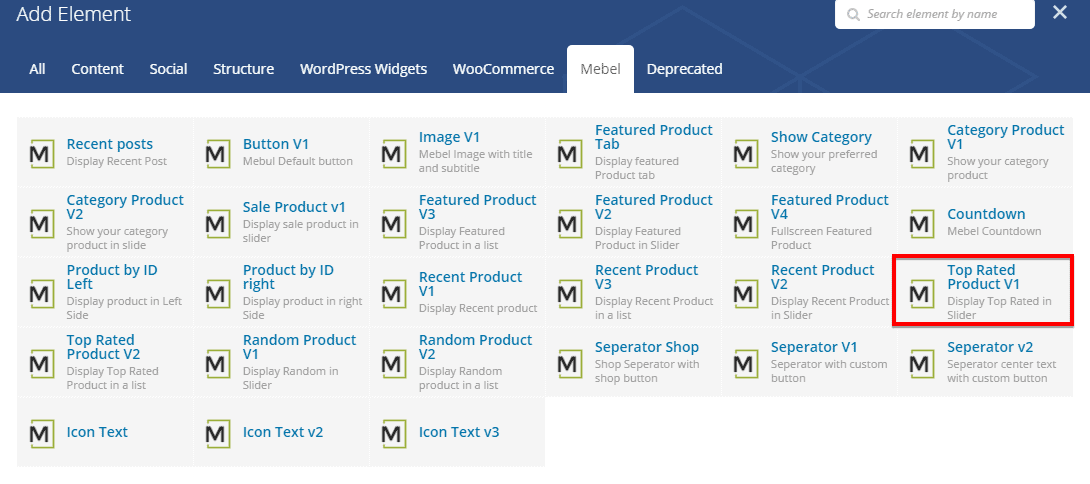
Shortcode : top-rated-product
Manual Process :
To add Top Rated Product V1 element on a page, first-
- Go to
Pages - Click on Edit With Visual Composer
- Click on Add Elements
- From Mebel tab, click on the element named Top Rated Product V1
- Configure the settings module according to your preferences and then
- Click on Save Changes to save the settings.
Top Rated Product V1 Settings
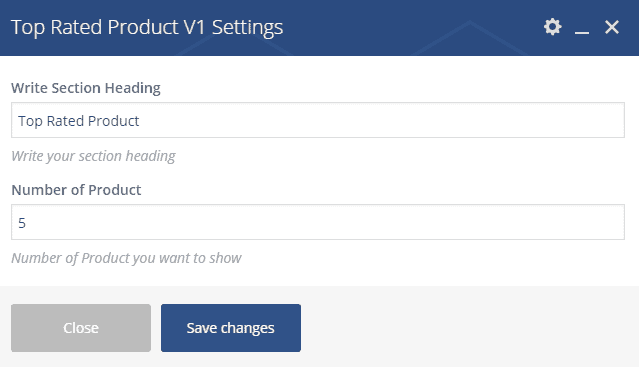
- Write Section Heading : Write the section title here.
- Number of Product : Define the number of products you want to show.
Top Rated Product V2
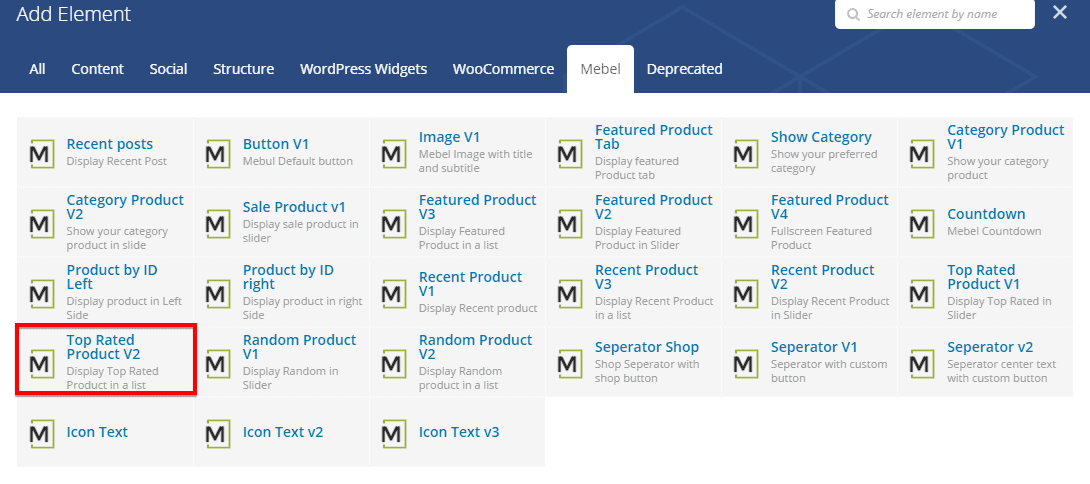
Shortcode : top-rated-product-list
Manual Process :
To add Top Rated Product V2 element on a page, first-
- Go to
Pages - Click on Edit With Visual Composer
- Click on Add Elements
- From Mebel tab, click on the element named Top Rated Product V2
- Configure the settings module according to your preferences and then
- Click on Save Changes to save the settings.
Top Rated Product V1 Settings
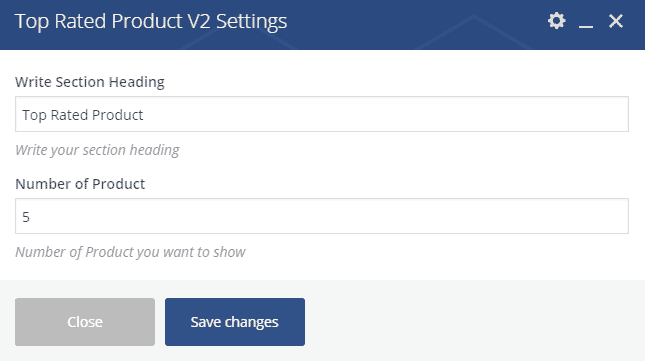
- Write Section Heading : Write the section title here.
- Number of Product : Define the number of products you want to show.
Random Product V1
Shortcode : random-product
Manual Process :
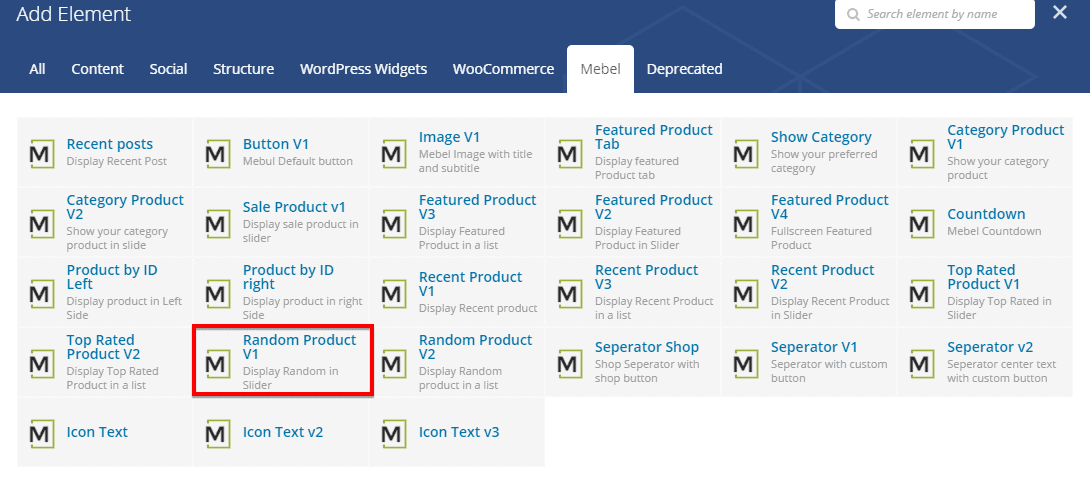
To add Random Product V1 element on a page, first-
- Go to
Pages - Click on Edit With Visual Composer
- Click on Add Elements
- From Mebel tab, click on the element named Random Product V1
- Configure the settings module according to your preferences and then
- Click on Save Changes to save the settings.
Random Product V1 Settings
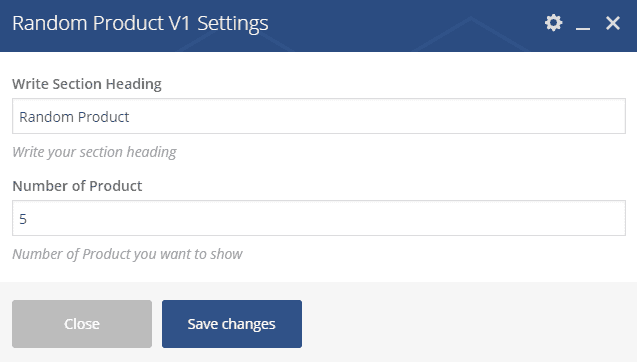
- Write Section Heading : Write the section title here.
- Number of Product : Define the number of products you want to show.
Random Product V2
Shortcode : random-product-list
Manual Process :
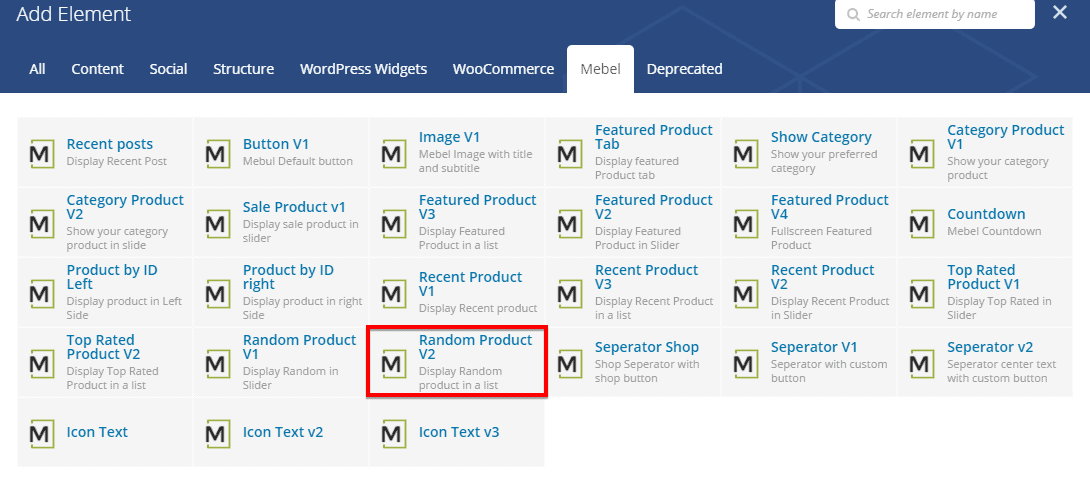
To add Random Product V2 element on a page, first-
- Go to
Pages - Click on Edit With Visual Composer
- Click on Add Elements
- From Mebel tab, click on the element named Random Product V2
- Configure the settings module according to your preferences and then
- Click on Save Changes to save the settings.
Top Rated Product V2 Settings
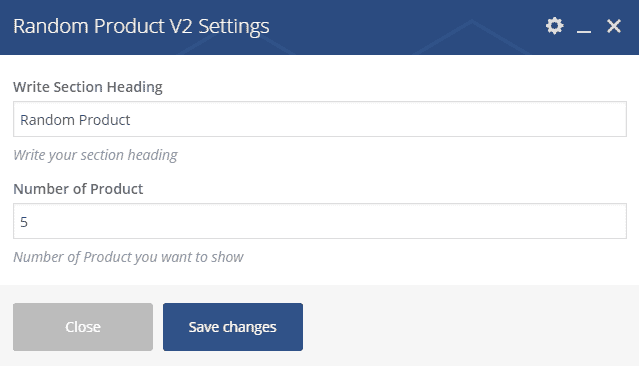
- Write Section Heading : Write the section title here.
- Number of Product : Define the number of products you want to show.
Separator Shop
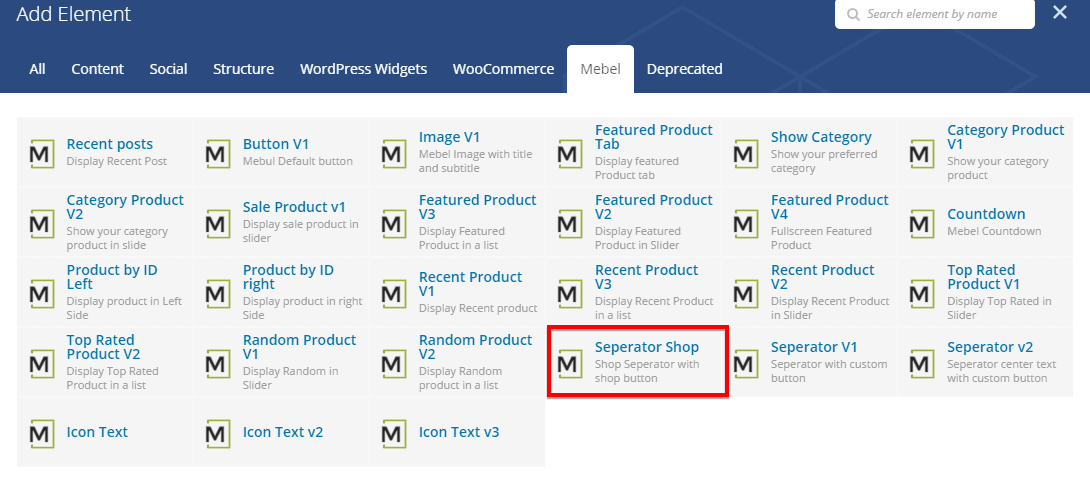
Shortcode : separator-shop
Manual Process :
To add Separator Shop element on a page, first-
- Go to
Pages - Click on Edit With Visual Composer
- Click on Add Elements
- From Mebel tab, click on the element named Separator Shop
- Configure the settings module according to your preferences and then
- Click on Save Changes to save the settings.
Seperator Shop Settings
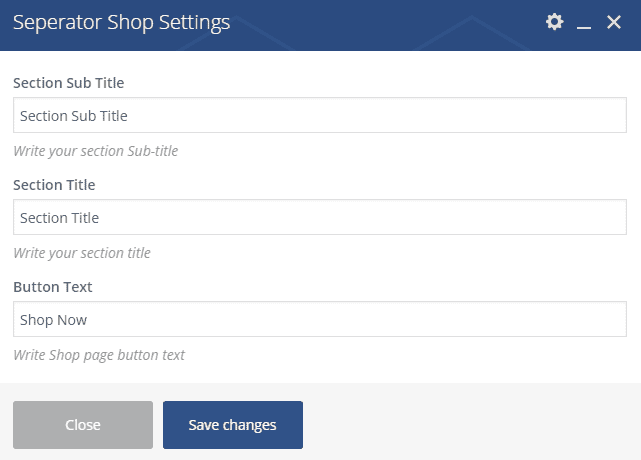
- Section Title : Write the section title here.
- Section Subtitle : Write the section sub-title here.
- Button Text : Write the button text here.
Separator V1
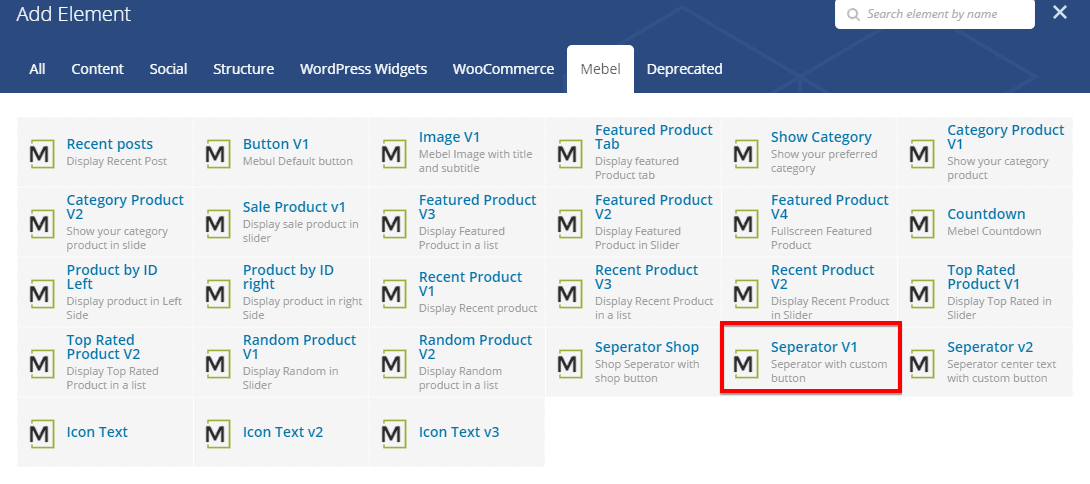
Shortcode : seperator-v1
Manual Process :
To add Separator V1 element on a page, first-
- Go to
Pages - Click on Edit With Visual Composer
- Click on Add Elements
- From Mebel tab, click on the element named Separator V1
- Configure the settings module according to your preferences and then
- Click on Save Changes to save the settings.
Seperator V1 Settings
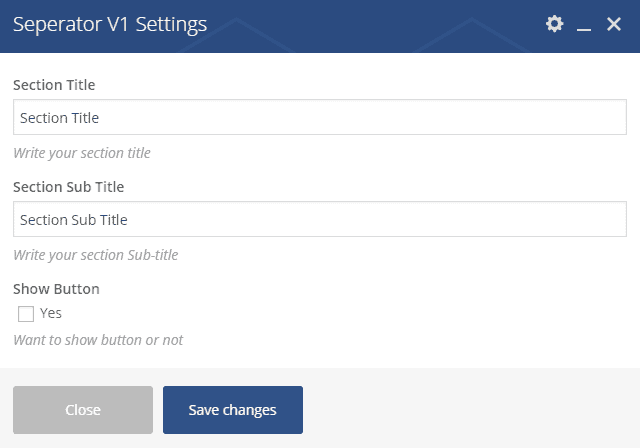
- Section Title : Write the section title here.
- Section Subtitle : Write the section sub-title here.
- Show Button : Define whether you want to show button or not.

Separator V2
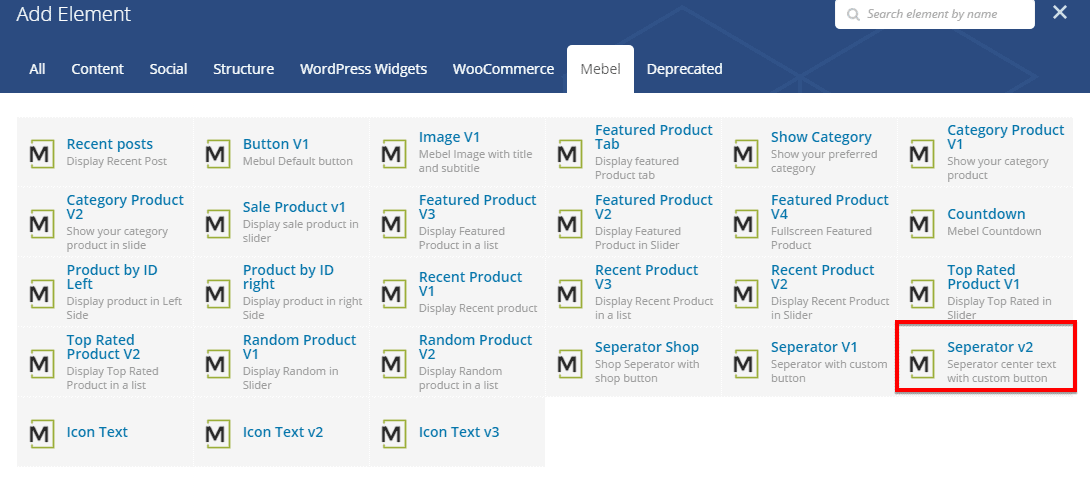
Shortcode : seperator-v2
Manual Process :
To add Seperator V2 element on a page, first-
- Go to
Pages - Click on Edit With Visual Composer
- Click on Add Elements
- From Mebel tab, click on the element named Seperator V2
- Configure the settings module according to your preferences and then
- Click on Save Changes to save the settings.
Seperator V2 Settings
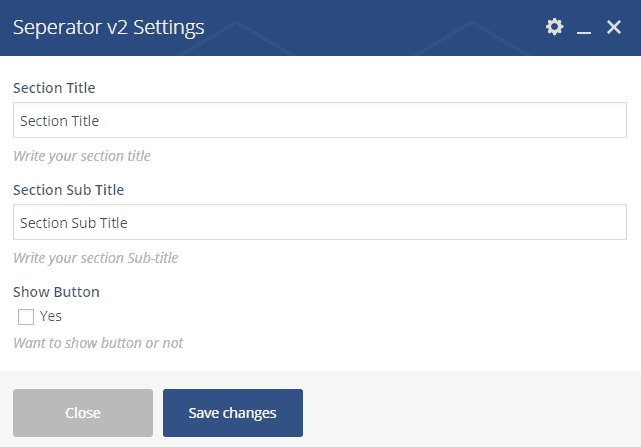
- Section Title : Write the section title here.
- Section Subtitle : Write the section sub-title here.
- Show Button : Define whether you want to show button or not.
Icon Text
![]()
Shortcode : icon-text
Manual Process :
To add Icon Text element on a page, first-
- Go to
Pages - Click on Edit With Visual Composer
- Click on Add Elements
- From Mebel tab, click on the element named Icon Text
- Configure the settings module according to your preferences and then
- Click on Save Changes to save the settings.
Icon Text Settings
![]()
- Icon : Select icon from the list.
- Icon Size : Define the selected icon size.
- Text : Write the text here
- Text Size : Define the font size.
Shortcode : icon-text-v2
Manual Process :
To add Icon Text2 element on a page, first-
- Go to
Pages - Click on Edit With Visual Composer
- Click on Add Elements
- From Mebel tab, click on the element named Icon Text2
- Configure the settings module according to your preferences and then
- Click on Save Changes to save the settings.
Icon Text2 Settings
- Background Color : Choose a Background Color.
- Icon : Select icon from the list.
- Icon Color : Choose the icon color.
- Title Text : Write the title text here.
- Title Text Color : Choose the title text color.
- Subtitle Text : Write the title subtext here.
- Subtitle Text Color : Choose the subtitle text color.
Icon Text3
Shortcode : icon-text-v3
Manual Process :
To add Icon Text2 element on a page, first-
- Go to
Pages - Click on Edit With Visual Composer
- Click on Add Elements
- From Mebel tab, click on the element named Icon Text2
- Configure the settings module according to your preferences and then
- Click on Save Changes to save the settings.
Icon Text3 Settings
- Background Color : Choose a Background Color.
- Icon : Select icon from the list.
- Icon Color : Choose the icon color.
- Title Text : Write the title text here.
- Title Text Color : Choose the title text color.
- Subtitle Text : Write the title subtext here.
- Subtitle Text Color : Choose the subtitle text color.

