Wedding
A beautiful Joomla template, specially crafted for wedding, anniversary and engagement event website with multiple Homepage variations. It has a gorgeous event countdown timer, and Google map locating facilities while it displays event information's beautifully with a crafted wedding card. Quix drag & drop page builder is used to build this template.
Key Features
- Fully Responsive
- Fast Loading
- Attractive Layout
- Huge Page Variations
- SEO Optimized by Quix's enhanced SEO
- Page with lots of element combination
- Specially crafted for wedding, anniversary, engagement event
- Wedding Card
- Google Map Locating
- Event Showcasing
- Family Chart
- Indexed & Searchable Pages
- Event Countdown Timer
- Megamenu
- Off-canvas Navigation
- Dynamic Navigation Menu
- Smooth Collapsing Transaction
- Quick Social Sharing
- Multiple Social Commenting
- Built with T3 Framework
- Quix - Drag & Drop page builder
Requirements
In order to run Wedding run smoothly on your server, you need to full-fill this requirements listed below :
- Joomla: 3.6.x
- Server : PHP 5.6+
Download
Head over to our download page and click Explore button of template you want to download. You will see several files listed there. Read section below to understand which file to dowload.
Installation
There are 2 ways you can install Wedding template. Both are pretty simple and straight forward.
- Install QuickStart package.
- Install Everything Manually with recommended extensions.
Install QuickStart Package
QuickStart is a complete Joomla pre-packaged with all required extensions, settings, images, content as well as default template configurations.
If you are starting from scratch, we recommend you to download Quickstart package and install it. This is the most simplest way to get started.
Please follow step by step process from the video:
Manuall Installation
If you already have an existing Joomla site and want to applly wedding template, you have to install the following packages listed bellow:
- T3 Framework - Used to build the template
- Quix - Drag & Drop page builder
- WeddingTemplate
All of above extensions are very easy to install by following standard Joomla installation process. Simply, go to Extensions > Manage > Install then upload respective extension's zip package and hit upload.
You can check our extensive installation tutorial to understand more.
Template Settings
You can differently customize template according to your need using Easy Customization feature. Go to Extensions > Templates >tx_wedding It will open up Template Setting Screen.
Compile LESS to CSS
When site development is complete, you should compile LESS to CSS. This option will compile LESS files to CSS files. All your customization in LESS files will be compiled to corresponding CSS files.
ThemeMagic
By enabling this feature, you'll get the ThemeMagic customization panel, and with this, you can customize your theme. After customization, you should turn it off.

For better understanding, go through the video below;
Megamenu Options
- Enable Submenu : This option is to show or hide submenu of a parent menu. If a menu has no submenus, to enable this option, it allows you to add new submenu and add content to the submenu.
To add a submenu, click on the menu in which you want to add submenu.
You can only add a submenu for a menu that has no child menus.
-
Add New Column/ Row : You can add new columns or rows for a selected Column/ Row.
-
Group Submenu or not : You can group submenus of any menu item by selecting the menu item then enable option "Group."
-
Assign any module for new created Row/ Submenu : After adding new Row/ Submenu, you can display content from any module by assigning the module to the Row/ Submenu.
-
Move Menu Item : You can move a menu item to the next or previous column. This option will help you to divide menu items into columns.
- Resize submenu and column width : T3 allows you to change the size of a submenu. To do so, select the submenu then change its size in pixel. After changing the size of the submenu, you can change the size of a column. Just select the column and set the Width (max 12).
Style Megamenu
You can style for any level of Megamenu including Menu Items, Columns, Submenus by Adding a class to Extra Class field.

Using two files, you can add style for MegaMenu. megamenu.less in: plugins/system/t3/base/less megamenu.less in: templates/tx_wedding/less
-
Add Icon for Menu Item : You can add class to define icon that you want to add to the menu item, or you can use classes of Bootstrap and Font Awesome.
- Bootstrap 3 icon list
- Font Awesome 4 icon list
- Animation Settings : T3 supports four types of animation for Megamenu.
This feature is only available from version: 1.2.5
There are two fields configure the animation.
- Animation type and
- Duration
Currently, T3 supports four animation types: Fading, Slide, Elastic, and Zoom.
- Small Screens Menu System : T3 supports two navigation systems for small screens. First one is the default Bootstrap navigation called Collapse navigation for small screens and The second one is the Off-canvas sidebar. Check out Off-canvas sidebar configuration documentation.
For better understanding, watch the video below:
To enable default Bootstrap navigation, in the Navigation tab, enable option Collapse navigation for small screens. We highly recommend you to disable this option if you use Off-canvas sidebar for navigation in small screens.
General Settings
The global settings are applied for all styles, themes, and layout, no matter the settings are changed in any styles.
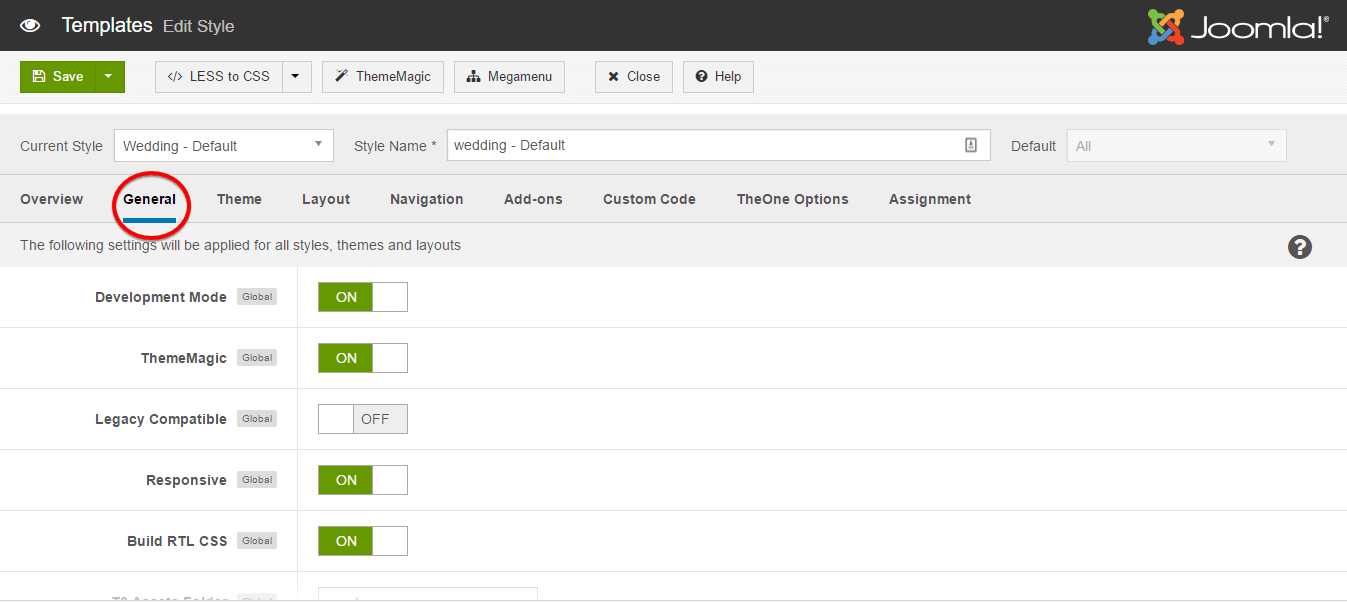
- Development Mode : As this is an important option, you should get the differences between Enabling and Disabling the option clearly. You should enable this option while you are developing your site.
We recommend to use Chrome Developer Tool or Firebug when developing your site. These tools help you to find problem and solve them faster.
Once it's turned on, your site will directly run original files - LESS files. The LESS files are located in templates/tx_wedding_less/ or templates/tx_wedding/less
Make sure to turn off development mode when your site goes live. It may decrease your site loading speed on production environment.
All compiled CSS files are located in templates\tx_wedding\css. But we don't recommend you to customize your site with the CSS files in this folder as each time you compile LESS to CSS, the files will be overridden.
-
Legacy Compatible : By enabling this feature, some compatible Boostrape 2.0 as well as Font Awesome 3.0 style will be loaded.
-
Responsive : Turn ON-OFF template responsiveness. By turning on, your site will be responsive according to the device screen size. If you turn the option OFF, you can set the screen size manually.
-
Build RTL CSS : This option allows you to fix the language appearance. Usually, some language like Arabic is to read from the right-hand side. If it is turned off, also those languages will appear from the left side and won't be understandable.
-
T3 Assets Folder : Defining the T3 Framework Asset Folder. It can be only done when the Development Mode or Optimize CSS is set to "YES".
- Show T3 Logo : Allows to enable or disable T3 Logo in footer.
- Optimization : In the case of Development mode is off, you are allowed to enable or disable option: Optimize CSS. This option will optimize and join CSS files. By this way, it will improve your site performance. When enabled, the optimized and joined CSS files will be located in the defined T3 Assets Folder folder. By default this folder is t3-assets.
For better understanding, watch the video below:
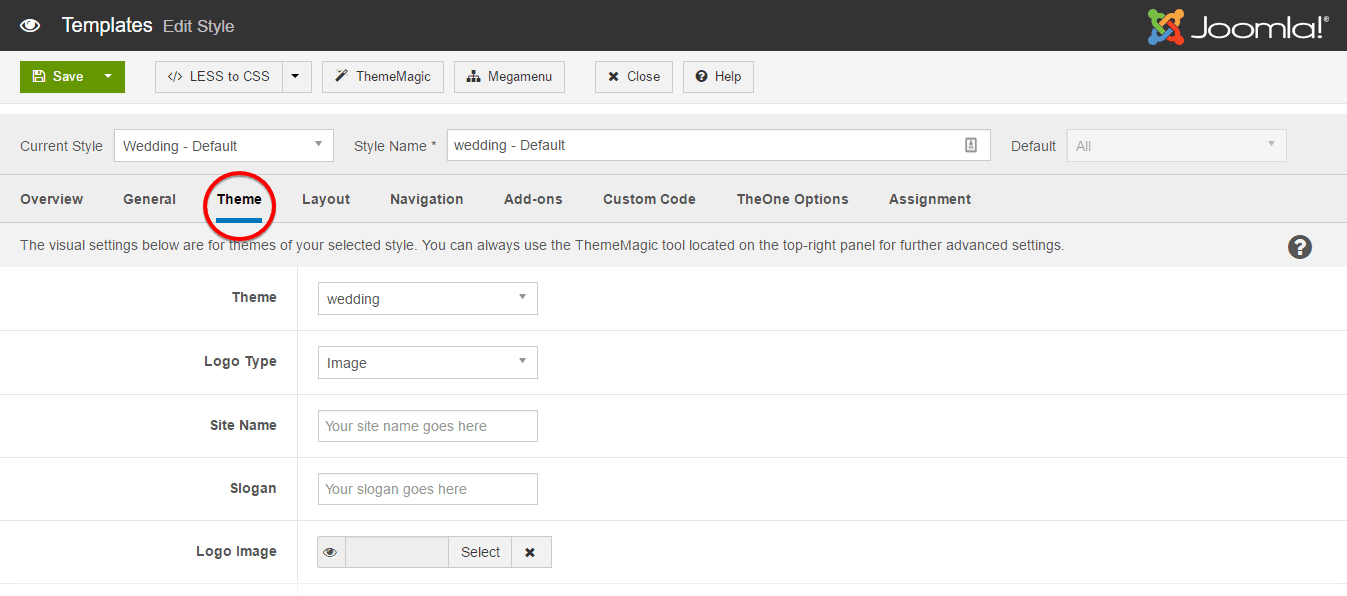
Theme Settings
-
Theme : This option allows you to choose a preset style for the current theme. It affects and changes the whole user interface according to its previously set color as well as font for the particular section on the theme.
-
Logo Type : Type you can either select image logo style or text logo style.
-
Site Name : Specify the name of your site.
-
Slogan : Write a slogan for your site.
-
Logo Image : Using this option, you can select an image that you want to use as the logo for your site. If you choose Image Logo Type in the previous option, only then this setting will appear.
- Enable Small Logo : If this set on, a small version responsive logo will appear for the small screens. That logo image has to be selected from the following option; Small Logo Image
You can find this below option only when you enable the option; Small Logo Image
Layout Setting
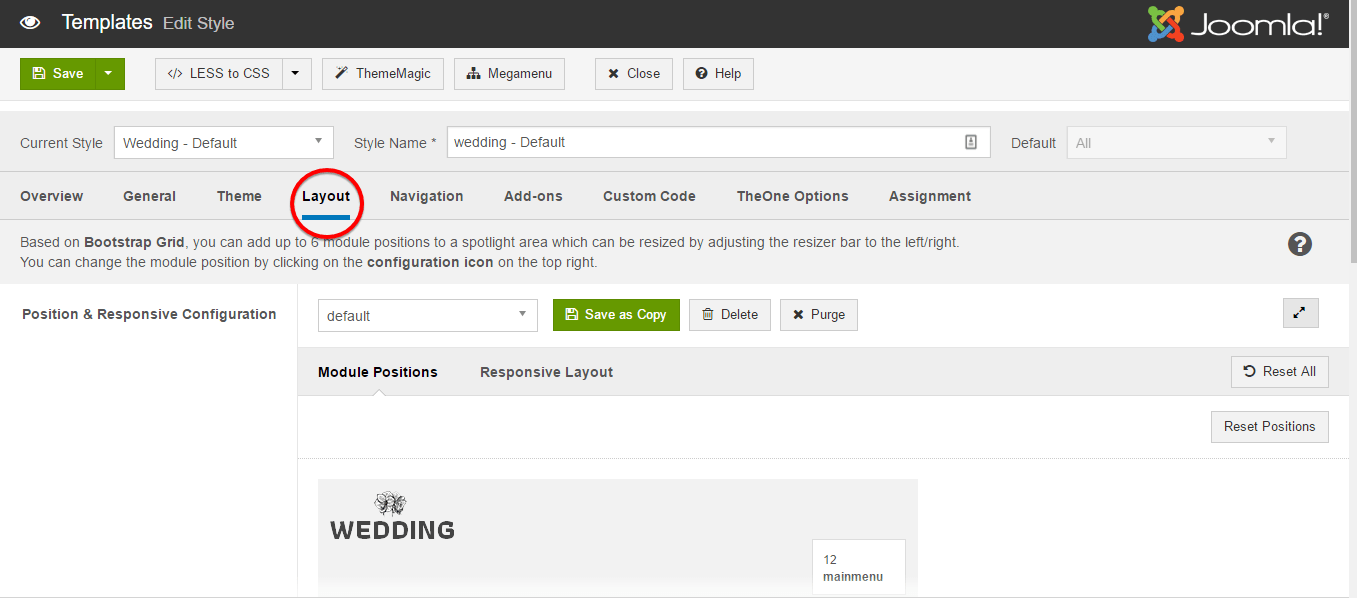
- Position & Responsive Configuration : Select a Layout configuration style.
- Layout structure : Assign the Module Position.
- Responsive layout configuration : Select responsive layout size. It can be Large, Medium, Small and Extra Small as well.
To know more about Layout Configuration, we reccomend you to watch the video below;
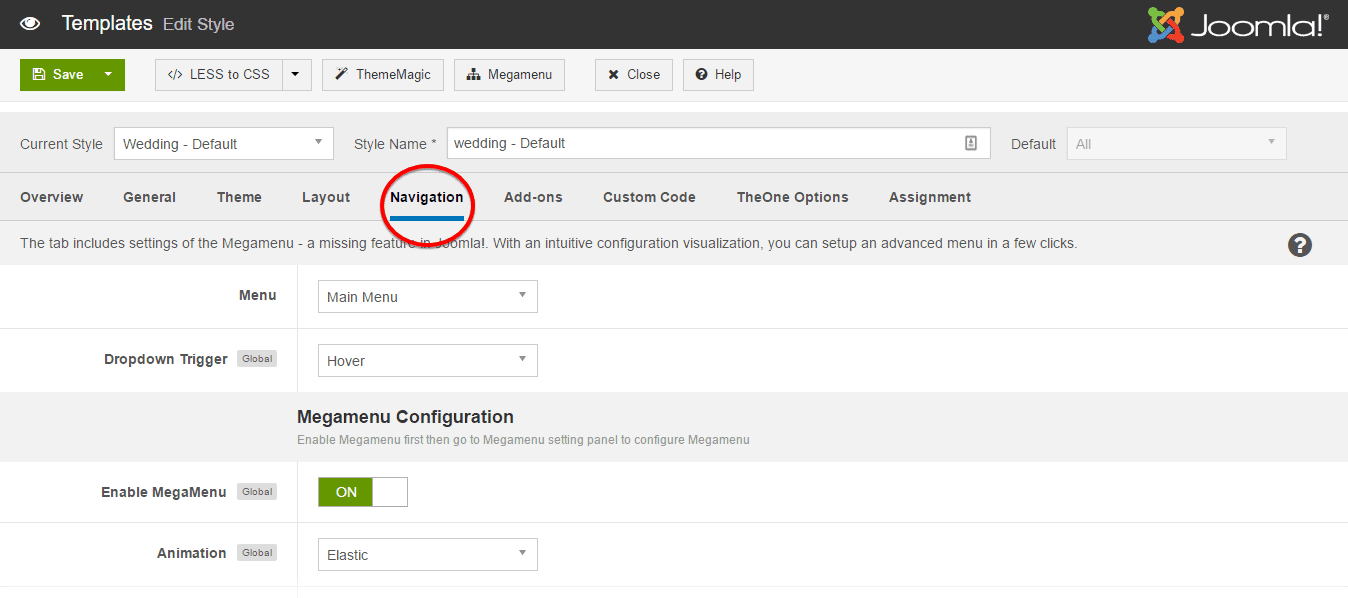
Navigation Settings
-
Menu : Select menu to configure megamenu.
The navigation settings are not global settings, so in each style, it may have difference navigations and in each style, you can display different menus as the main menu.
-
Dropdown Trigger : Define the style while mouse hovers on the menu items to fetch sub-menus.
-
Enable Megamenu : To enable Megamenu, First open Navigation tab. Then set Enable Megamenu "ON".
Megamenu > Enable Megamenu. -
Animation : Defining animation for Megamenu.
-
Collapse navigation for small screens : Allows you to enable default collapse navigation for the main navigation menu for small screens.
-
Configuration Level : There are three levels of configuration that you are suppose to know;
- Submenu Setting
- Column Setting
- Menu Item Setting
-
Sub-megamenu Setting : This setting allows you to configure the width of the sub-megamenu, add the column, and add class that manage the style.
-
Column Setting : Here, you can Add column, remove column, set width of column and assign the module to column as well.
- Main Item Setting : In this configuration level, you can Enable or Disable Submenu, Whether a menu item displays sub-menus in a group or not, Move menu item to the right or left, Assign a module to a module menu item, Add icon for the menu item.
Add-ons Settings
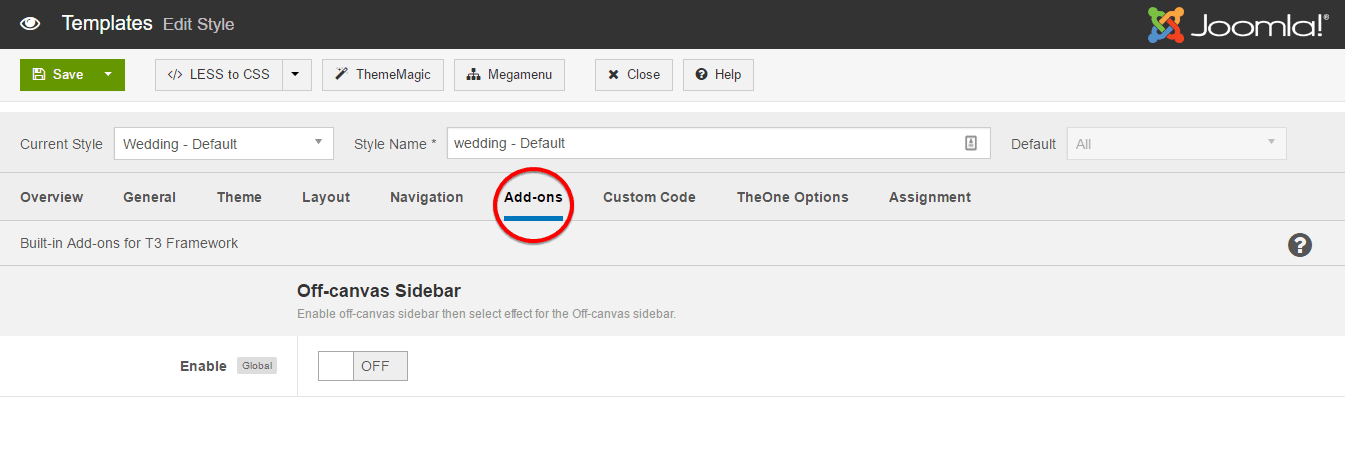
Off-canvas Sidebar
- Enable : Enabling or Disabling Off-canvas Sidebar. Assign a module position to Off-canvas sidebar. By default, Off-canvas will be assigned to off-canvas position. Add content to Off-canvas sidebar by creating modules then assign them to off-canvas position
To display menu in the off-canvas sidebar, create module menu then assign the menu to "off-canvas" position.
For better understanding, watch the video below:
Custom Codes
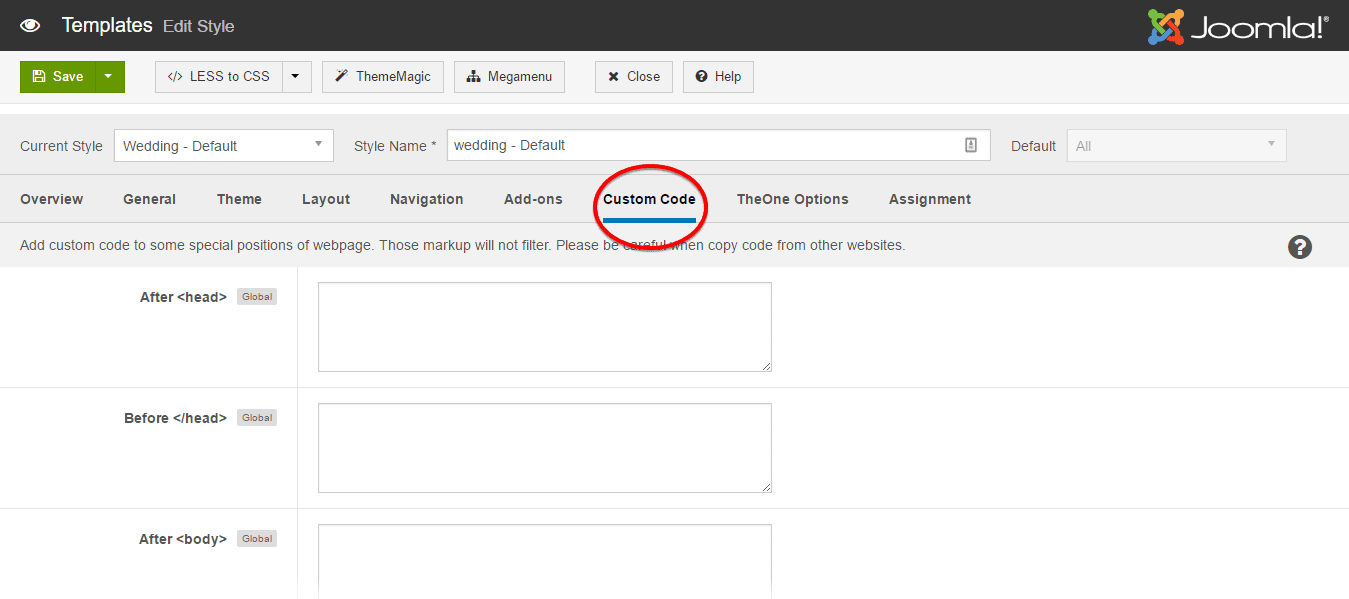
The tab includes settings that allows you to add scripts like Google Analytic, Live chat service to any position.
To add scripts, you have to open Custom Code tab then you can add scripts in four positions: Before Head, After Head, Before Body and After Body as well.
In front-page, you can see the source code to watch whether the scripts are added or not

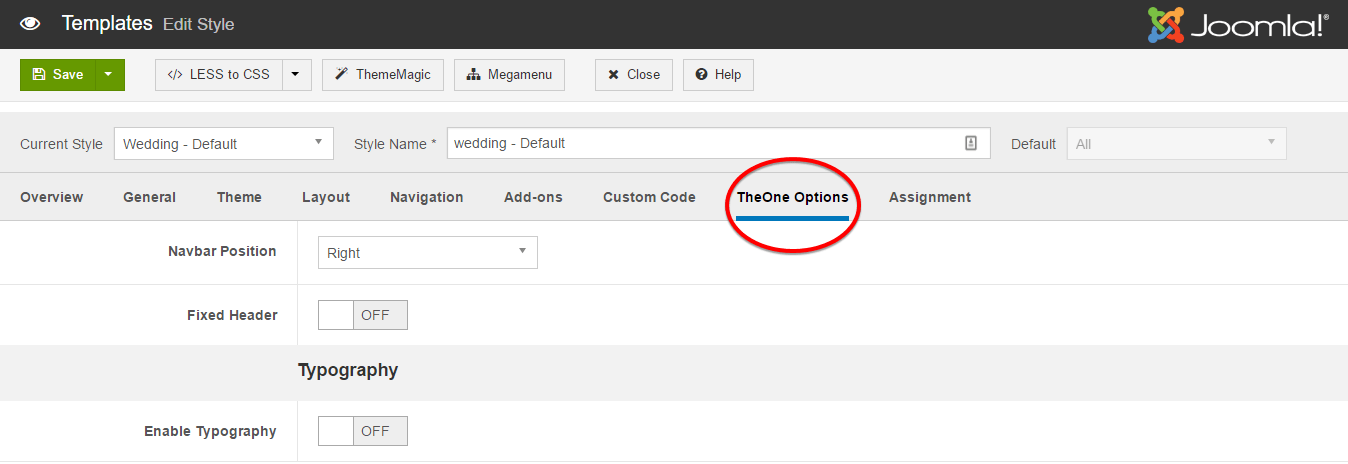
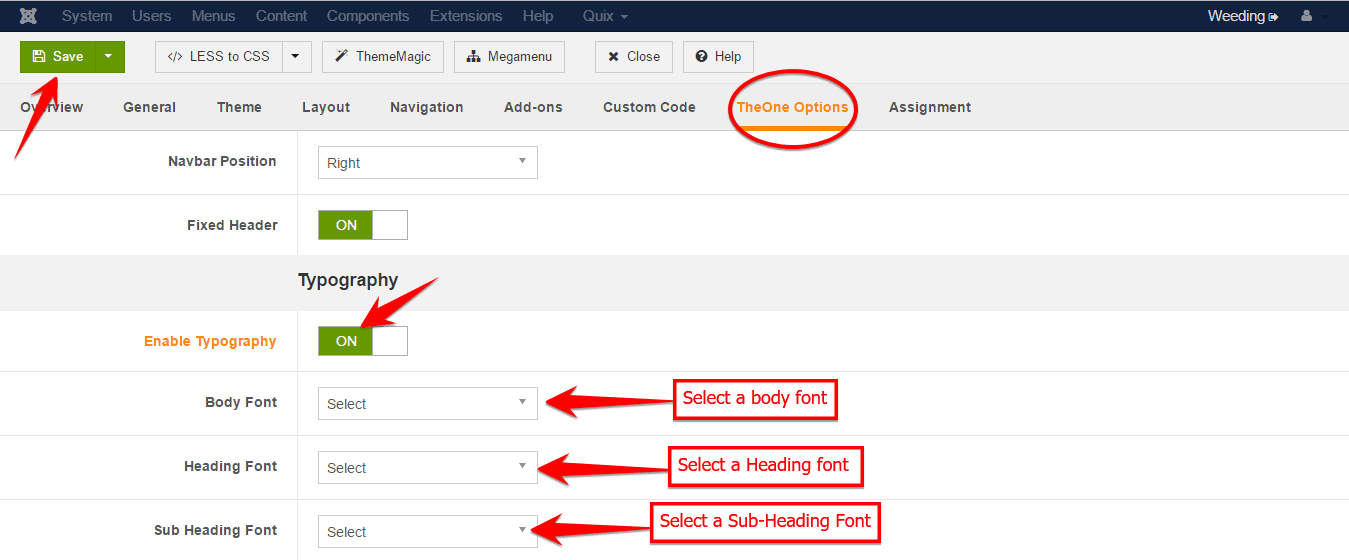
The OpeOptions
-
Navbar Position : Defining the Navbar Position. You can either select Left or Right.
- Fixed Header : Allow you to either enable or disable the fixed header at the top position when you scroll down your site pages.
Typography
- Enable Typography : With this option, you can define different font style for different your site's Body as well as. To apply that, you have to Enable the option first then just select the font from the drop down menu for the sections.
How To's
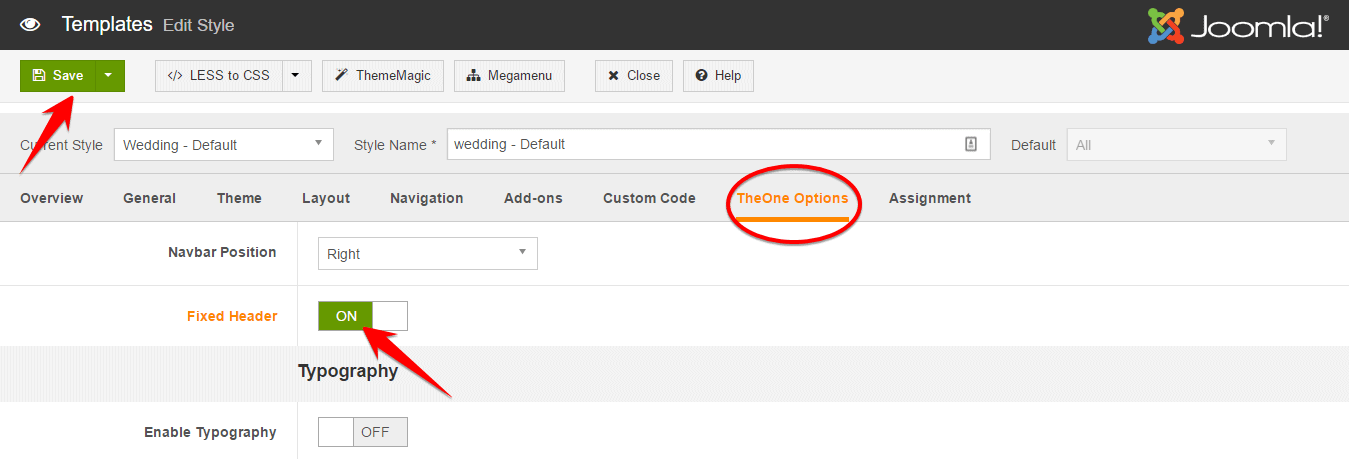
Fixed Header
To set a Fixed Header for your site, just go to Extensions> Templates> Click on the wedding - Default then a configuration module will be appeared. On The OneOptions tab, set Fixed Header On and Save the settings.
Typography
You can change your site's Body, Heading and Sub-Heading font styles and size using typography settings. To do so, go to Extensions> Templates> Click on the wedding - Default then a configuration module will be appeared. On The OneOptions tab, set On Enable Typography option first then select font style for your expected section and then Save the settings.
If you do everything according to the instructions, you'll get the expected output after your refresh your site.
Creating Pages With Quix
Quix is the most powerful tool of Joomla with 34 elements in its pro version. You can create your complete dream website using these elements within a very short time just by simple drag & drop. You can control the page layout and manage everything from one place. It has advanced caching mechanism and powerful rendering engine that's why the site load pretty faster and it is compatible with any template or any framework in Joomla. In short, It's just awesome!!
Now, I will show you the procedure to create a complete website without even a single line of coding.
Here is the process to install QuickStart
You can Manually Install Joomla, following this procedure.
Home Page
Go to Quix> Pages>Click on New

Give a Page name on the Title Box. Click on the Top Right Corner Icon wich will allow you to select presets from sort of default saved presets.

Click Load From Collections and then click on the right side Load button of Home 1 preset.
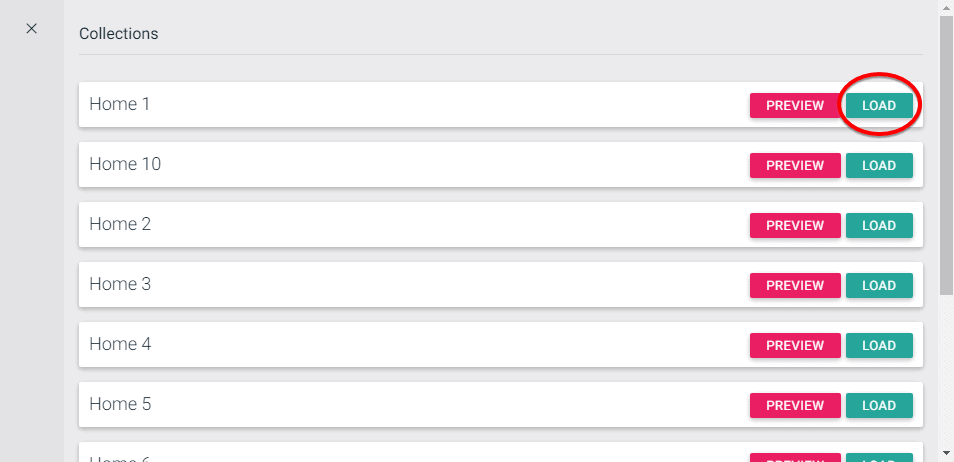
Click on the Save Button or Manually press Ctrl+S from your keyboard. Close it by clicking on the Close Button. Now, refresh your site.
You can have the test of different Homepage variation. All you need to do, just click Load From Collections and then you can select Home 2 and Home 3 as well. Choose the right preset according to your need.
Join The Event Button

If you want to add a Join The Event Button like our demo site, all you need to do, just go to Extensions> Modules> Click on Header Button then module configuration will be appeared.
- Now, give a title on the Title text box,
- Write the following line of code on the Content area of the module.
<p><a class="qx-btn qx-btn-default header-button" href="#">Join The Event</a></p>
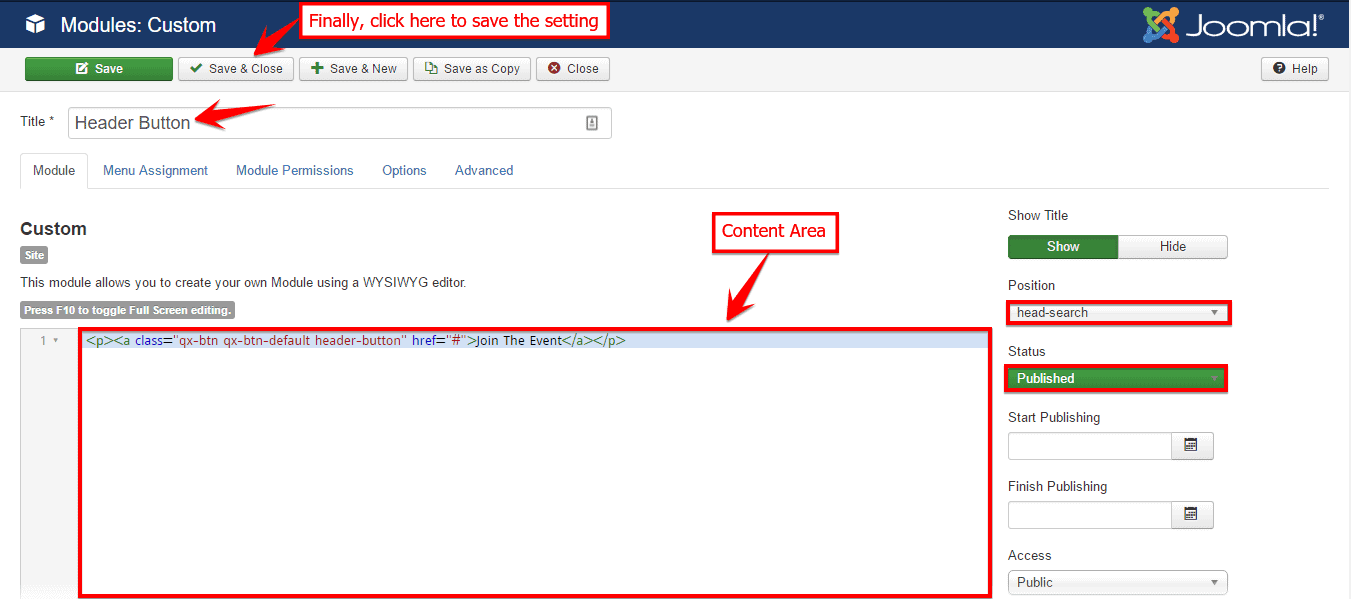
Make sure head-search is selected on Position drop-down menu and Status is in Published mode. If not, then select them from the corresponding drop-down menus.
- Save & Close the module.
Event Countdown Timer

To add an event countdown is pretty simple. To do so, just go to Quix> pages> Click on the page on which you want to add the Timer, then
- Click on Add Element button to add a Countdown element.
- Save and Close the Settings
If you add some padding/ margin before or after the timer then you have to go to the Countdown element Settings then configure according to your preference. You can also change the animation of how the countdown element appears on the site, text alignment, font styles and many more from the Element Settings module.
Drop Down Menu
Go to Menu> Main Menu and Click in New on the top-left corner of the module.

Click on New and write the Home 01 on the Menu Title box, select Menu Item Type System Links> External URL, write # on Link Box, select your Main Menu from the Parent Item drop-down box then Save it.
Make sure, you have selected your main menu from the Parent Item drop-down box.
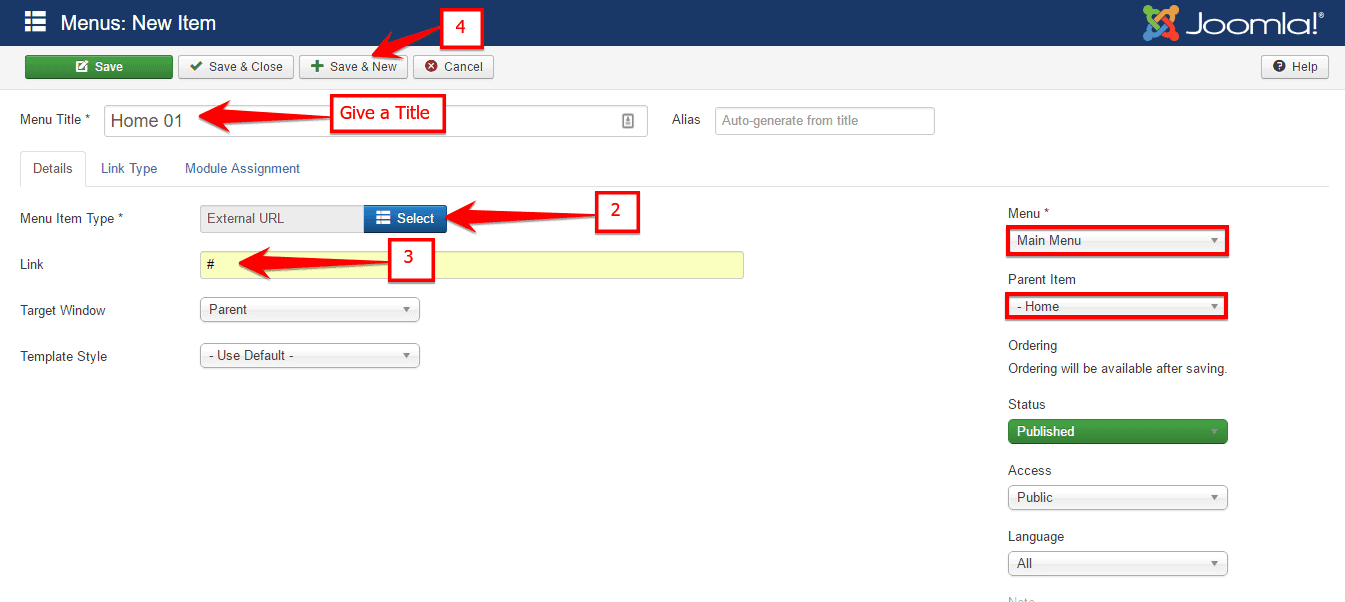
Add the number of Submenus according to the same procedure.
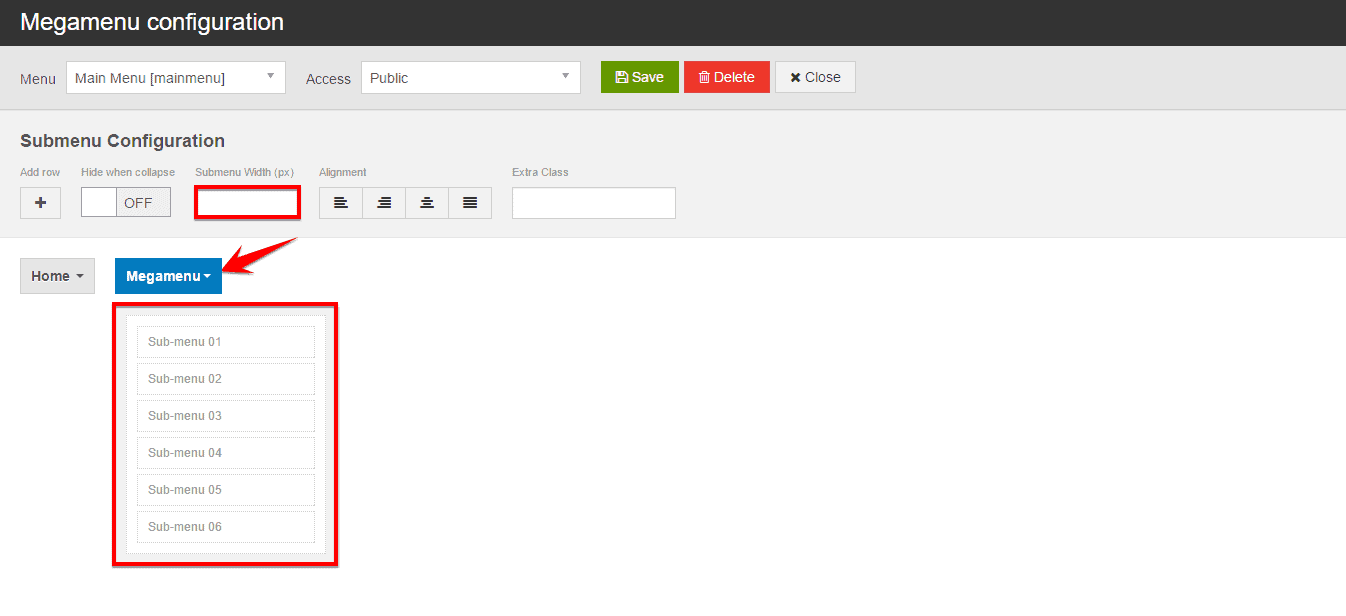
Megamenu
First, create a Drop Down Menu, and go to Extensions> Templates> Click on the tx-wedding - Default> Click on Megamenu then the Megamenu configuration module will be opened.
We have used here, Megamenu as the Parent of the drop-down menu and the submenus are Sub-Menu 01, Sub-Menu 02, Sub-Menu 03, Sub-Menu 04, Sub-Menu 05 and Sub-Menu 01 for example.
Select the Drop Down Menu, select the area of drop-down submenus then define the value in Submenu Width Box.
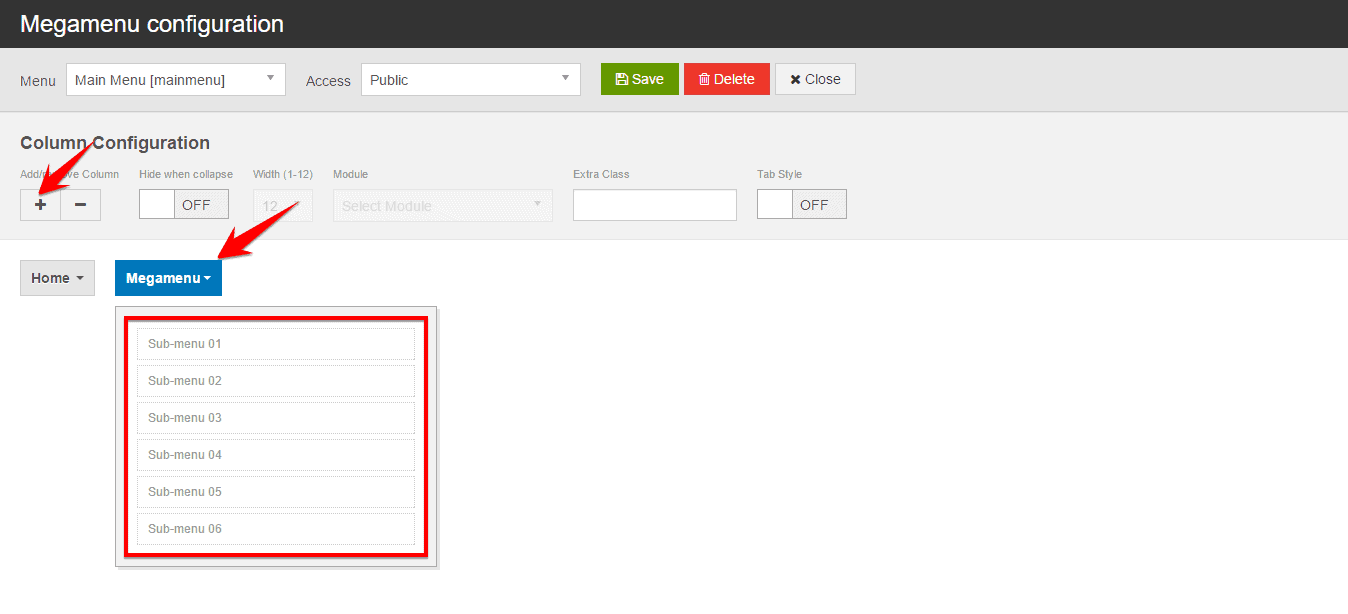
Select the Drop Down Menu again then select the area of drop-down submenus then click on the **Add/ Remove Column.
Select the Sub-Menu Item then use the Position Button to devide the Sub-Menu Items into columns only when there are multiple columns.
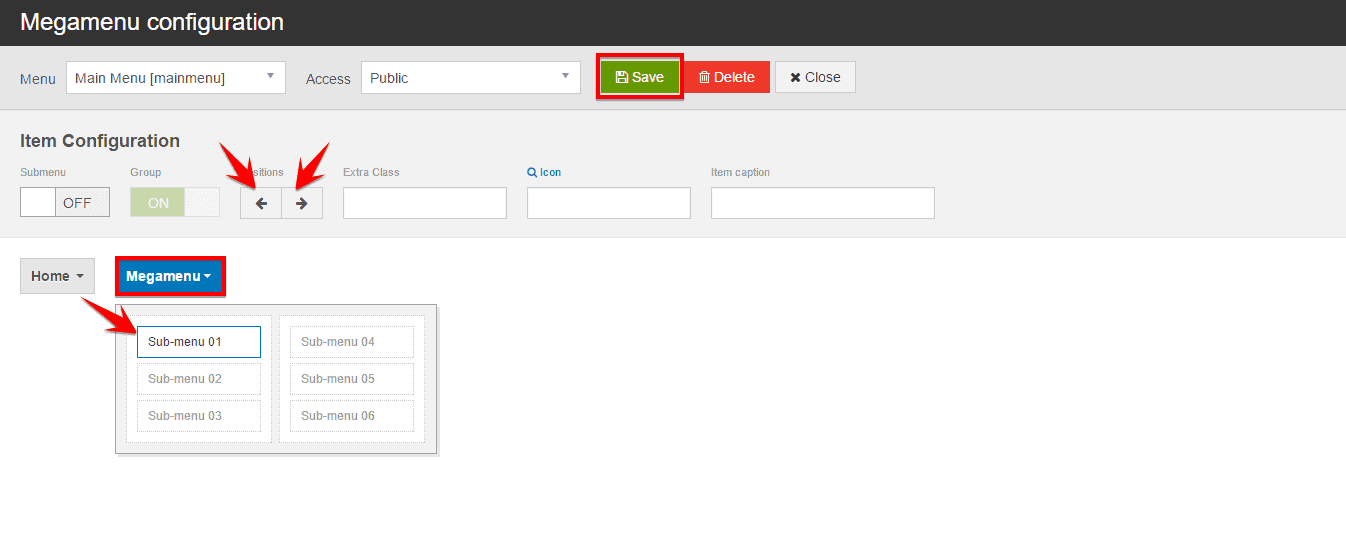
After done, Save it. If everything you did according to the instruction.
Creating Blog with Joomla
Blogging using Joomla is now much easier than before. You can go through detail here about How to create Blog in Joomla within a very short time.

Grow rapidly with our Joomla SEO service done by the veterans
With over 12 years of business and a vast array of Joomla templates and extensions, we know Joomla SEO better than anyone you could possiblly hire.
Improve my ranking