Joomla is considered as one of the most popular Content Management System (CMS) for managing dynamic websites. English is set as its primary...
Joomla is considered as one of the most popular Content Management System (CMS) for managing dynamic websites. English is set as its primary language initially, but it doesn't prevent you populating your site with content written in any other languages. Even it doesn't require creating Joomla multilanguage options to do so.
However, a Joomla multilanguage website does have the ability to show its content in multiple languages, perhaps with triggering a switch or button.
But the question is- if you find a Joomlawebsite where contents in different languages are placed here and there, does it make any sense to you, and will you deal with them?
We know your answer- that's a big NO!
Genuinely, it's not a good practice having contents in multiple languages without having a multilingual option. It greatly makes the visitors confused which leads the reason they leave forever.
So, the notable factor's been found here- Multilingual Option but can you yet guess, why we're strongly mentioning that having Multilingual Option is beneficial for your site?
Well, you might already know- a Joomla multilingual site is able to hold the traffic twice sometimes even more than a single language based site does. So naturally, the conversion rate in a Joomla multilanguage website is much higher than single language based one.
Joomla previously couldn't let users creating multilanguage websites through its existing features. Sort of third-party extensions had to be used for doing so. But the stressful period is over now..
And the most exciting news is- Joomla currently is allowing users to create multilingual websites without using any 3rd party extensions and it's absolutely free of cost.
In this tutorial, I'm going to show you- how to create a multilingual site with Joomla, through TEN simple and straightforward steps.
Let's have a quick look at the index.
- Install your Desired Language
- Enable Installed Language
- Enable Language Plugins
- Create Multilingual Joomla Content
- Create new Categories
- Add contents
- Create Multilingual Menus
- Set Default Homepage for Each Language
- Display Menu Items on Front-End
- Enable Associations Component
- Make Association Between two Articles
- Duplicate the Template
- Add Language Switcher Module
Step 01 : Install your Desired Language
This is the very first thing you need to do. Since English is set as the default language primarily, you have first to install your desired language to get started creating Joomla multilanguage option.
Note that- a Joomla multilanguage website doesn't automatically translate the whole content itself. So, if you are planning to make your site supports in two different languages, you have to create entire contents in that two languages.
Follow the below instruction of how you can install a new language.
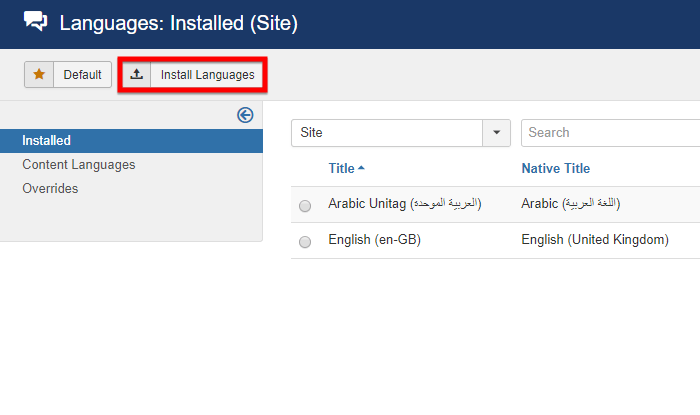
- Go to
Extensions> Language(s)> Installed Click on Install Languages button at left-top.
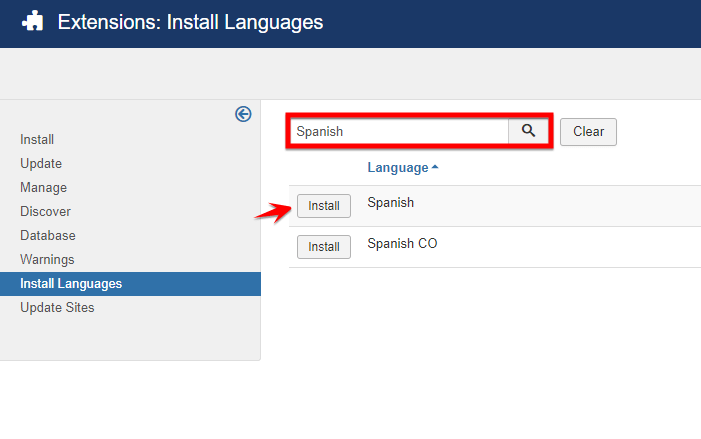
- Use the Search button to find your preferred language and having found it, click on the Install button to install it.
Step 02 : Enable Installed Language
Now, it's a must to enable the installed language before you proceed. Find the approach below.
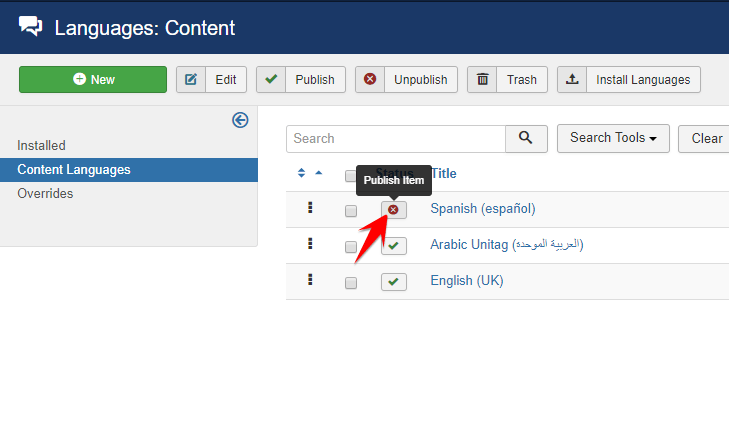
- Go to
Extensions> Language(s)> Content Languages - Click on the Publish Item button pointed on the screenshot below to enable the just installed language.
Enable Language Plugins
Make sure, the language plugins are enabled for the new language. You can enable language plugins from the plugin manager.
- Go to
Extensions> Plugins - Use the search box to find them quickly. Write language on the box and hit enter.
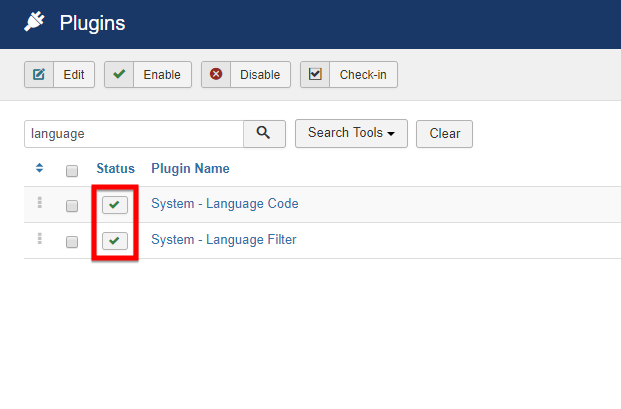
- Click publish button to enable both plugins.
Step 03 : Create Multilingual Joomla Content
Now, you are ready to generate multilingual Joomla content. But before that, let's create two new categories; one is for English and the other is for your desired language. Spanish is my chosen language for instance.
Create new Categories
- Go to
Content> Categories> Add New Category - Give a category Title for Spanish language, select Spanish from the language drop-down menu and click Save & New.

- Give a category Title for English language, select English from the language drop-down menu and click Save & Close.

Add Contents
Now, let's create articles for both Languages (English and Spanish). First let's create for English.
- Go to
Content> Articles> Add New Article - Give the article title on the Title text box.
- Put the content on the editor area.
- Choose English from both the category drop-down as well as Language drop-down at the right side of the module.
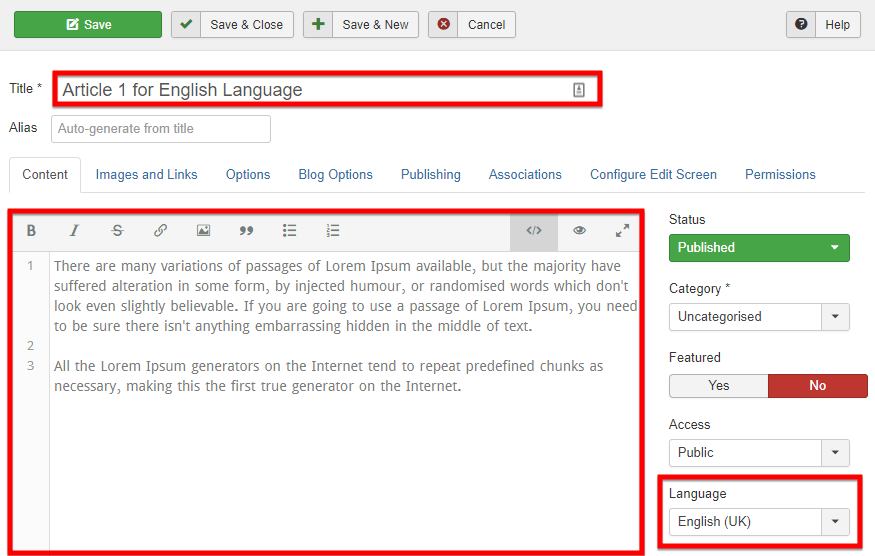
- Click on Save & New button at the top-left.
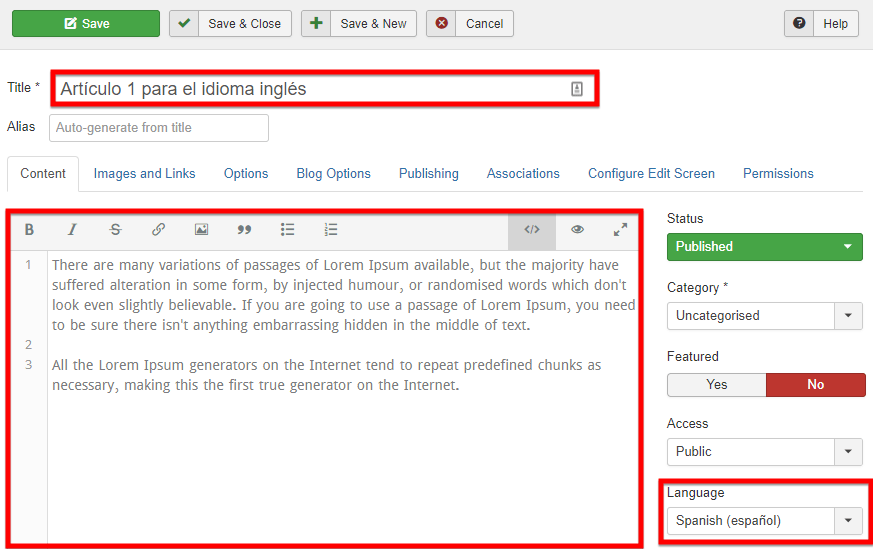
Now, let's create another article for Spanish language. Follow the same procedure above.
Step 04 : Create Multilingual Menus
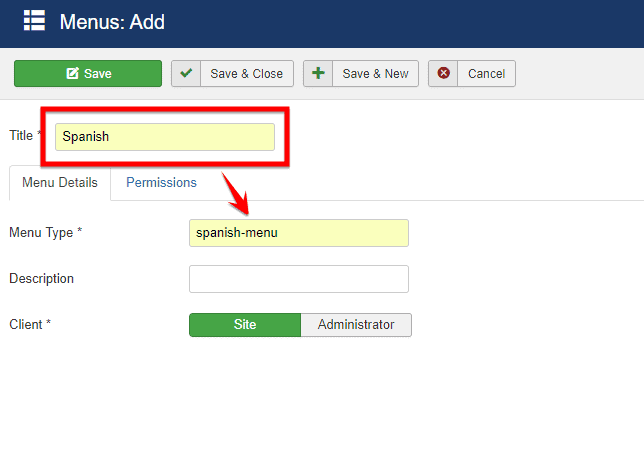
Now, it's the time to create menus for each language. Let's create the menu for English language first.
- Go to
Menus> Manage> Add New Menu. - Give a menu name on the Title text box.
- Write the menu type on the Menu Type text box.
- Click on Save & New button to add menu for the Spanish language.

Similarly, create another menu for the Spanish language.
Creating Menu Items
Till now, the newly created menus are empty as we haven't added any sub-menu items. So, let's create sub-menus under those two menus. First, I'm creating a sub-menu under the main menu- English.
- Go to
Menus> English> Add New Menu - Give a sub-menu title on the Menu Title text box.
- Click on the select button next to the Menu Item Type option and a pop-up modal will appear.
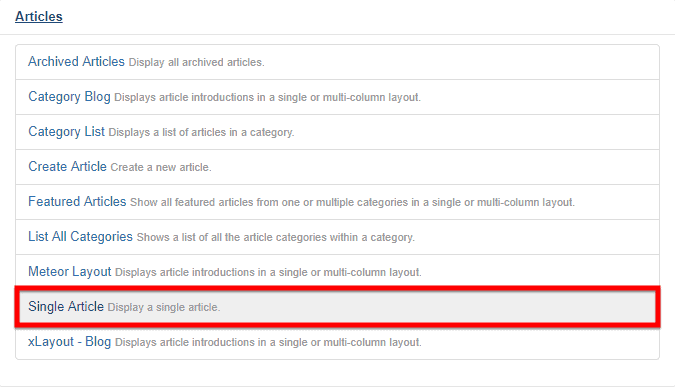
- Select
Articles> Single Article
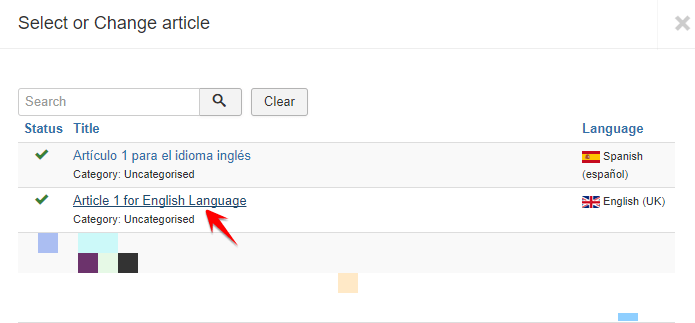
Click on the Select button next to the Select Article option and from the next pop-up modal, choose the article we previously created for English language.
Click on Save & New to add another sub-menu.

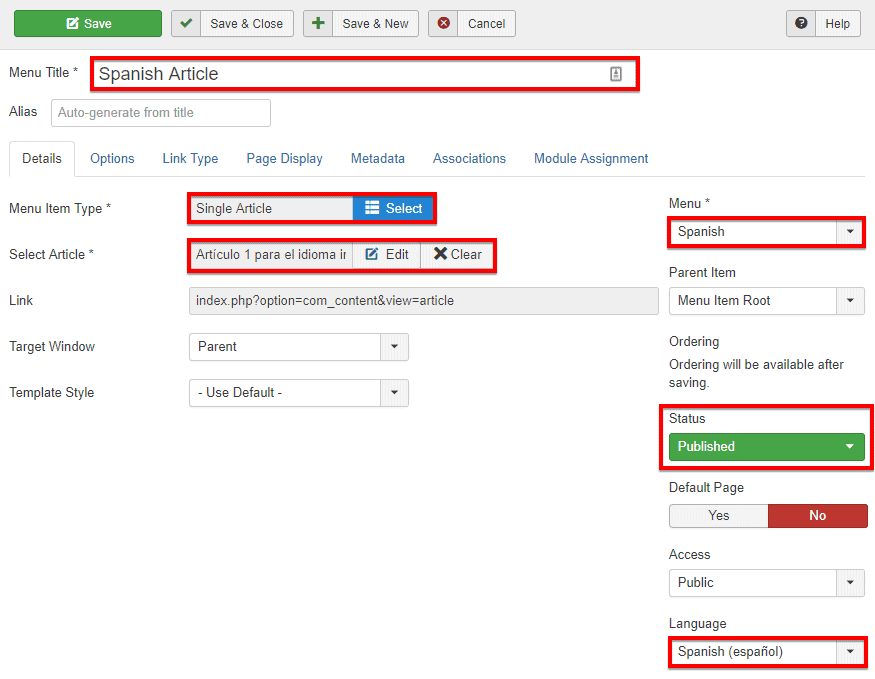
Unlikely the above instruction, create a sub-menu item for the main menu Spanish as well.
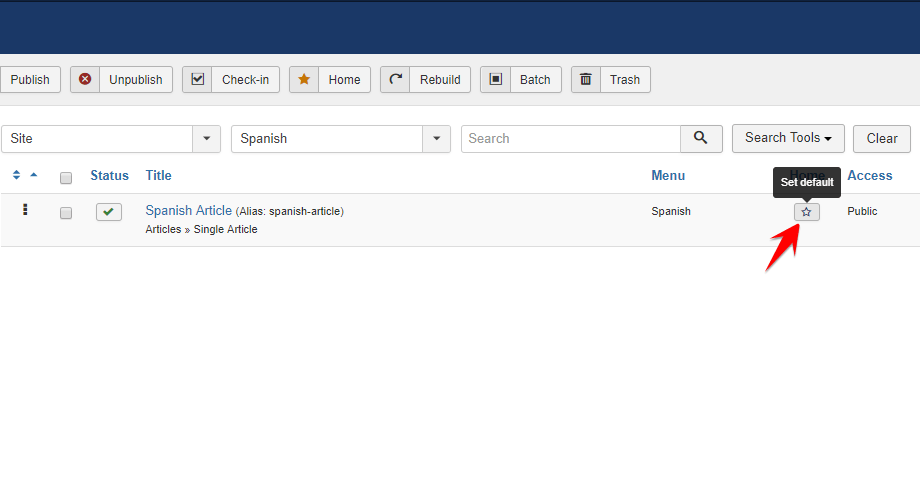
Step 05 : Set Default Homepage for Each Language
Now, you have to define the article page in each language as their corresponding default homepage. Let's make the default homepage for English menu first. To do so-
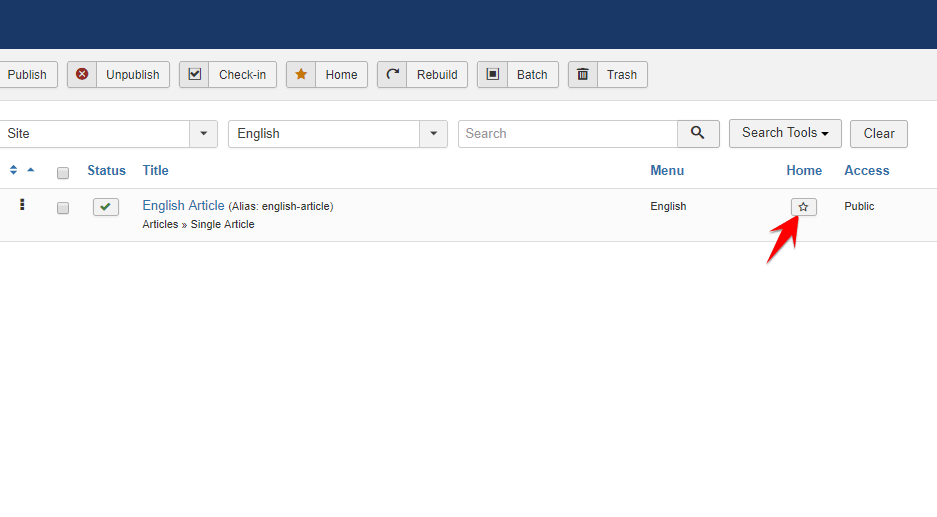
- Go to
Menus > English - Click on the star icon pointed on the below screenshot and it'll turn yellow in color, meaning- the English article page has successfully set as your default homepage for English menu.
Same instruction to be followed in order to set default homepage for Spanish menu.
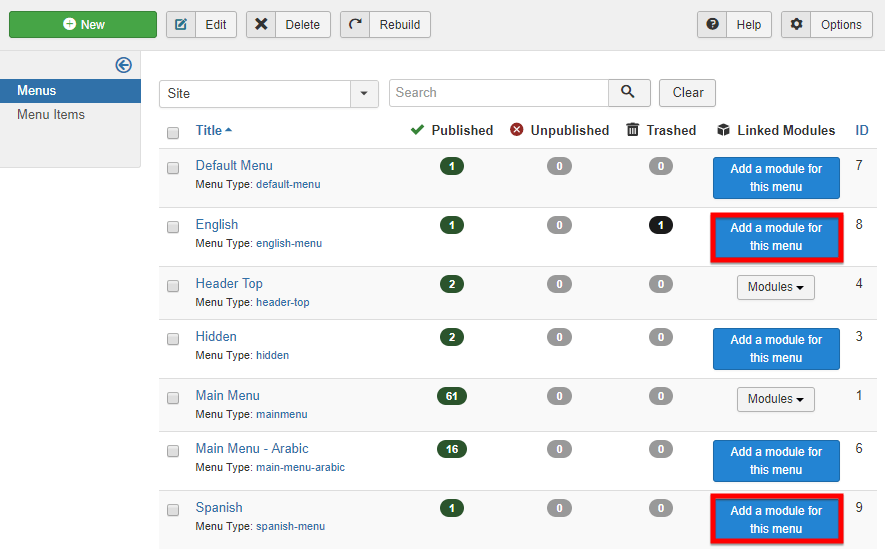
Step 06 : Display Menu Items on Front-End
In Joomla, the only way to show a menu item on website's front-end is to add a module for the menu item and show the module on front-end by setting a position. Find below- how you can do so;
- Go to
Menus > Manage - Click on the Add a module for this menu button next to the English menu.
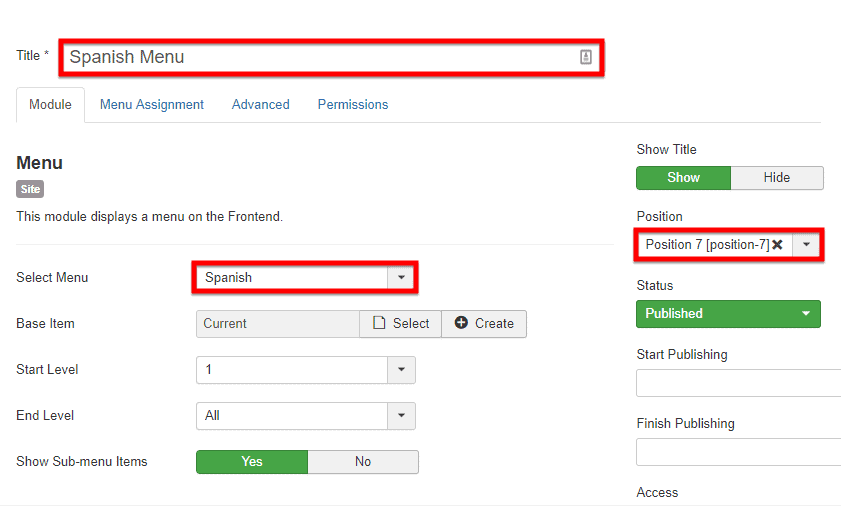
From the next window, give a title on the Title field, select English from the Select Menu drop-down and define the module position from the Position drop-down at the right sidebar.
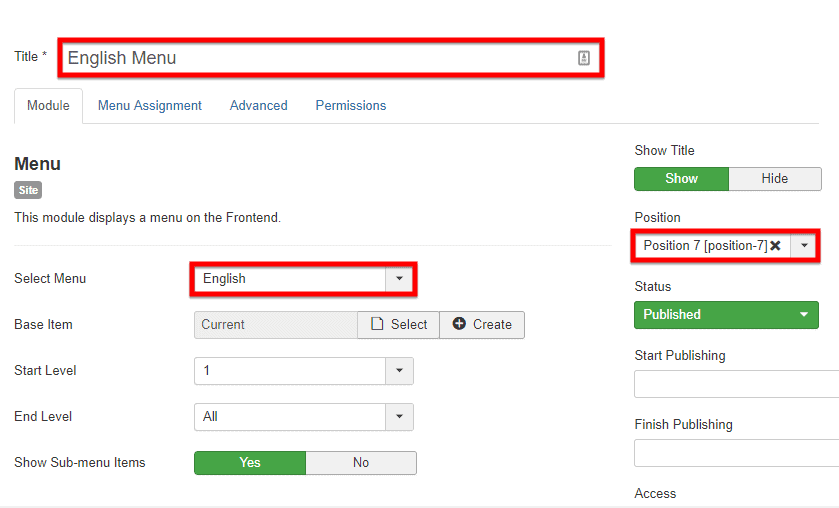
- Scroll-down the page and choose English from the language drop-down at the right-bottom.
- Click on Save & Close.
Step 07 : Enable Associations Component
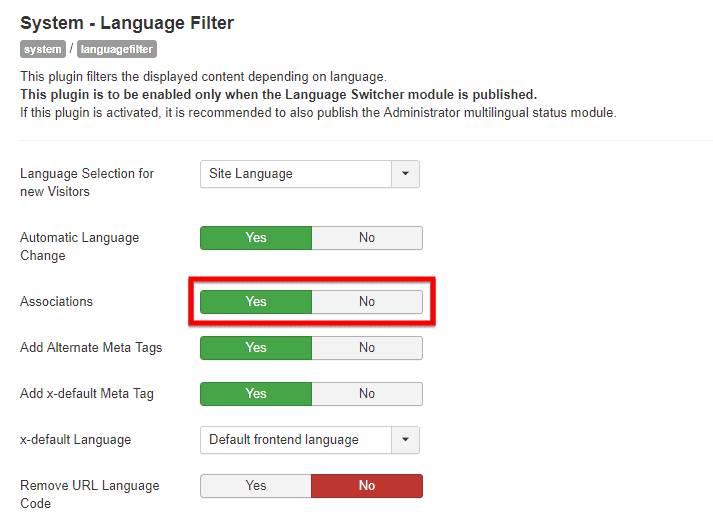
The most recent version of Joomla is packed with Multilingual Associations feature, that allows you to perform translating contents from one place. Make sure, the Associations option is enabled. To check and enable the association option.
- Go to
Extensions> Plugins - On installed plugin list, find the System - Language Filter and click on it.
Make sure the Associations option is enabled but if not, then toggle it to enable.
Step 08 : Make Association Between two Articles
Suppose, a visitor lands on an article page which is written in English. But unfortunately, he's from Spain. In that case, if you had previously been associated that article with its Spanish version, just by choosing the Joomla multilanguage option, the visitor can see the article in his native language.
Let's see, how you can associate multiple articles with one another.
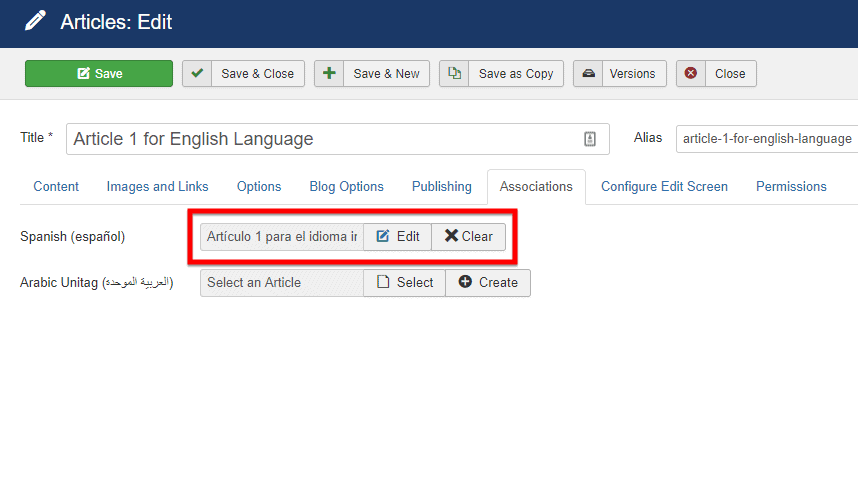
- Go to
Content > Articlesand open/edit the article. - Under Associations tab, click on the Select button to choose the article to associate with, Save & Close.
Now you're ready to utilize the Multilingual Associations Component if you have successfully done the above steps.
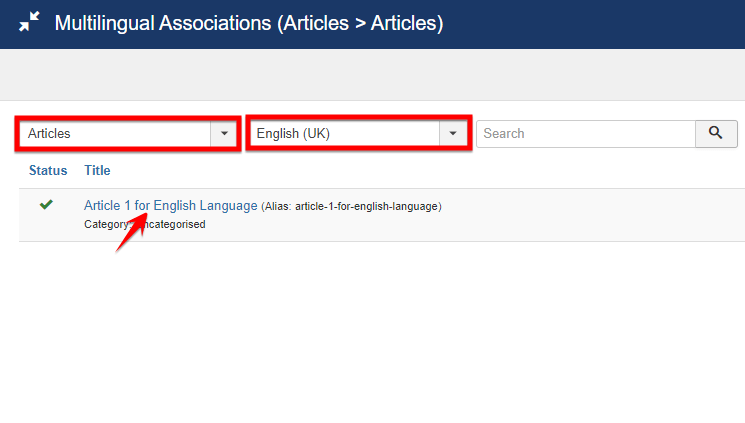
- Go to
Component > Multilingual Associations - Choose an article from the Select Item Type category filter and select a language from the Language box. Click on the fetched article from below then.
Select the Targeted language from the right-top box to translate the article into.
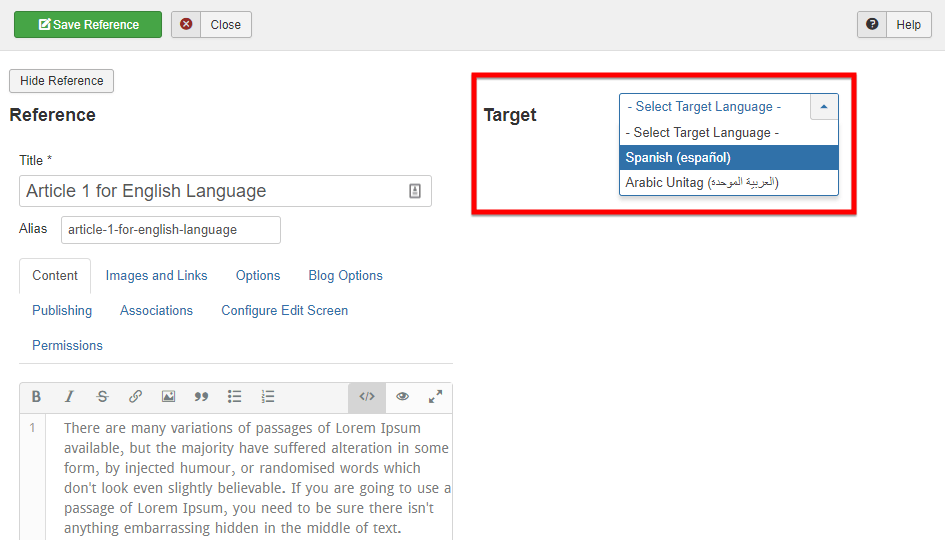
You can find two button at left-top to save the changes. Where- Save Reference button to save changes the first article and the Save Target button to save changes the second article.
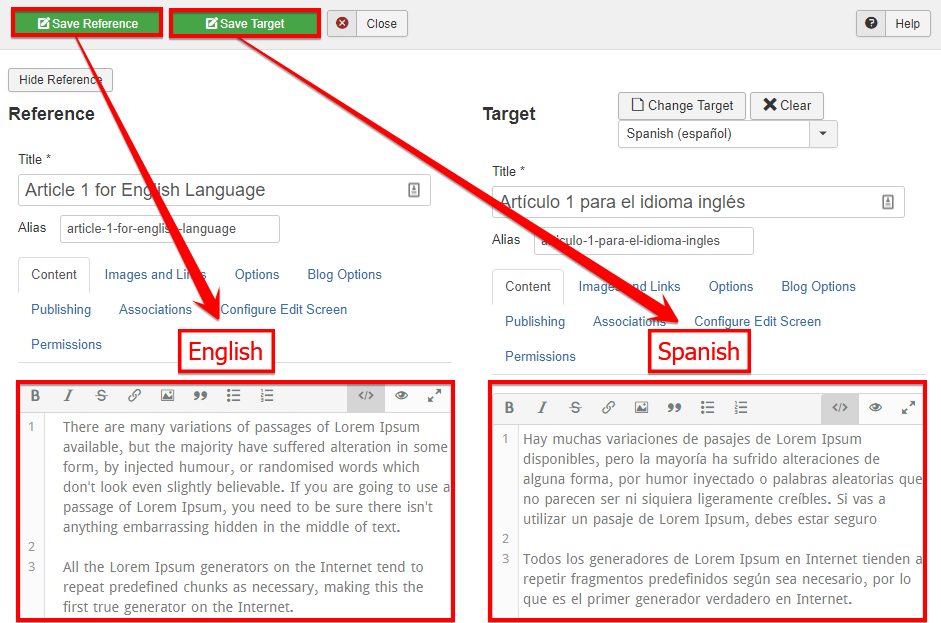
- Close the window once you're done.
Step 09 : Duplicate the Template
Now, you have to create two different templates for two languages. The approach is absolutely simple- just duplicate your default template twice and name them accordingly for the two languages.
- Go to
Extensions > Templates. Duplicate your default template twice. (One for English and the other for Spanish) - To duplicate, select your default template and click on the Duplicate button at left-top.

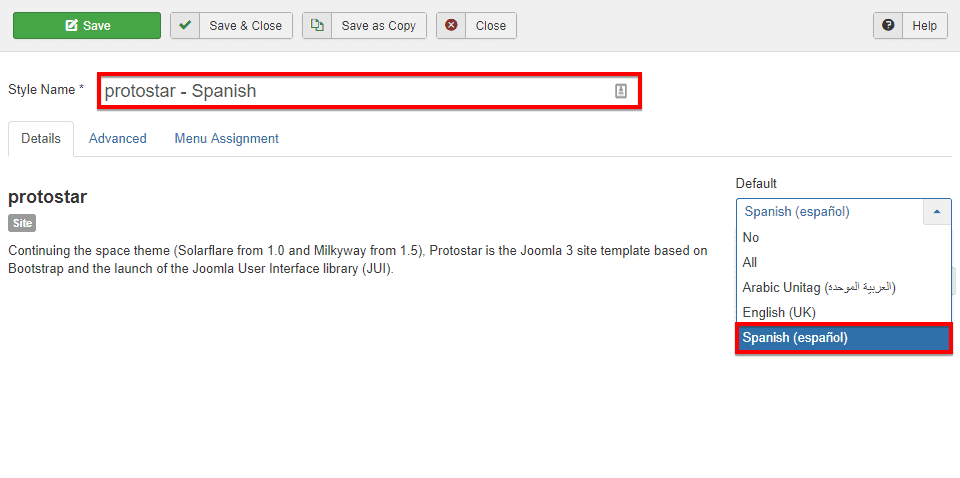
- Click on your duplicated template
- Modify Style Name as you prefer and choose English from Default drop-down menu (for English)
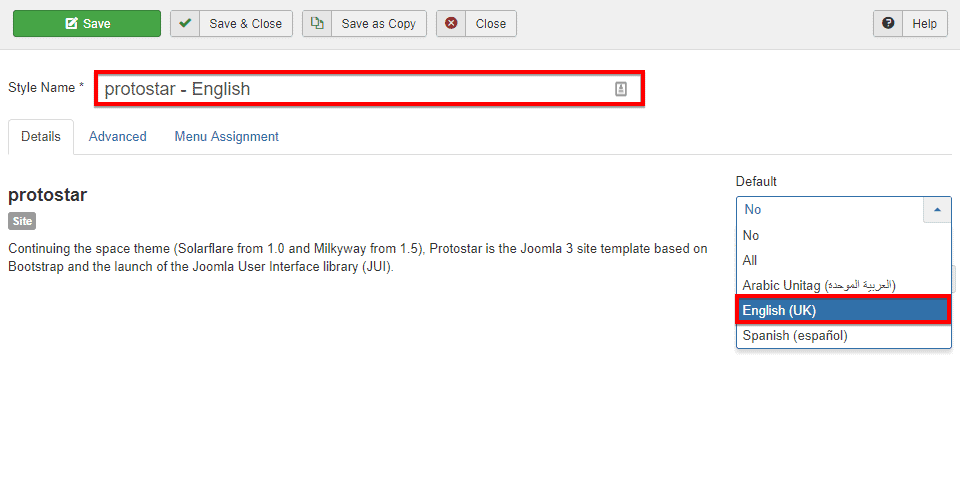
- Save & Close the window.
Step 10 : Add Language Switcher Module
Now, just one last task left on your hand. A language switcher allows the visitors switching language anytime they want. You can find language switcher module on the modules list.
- Go to
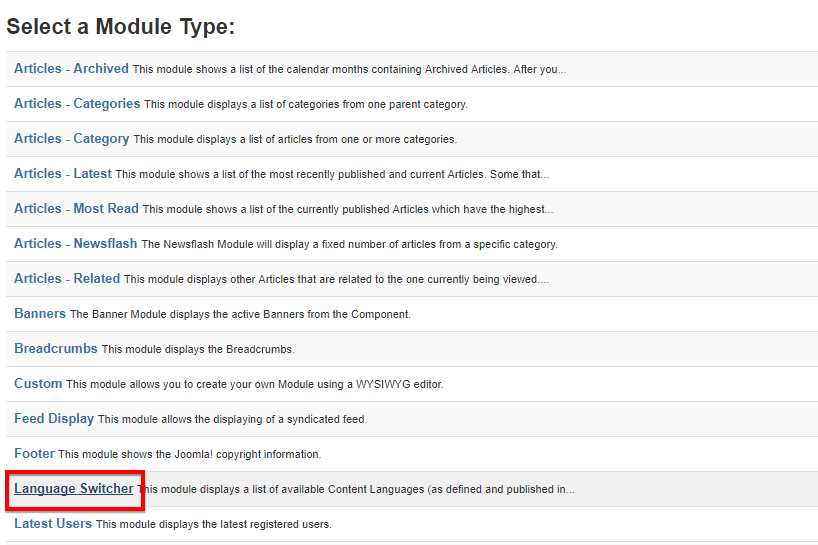
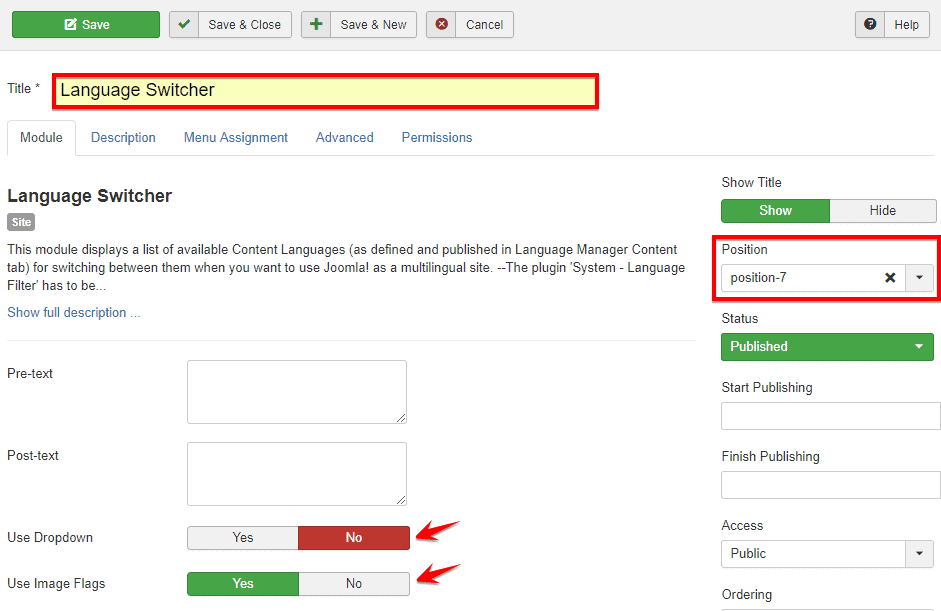
Extensions > Modulesand hit on the New button from the left top. - Find the Language Switcher module and click on it to go to its configuration mode.
- Give the module title on the Title field.
- Select the module position from the Position drop-down.
- Enable the option Use Drop-down if you want the language switcher as a drop-down menu.
- Save & Close to successfully save the switcher.
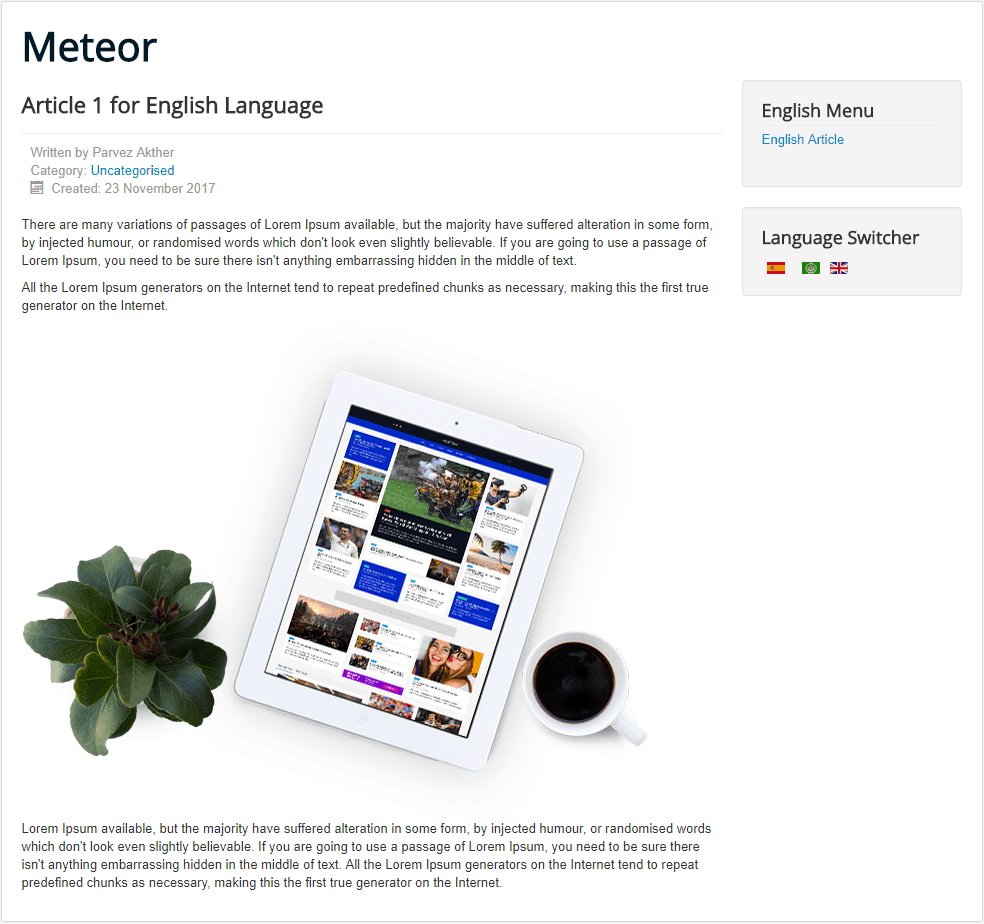
See, a language switcher option has been successfully added to the site front-end which allows readers/ visitors to switch content language just by a single mouse-click.
Conclusion
This is the most straightforward approach to convert a Joomla website into a Joomla multilanguage website within possibly the shortest time. If you find any of the above procedures critical, and fail to do by yourself, feel free to use the below comment section for letting us know. We would love to help you out.